How to add LibPEConv to your Visual Studio project
Once you built libPEConv library, adding it to your existing Visual Studio project is easy. This small guide will walk you through all the important steps.
Note, that alternatively you can use a ready-made template project, available here:
The template automates the whole process, along with building the library itself.
- In
Project->Properties->VC++ Directories, set two things:
A) Include Directories (to LibPEConv headers)

B) Library Directories (to the directory where the libpeconv.lib is)

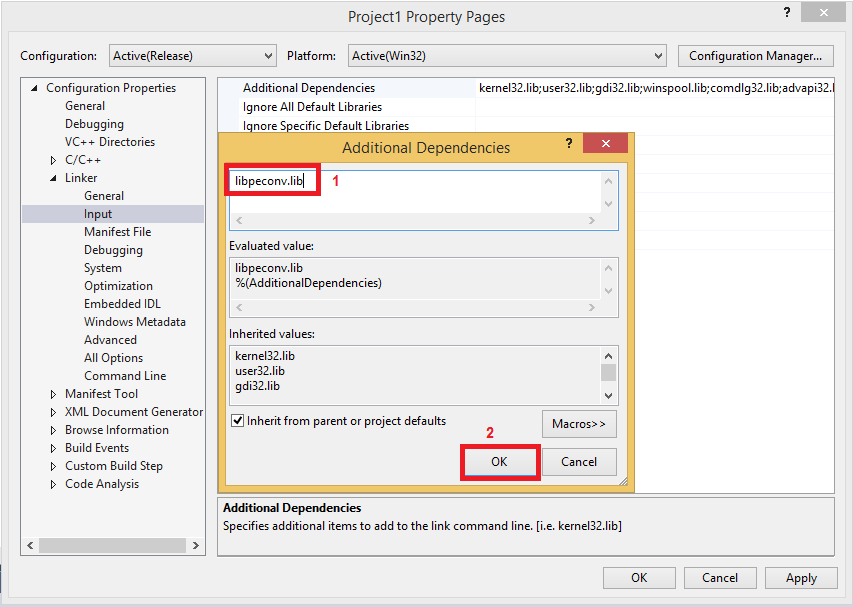
- In
Project->Properties->Linker->Input:Additional Dependenciesaddlibpeconv.lib
- libPeConv was built as Multi-threaded, so application that use it needs to be built in the same mode (
C/C++->Code Generation->Runtime Library:Multi-threaded (/MT))

This depends on the options that were set in CMake, here.
- If libPeConv was built in the Multi-byte mode (default), the same mode has to be set in the project that uses it (
General->Character Set:Use Multi-Byte Character Set)

- If libPeConv was built in the Unicode mode (CMake option
PECONV_UNICODEwas set), the current project should also have Unicode Character Set enabled (Use Unicode Character Set)
Once everything is added, you can include libpeconv header to your source code:
#include <peconv.h>

using namespace peconv;