It is not possible to unit test the Grasshopper component itself.
However, this repository is sample how to use RhinoCompute to test Grasshopper components directly in Grasshopper from MsTest and other sources.
This will allow you to write tests for RhinoCommon and Grasshopper dependent implementations.
Normally, we use Rhino's GUI to check and test our Grasshopper components. However, this means that every time you change the behavior, even if it is a minor change, you have to run debug, wait for Rhino and Grasshopper to start, and then load the GH file.
Isn't this causing you to lose efficiency?
RhinoCompute, a new feature in Rhino7, allows you to run tests on Grasshopper components from MsTest and other programs.
You will need to set up an environment to run RhinoCompute, which can be downloaded from mcneel's GitHub or other sources. The easiest way to do this is to install Hops.
The easiest way to do this is to install Hops, see the following article.
If you have installed Hops, for example ver0.4.7, you can find the data in the following folder.
%APPDATA%/McNeel/Rhinoceros/packages/7.0/Hops/0.4.7/compute.geometry
Run compute.geometry.exe in the above folder, and RhinoCompute is running if it is running as shown at the end of the following.
[20:43:46 INF] Compute 1.0.0.0, Rhino 7.5.21100.3001
[20:43:46 INF] Configuration Result:
[Success] Name compute.geometry
[Success] DisplayName rhino.compute
[Success] Description rhino.compute
[Success] ServiceName compute.geometry
[20:43:46 INF] Topshelf v4.1.0.172, .NET Framework v4.0.30319.42000
[20:43:46 INF] Launching RhinoCore library as hiron
[20:43:48 INF] Starting listener(s): ["http://localhost:8081"]
[20:43:50 INF] (1/2) Loading grasshopper
[20:43:56 INF] (2/2) Loading compute plug-ins
[20:43:57 INF] Listening on ["http://localhost:8081"]
[20:43:57 INF] The compute.geometry service is now running, press Control+C to exit.Since how to create a component is not the main subject here, we will create a simple component that outputs the sum of A and B as shown below.
protected override void RegisterInputParams(GH_Component.GH_InputParamManager pManager)
{
    pManager.AddNumberParameter("A", "A", "A", GH_ParamAccess.item);
    pManager.AddNumberParameter("B", "B", "B", GH_ParamAccess.item);
}

protected override void RegisterOutputParams(GH_Component.GH_OutputParamManager pManager)
{
    pManager.AddNumberParameter("Result", "Result", "Result", GH_ParamAccess.item);
}

protected override void SolveInstance(IGH_DataAccess DA)
{
    double A = 0;
    double B = 0;
    if (!DA.GetData("A", ref A)) { return; }
    if (!DA.GetData("B", ref B)) { return; }

    DA.SetData("Result", A + B);
}
Create a Grasshopper definition to test first.
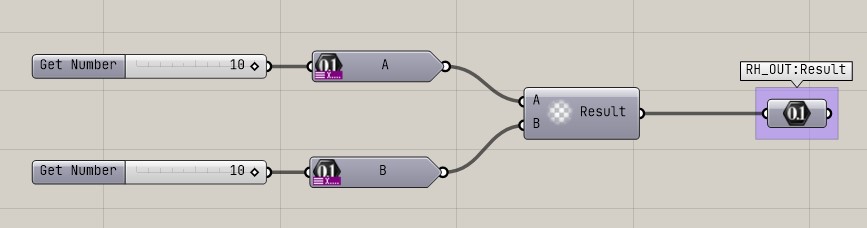
Put in two values to get the result, as shown below. Since we are using RhinoCompute, the input and output are set up for it
Put the created GH files in the GHCITestTests folder and set the settings so that VisualStudio always copies them to the output directory.
Or add the following to GHCITestTests.csproj
<ItemGroup>
  <None Update="SumComponentTest.gh">
    <CopyToOutputDirectory>Always</CopyToOutputDirectory>
  </None>
</ItemGroup>
Next, create a test project; if you are creating it from the CLI, do the following in the root directory Do not refer to the test project GHCITest.csproj.
mkdir GHCITestTests
dotnet new mstest -o ./GHCITestTests
dotnet sln ./GHCITest.sln add ./GHCITestTests/GHCITestTests.csproj
cd ./GHCITestTests
dotnet add package Newtonsoft.Json --version 13.0.1
dotnet add package Rhino3dm --version 0.3.0
Of course, you can also use VisualStudio's features to create your own
First, we need to get the SDK to use RhinoCompute. To download it, type the following in your browser.(need running RhinoCompute)
Put the downloaded file in the same location as your test csproj file so that you can refer to it.
Write the code to actually run the test. The contents are as follows
using System.Collections.Generic;
using System.IO;
using System.Linq;
using System.Reflection;
using Microsoft.VisualStudio.TestTools.UnitTesting;
using Rhino.Compute;

namespace GHCITest.Tests
{
    [TestClass]
    public class GHCITestComponentTests
    {
        [TestMethod]
        public void GHCITestComponentTest()
        {
            // RhinoCompute Adress
            ComputeServer.WebAddress = "http://localhost:8081/";

            // GH file path
            const string definitionName = "SumComponentTest.gh";
            string definitionPath = Assembly.GetExecutingAssembly().Location;
            definitionPath = Path.GetDirectoryName(definitionPath);
            definitionPath = Path.Combine(definitionPath, definitionName);

            var trees = new List<GrasshopperDataTree>();

            // input A to 10
            var value1 = new GrasshopperObject(10);
            var param1 = new GrasshopperDataTree("A");
            param1.Add("0", new List<GrasshopperObject> { value1 });
            trees.Add(param1);

            // input B to 35
            var value2 = new GrasshopperObject(35);
            var param2 = new GrasshopperDataTree("B");
            param2.Add("0", new List<GrasshopperObject> { value2 });
            trees.Add(param2);


            List<GrasshopperDataTree> result = GrasshopperCompute.EvaluateDefinition(definitionPath, trees);
            string data = result[0].InnerTree.First().Value[0].Data;

            // check result
            Assert.AreEqual(45, double.Parse(data));
        }
    }
}
If you run the test with RhinoCompute running, you will get the results of the calculations in the Grasshopper file created by RhinoCompute. Assert.AreEqual method evaluate the results.
To run the test from the CLI, do the following
dotnet testIf it connects to RhinoCompute without any problems, you will see the following in rhino.compute. The status code is 200, which confirms successful connect.
::1 - [2021-04-19T00:15:20.1053330+09:00] "POST /grasshopper HTTP/1.1" 200 -
We will use GitHub's self-hosted runner for CI.
The reason we use a self-hosted runner is to resolve Rhino licensing. Because GitHub Actions runs in GitHub's virtual environment, it cannot create its own licensed Rhino environment.
The official documentation for the self-host runner is below. Please refer to it if necessary.
In the repository that uses the self-hosted runner, press Add Runner at the bottom of Actions in Settings.
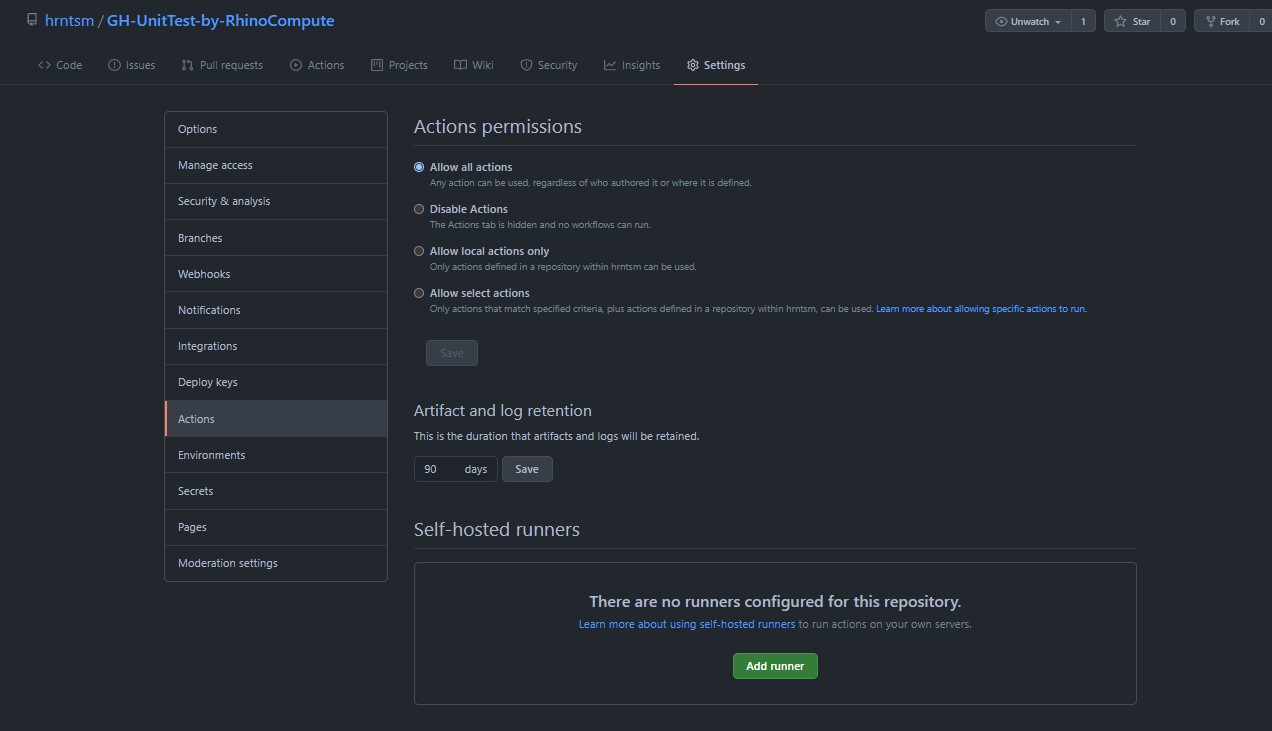
You will then see the following screen, where you can get the URL and token of the repository and run it using PowerShell.
# Create a folder under the drive root
$ mkdir actions-runner; cd actions-runner# Download the latest runner package
$ Invoke-WebRequest -Uri https://github.com/actions/runner/releases/download/v2.277.1/actions-runner-win-x64-2.277.1.zip -OutFile actions-runner-win-x64-2.277.1.zip# Extract the installer
$ Add-Type -AssemblyName System.IO.Compression.FileSystem ; [System.IO.Compression.ZipFile]::ExtractToDirectory("$PWD/actions-runner-win-x64-2.277.1.zip", "$PWD")

# Create the runner and start the configuration experience
$ ./config.cmd --url {YOUR_REPO_URL} --token {YOUR_TOKEN}
If the environment has been successfully set up, you will see the following message and be asked to configure some settings. You can leave the settings as default.
--------------------------------------------------------------------------------
|        ____ _ _   _   _       _          _        _   _                      |
|       / ___(_) |_| | | |_   _| |__      / \   ___| |_(_) ___  _ __  ___      |
|      | |  _| | __| |_| | | | | '_ \    / _ \ / __| __| |/ _ \| '_ \/ __|     |
|      | |_| | | |_|  _  | |_| | |_) |  / ___ \ (__| |_| | (_) | | | \__ \     |
|       \____|_|\__|_| |_|\__,_|_.__/  /_/   \_\___|\__|_|\___/|_| |_|___/     |
|                                                                              |
|                       Self-hosted runner registration                        |
|                                                                              |
--------------------------------------------------------------------------------
Due to Rhino's license, we do not use a virtual environment such as Docker to call PowerShell in Windows directly.
Basically, do not do this in a public repository.
If you are in a position where anyone can send you a pull request, it means that you are in a position where you can execute arbitrary code on your PC. This is more than just hacking. Please be careful.
The yml file to configure GitHub Actions should look like this
name: Run Unit Test
on: push

jobs:
  run-test:
    runs-on: self-hosted

    steps:
      - uses: actions/checkout@v2
      - name: Setup RhinoCompute
        run: |
          Start-Process -FilePath ../../../compute.geometry/compute.geometry.exe
          Start-Sleep -Seconds 5
      - name: Run Unit Test
        run: dotnet test
FilePath should be the path to your RhinoCompute files.
If you put the compute.geometry folder directly under the actions-runner folder, the path will look like the above.
Run the following in the actions-runner folder to connect the self-hosted runner on your PC to GitHub.
./run.cmd

√ Connected to GitHub

2021-04-19 13:51:11Z: Listening for Jobs
# ↑ wait for calling from GitHub

# GitHub called your self-hosted environment
2021-04-19 14:00:21Z: Running job: run-test
2021-04-19 14:01:21Z: Job run-test completed with result: Succeeded
The CI will be executed on push, and the GitHub side will look the same as it does when you run normal GitHub Actions.
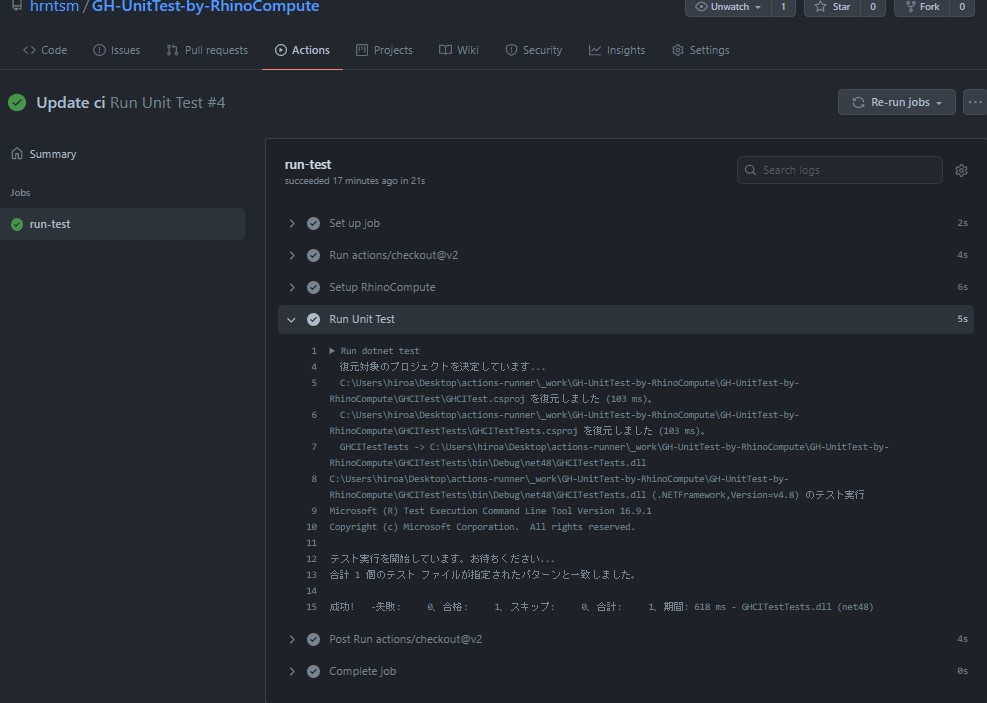
If you check the "Run Unit Test" column, you can see that the unit test was executed properly and passed the test.
The combination of unit testing in a local environment and CI will make the development of Grasshopper components much more efficient.
Let's make it more efficient and spend more time on creative things!