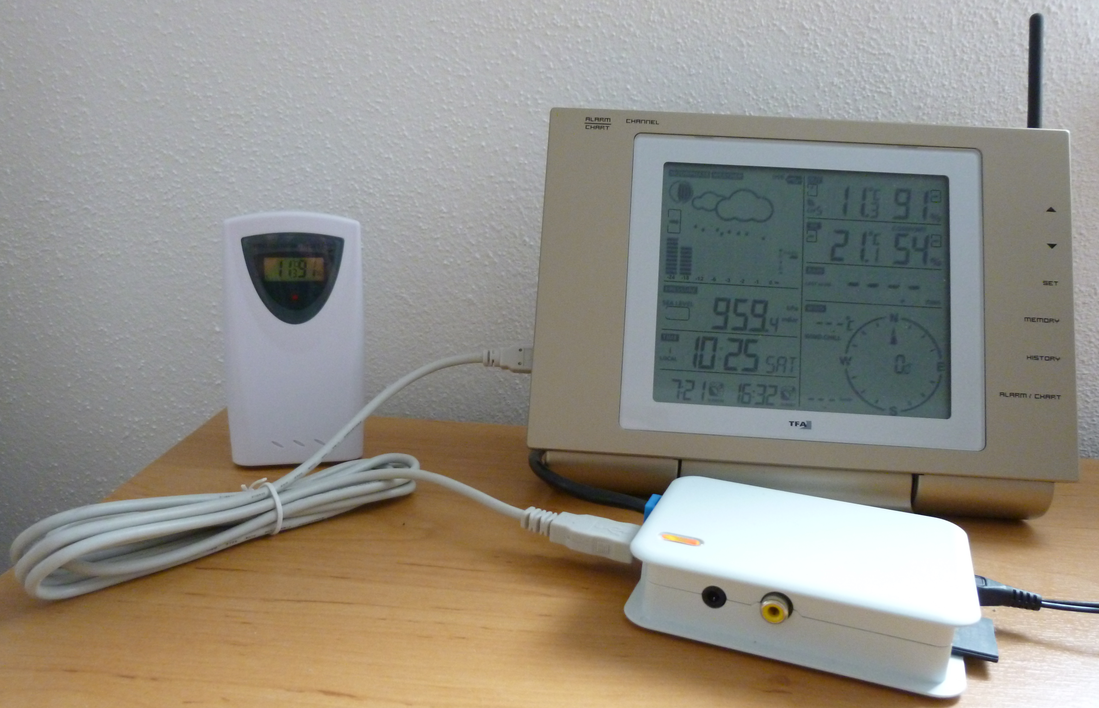
This is my home metering (Temperature, Humidity, ...) project connecting a TFA Nexus weather station with a Raspberry Pi.
The following picture shows the main parts of the hardware setup

- Collect Temperature and Humidity readings from my home weather station
- Collect Temperature and Humidity readings from additional sensors
- Store Temperature and Humidity readings
- Make Temperature and Humidity available on the internet through a web server
- Use already available Hardware: Raspberry Pi and the TFA Nexus weather station
- Re-use existing software: Have a bit fun in coding but do not re-invent the wheel
- Improve my Python knowledge
- Improve my Raspberry Pi knowledge
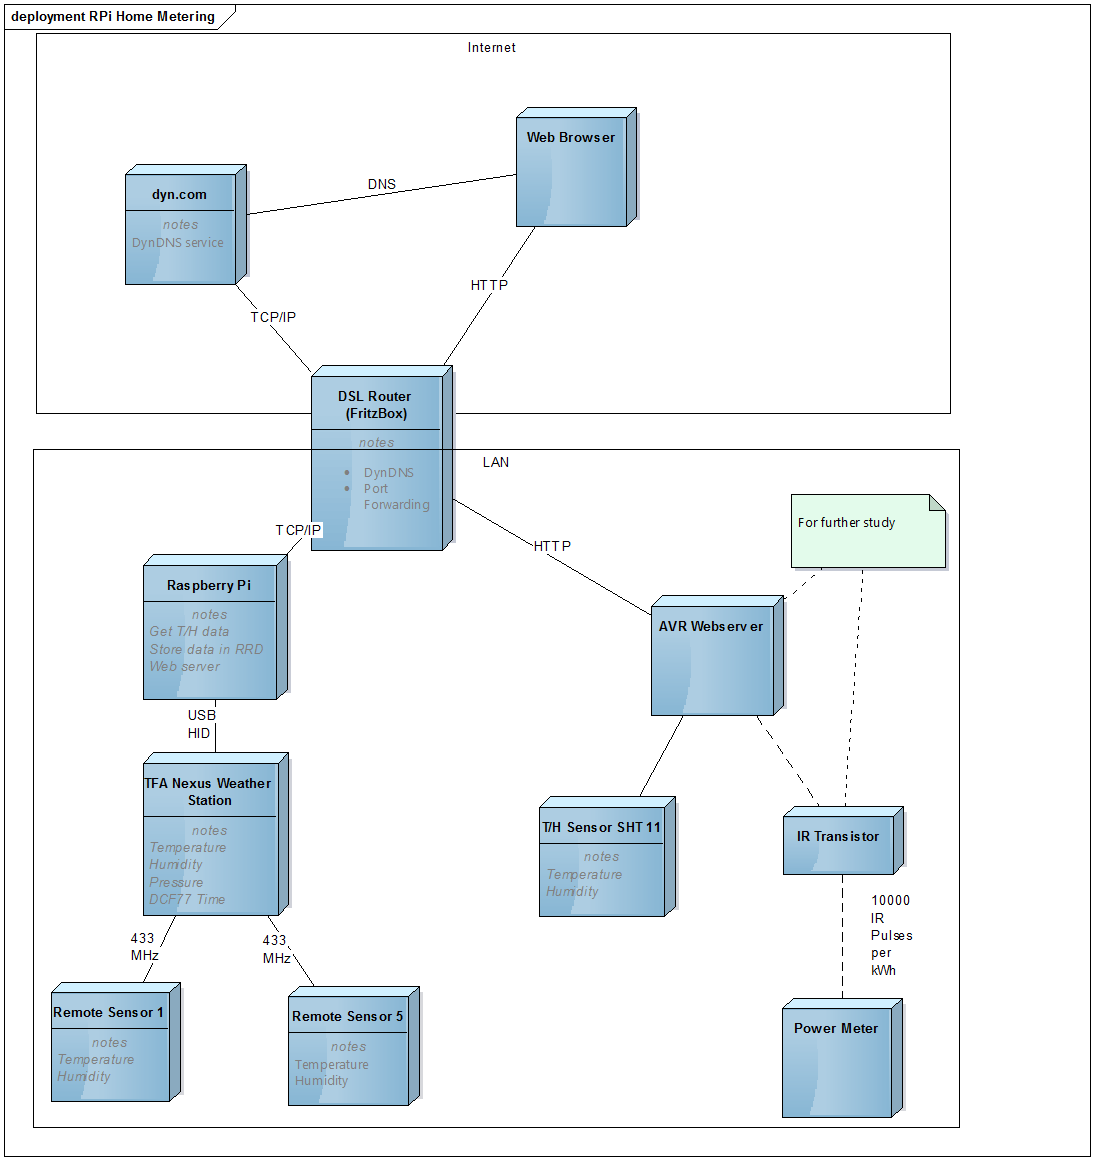
The system architecture is shown in the following deployment diagram.
- The Raspberry Pi collects Temperature and Humidity data from various sensors, mainly from the TFA Nexus weather station
- Sensor data are stored in RRD (round robin database) archives
- Sensor data are made available via a web server
- The Nexus TFA weather station
- has a built-in DCF77 time receiver, a Temperature/Humidity sensor and a barometric pressure sensor
- receives Temperature/Humidity data from up to 5 external sensors via 433MHz RF
- The DSL router
- makes the Raspberry Pi web server available to the internet via port forwarding
- provides its internet IP address to a dynamic DNS service to ease accessibility
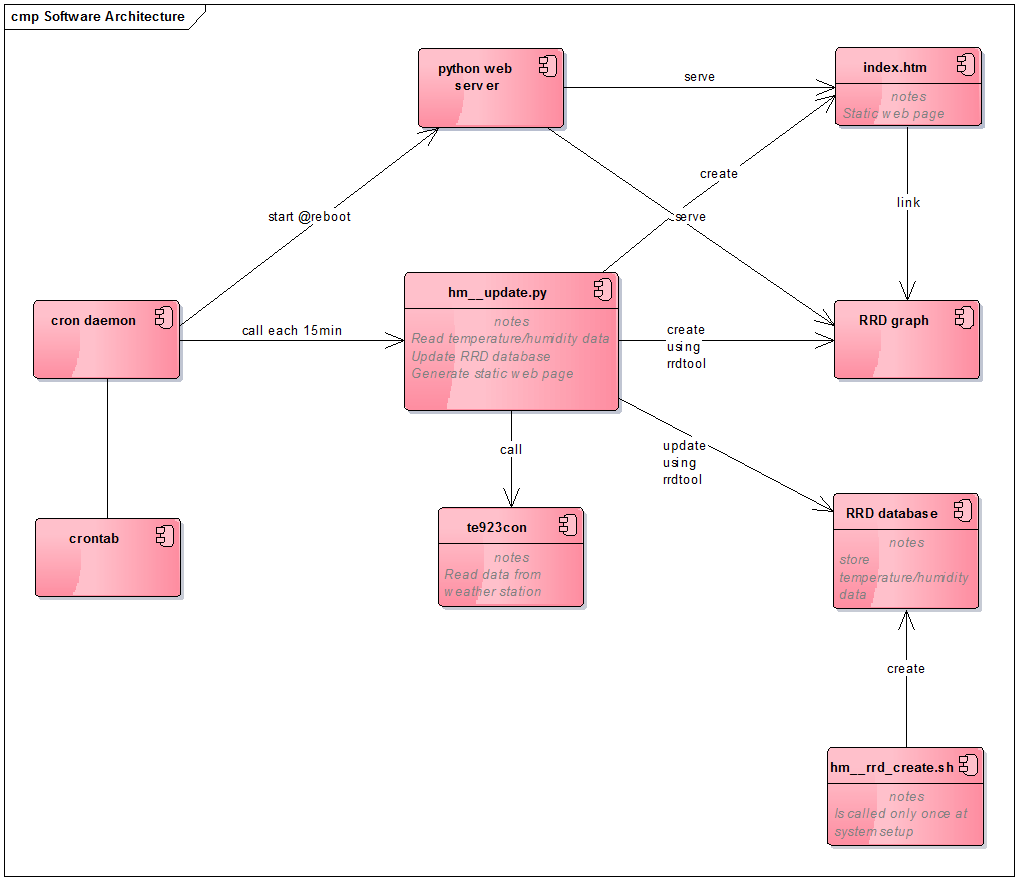
The software architecture is shown in the following diagram
- The cron daemon
- reads its configuration data from the crontab
- starts the python web server at reboot
- calls the python script hm__update.py each 15min
- The python script hm__update.py
- reads out the temperature/humidity data from the Nexus weather station by calling the te923con program
- updates the RRD database with the new data
- creates a static web page from current data and a time series plot from RRD data
- The RRD database
- is created at system setup by the shell script hm__rrd_create.sh
- stores temperature/humidity data in a cyclic buffer
- automatically calculates minimum/maximum values
- The python webserver
- provides the static web page and the time series plot to the outer world
Basic Raspberry Pi Setup:
- Install raspbian image (2014-09-09-wheezy-raspbian.img) on 4GB SD-Card using WinDiskImager
- Connect Raspberry Pi to the network
- Connect the Nexus weather station via USB to the Raspberry Pi
- Initial connect from Windows PC via putty-ssh (IP-adress assigned by router: 192.168.2.23)
sudo raspi-config- Timezone Berlin
- limit GPU memory to smallest value (1MB)
- Expand filesystem
passwd- change password
- Optional: Verify that python and python3 are already installed
python -Vpython3 -V
Compile the TE923 tool and configure USB HID access:
- Get the te923 tool and compile
wget http://te923.fukz.org/downloads/te923tool-0.6.1.tgztar -xvf te923tool-0.6.1.tgzcd te923tool-0.6.1sudo apt-get install libusb-devmake
- Allow access to the USB HID device without root rights
- create udev rule
sudo vi /etc/udev/rules.d/99-te923.rules- enter
ATTRS{idVendor}=="1130", ATTRS{idProduct}=="6801", MODE="0660", GROUP="plugdev" sudo reboot
- Example output:
1416078280:21.90:51:8.00:86:U:U:U:U:U:U:7.70:83:956.8:U:3:0:U:U:U:U:0- Colon-separated fields: timestamp, followed by temperature and humidity readings
- Access individual fields by filtering with awk
./te923con | awk -F: '{print $2}'
- Convert time from epoch to local time - see epochconverter
date -d @\`./te923con | awk -F: '{print $1}'`
Install rrdtool and the associated python package
sudo apt-get install rrdtoolsudo apt-get install python-rrdtool
Create the directory structure and deploy the scripts
mkdir weathercd weather- copy the scripts
hm__update.pyandhm__rrd_create.shhere - copy the
te923conexectuable here - create the RRD database by executing
./hm__rrd_create.sh
- copy the scripts
mkdir www- this directory is for the static web page and the time series plot
Configure the cron daemon to start the web server at reboot and to call the update script each 15min
crontab -e- enter
*/15 * * * * cd $HOME/weather;python hm__update.py > www/index.htm@reboot cd $HOME/weather/www;python3 -m http.server*/01 * * * * cd $HOME/weather;python gc__update.py
sudo reboot
Python
- Python is great.
- Python has a built-in webserver.
- Both Python2 and Python3 are pre-installed on the Raspberry Pi.
- The Python2/Python3 schism still exists, e.g. not all packages are available easily on Python3.
RRDTools
- RRDTool is great to store and graph log data.
GitHub
- GitHub provides a convenient way to share open source software including markdown documentation
- Improve robustness against bad sensor data
- te923con -iU to generate "unknown" values for rrdtool
- Add dew point calculation to the python script
- Redirect error output from programs run by cron
- Internet Security: Is the python webserver vulnerable?
- Solution: Disable port forwarding at router.
- Push data to external server, e.g. data.sparkfun.com.
- Create graps with google charts.
- Only outgoing connection from Raspberry Pi.
- FTP password must be stored on Raspberry Pi. Is this the next security risk?
- Solution: Disable port forwarding at router.
- Privacy
- Can my life be spied out by analyzing those data?
- SD-Card lifetime:
- Stability of RF sensor connection:
- Occasionally the connection between TFA Nexus and a remote sensor breaks for unknown reasons.
- Accuracy of humidity measurements:
- Humidity readings of different sensors at the same place can spread significantly
- Recent example: One of the Nexus RF sensors measured 55% RH, the Conrad DL141TH measured 60% RH and the SHT 11 measured 65% RH.
-
Weather station:
-
The te923 tool to read out data from the Nexus weather station
-
Python
- web server
python3 -m http.server
- web server
-
The crontab command
- Example 1: run-a-script-on-start-up
- Example 1: Launch-Python-script-on-startup
-
Similar projects
- Martin Kompf: DS1820 1-wire Temperature Sensor @ Raspberry Pi
- Charly Kuehnast: DS1820 1-wire Temperature Sensor @ Raspberry Pi
-
Alternative approaches to record weather data - mostly more sophisticated
Connect the sensor using parasite power supply
- Connect the GND and! the VDD pin of the sensor to GND (these are the outer 2 pins)
- Connect the DQ pin (the middle one) to GPIO4 (pin7) of the RPi
- Add a 4.7kOhm resistor between 3.3V and GPIO4/DQ as pull-up
sudo modprobe w1-gpio pullup=1sudo modprobe w1-thermcd /sys/bus/w1/devicescd 10-00080*cat w1_slave# the second line contains the temperature - with 3 decimal digits
You can automatically load the drivers by adding the to /etc/modules
w1-gpio pullup=1- or
w1-gpio pullup=1 gpiopin=17to use GPIO17 instead of GPIO4 w1-therm
Note: I have not been able to use I2C when w1 was configured with parasite power (pullup=1). If I use w1 with separate power supply (no pullup), then I2C works. In some posts
1
2
3
, it was proposed to change the order of drivers in /etc/modules, but this did not help for me.
Probably this has been resolved with the latest Raspbian release, see commit a827a5619e72983159a152fd4943d9618c7a81a3? See also here and here
References
- Martin Kompf: DS1820 1-wire Temperature Sensor @ Raspberry Pi
- Explanation of the w1_slave field
- Caution: newer Raspbian releases use the devicetree: See 1, 2 or even better 2 3 4 5 6
- List of 1-wire devices in /sys/devices/w1_bus_master1/w1_master_slaves

