Skip to content
New issue

Have a question about this project? Sign up for a free GitHub account to open an issue and contact its maintainers and the community.

By clicking “Sign up for GitHub”, you agree to our terms of service and privacy statement. We’ll occasionally send you account related emails.

Already on GitHub? Sign in to your account

make sudo a multisig account #44

Closed
brenzi opened this issue Sep 20, 2021 · 4 comments · Fixed by #48
Closed

make sudo a multisig account #44

brenzi opened this issue Sep 20, 2021 · 4 comments · Fixed by #48
Assignees

Comments

@brenzi
Copy link
Collaborator

brenzi commented Sep 20, 2021

No description provided.

@echevrier
Copy link
Contributor

echevrier commented Sep 28, 2021

Create a multisig account in Genesis config (not as sudo)
Write tutorial for cases (from polkadot.js)

  • transfer from multisig account
  • make multisig account as sudo and then test it with treasury

@brenzi brenzi changed the title make sudo a multisig account from genesis make sudo a multisig account Sep 28, 2021
@echevrier
Copy link
Contributor

echevrier commented Sep 28, 2021

Tutorial

Multi-signature accounts

Multi-signature accounts cannot be modified after being created. Changing the set of members or altering the threshold is not possible and instead requires the dissolution of the current multi-sig and creation of a new one. As such, multi-sig account addresses are deterministic, i.e. you can always calculate the address of a multi-sig by knowing the members and the threshold, without the account existing yet.

A Multisig account is created in the genesis.

  • in the development config, the account contains Alice, Bob, Dave
  • in the local testnet config, the account contains Alice, Bob, Charlie, Dave

To show up in polkadot.js the account has to be added:

  • Click on +Multisig
  • Select Signatories: Alice, Bob, Dave.
  • Set threshold to 2

-> Multisig account with key

2JSjRJ8Yban5FJjkLnCcV7hYpyqK6U9XQrhG1ze6ir7i8XRr

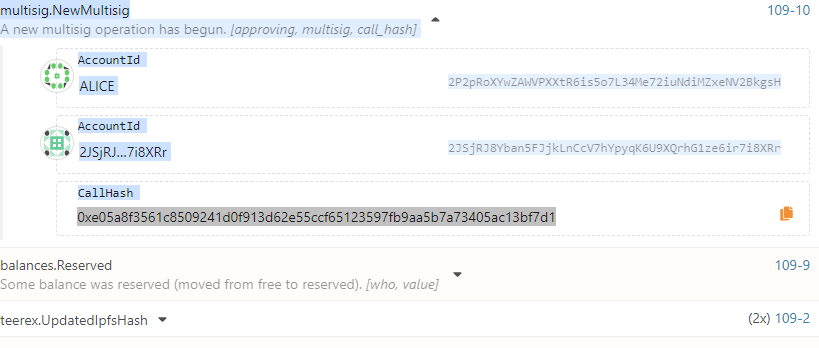
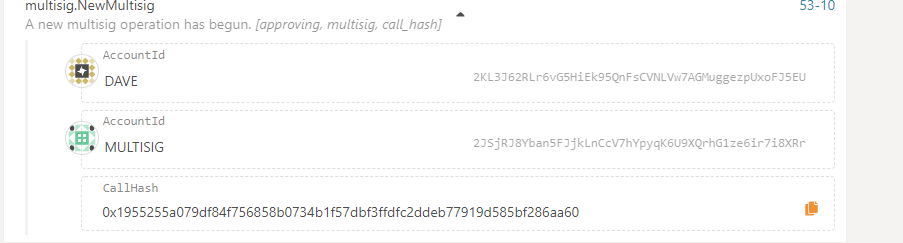
This account has a fund from the genesis like Alice account

Note: The address of a multi-signature account is deterministically generated from the signers and threshold of the multisig wallet. So the order of the adresses provided to the multi-sig account is important.
Creating a multi-sig account from Polkadot-JS Apps UI, always sort the accounts according to the keys. For compatibilty reason, the multi-sig account created in the genesis config sort the account in the same way

Scenarios

1. Transfer 50 Unit from Multisig account to Eve from Accounts UI

  • Generate extrinsic and first authorization (ex:Alice)

    • Click on Send (Multisig account) and fill form
      Transfer_1

    • Click Make Transfer
      ->authorize transaction form for first signature (Alice):
      authorization_alice

    • Click Sign and Submit
      -> NewMultisig Event in block
      Event_1

    -> 1 Multisig approvals is pending. See Account UI
    1_approv_pending

  • 2d authorization (ex:Dave):

    • Click on Send (Multisig account) and fill form
      Transfer_1

    • Click Make Transfer
      -> authorize transaction form for second signature (ex:Dave):
      Note : the Multisig message with call (for final approval) is selected
      authorization_2d

    • Click Sign and Submit
      -> MultisigExecuted Event in block
      Event_Done

    -> Eve got 50 Unit and no multisig approval is pending anymore

2. Transfer 50 Unit from Multisig account to Charlie from Developer/extrinsics UI

  • Go to Developer/extrinsics

  • Generate extrinsic and first authorization (ex:Bob)

    • Using selected account: Multisig submit the following extrinsic
      Extrinsics_transfer_1

    • Click Submit Transaction
      -> first authorization from Bob
      1-auth_extrinsics_bob

    • Click Sign and Submit
      -> NewMultisig Event in block
      Event_1_extrinsic

  • 2d authorization (ex:Dave):

    • Change nothing extrinsics Submission UI

    • Click Submit Transaction
      -> authorize transaction form for second signature (ex:Dave):
      Note : the Multisig message with call (for final approval) is selected
      2-auth_extrinsics_dave

    • Click Sign and Submit
      -> MultisigExecuted Event in block
      -> Charlie got 50 Unit and no multisig approval is pending anymore

3. Make Multisig account sudo

  • Go to Developer/Sudo

  • submit following change sudo, setKey, new: Multisig

  • Click Submit sudo

  • Click Sign and Submit
    -> Key_Changed Event in block
    sudo_key_changed_event

  • Check the Sudo key:

    • Go to Developer/Chain state
    • Selected state query: sudo, key() -> 2JSjRJ8Yban5FJjkLnCcV7hYpyqK6U9XQrhG1ze6ir7i8XRr

4. Treasury with sudo Multisig account

  • Create a proposal from Eve (Eve needs fund): transfer 500 units to Ferdie

    • Go to Treasury Tab
    • Click Submit proposal
    • Fill Form according to desired proposal
    • Click Submit Proposal and Sign and Submit
      -> In the Treasury there is 1 proposal
      proposal_1
  • First accept of proposal (from ex Dave)

    • Go to Developer/extrinsics and fill form
      1_approv_propos

    • Click Submit Transaction
      -> first authorization from Dave
      1_approv_propos_authoriz

    • Click Sign and Submit
      -> NewMultisig Event in block
      1_approv_propos_event

  • 2d authorization (ex:Bob):

    • Change nothing extrinsics Submission UI

    • Click Submit Transaction
      -> authorize transaction form for second signature (Bob):
      Note: the Multisig message with call (for final approval) is selected
      2_approv_propos_authoriz

    • Click Sign and Submit
      -> MultisigExecuted Event in block
      2_approv_propos_event

-> In the Treasury there is 1 approve proposal
approved_proposal

@brenzi
Copy link
Collaborator Author

brenzi commented Sep 28, 2021

forceTransfer should only work with sudo. Your screenshot confuses me as it should fail. should be transfer instead

Just reproduced: Your flow gets the multisig approved, but the dispatch will fail with BadOrigin. As to be expected.

@brenzi
Copy link
Collaborator Author

brenzi commented Sep 28, 2021

I actually think, the better instructions would be:

  1. original author of multisig extrinsic copy-pastes the encoded call data and encoded call hash and sends that to the others.
  2. The others check pending multisig approvals in the js/apps UI and select "..." -> "Multisig Approvals" where they just enter the call data and do not need to re-enter all extrinsic data (important because it may even be a batch of 999 extrinsics ....

Tested changing sudo as well and then doing a forceTransfer. all works as expected

Now I understood: The first multisig extrinsic doesn't actually send the extrinsic it wants to execute to the chain at all. It just registers its hash. The others approve the hash and have to check for themselves if the hash corresponds to what they think will be executed. Only the final approval actually submits the extrinsic and it gets executed

brenzi pushed a commit that referenced this issue Sep 28, 2021
#48)

closes #44 

Co-authored-by: echevrier <edith.chevrier@scs.ch>
Sign up for free to join this conversation on GitHub. Already have an account? Sign in to comment
Labels
None yet
Projects
None yet
2 participants