This project organizes and summarizes the common methods in encrypted traffic classification, and provides the execution entry of each method. When using it, you only need to preprocess your own data as required, put it in a specified directory, and then run the entry main function of the corresponding model. This project is particularly helpful for researchers to conduct comparative experiments. Now that one of my papers has been accepted, so I open the source this project and share it with everyone!
Currently this project only integrates related models based on packet length sequences, ** payload-based models are not discussed**!
https://github.com/jmhIcoding/traffic_classification_utils
Currently this project supports the following models:
-
FS-Net Liu, C., He, L., Xiong, G., Cao, Z., & Li, Z. (2019, April). Fs-net: A flow sequence network for encrypted traffic classification. In IEEE INFOCOM 2019-IEEE Conference On Computer Communications (pp. 1171-1179). IEEE.
-
GraphDapp Shen, M., Zhang, J., Zhu, L., Xu, K., & Du, X. (2021). Accurate decentralized application identification via encrypted traffic analysis using graph neural networks. IEEE Transactions on Information Forensics and Security, 16, 2367-2380.
-
Deep Fingerprinting Sirinam, P., Imani, M., Juarez, M., & Wright, M. (2018, October). Deep fingerprinting: Undermining website fingerprinting defenses with deep learning. In Proceedings of the 2018 ACM SIGSAC Conference on Computer and Communications Security (pp. 1928-1943).
-
SDAE/LSTM/CNN Rimmer, V., Preuveneers, D., Juarez, M., Van Goethem, T., & Joosen, W. Automated Website Fingerprinting through Deep Learning.
-
Beauty Schuster, R., Shmatikov, V., & Tromer, E. (2017). Beauty and the burst: Remote identification of encrypted video streams. In 26th USENIX Security Symposium (USENIX Security 17) (pp. 1357-1374).
-
CUMUL Panchenko, A., Lanze, F., Pennekamp, J., Engel, T., Zinnen, A., Henze, M., & Wehrle, K. (2016, February). Website Fingerprinting at Internet Scale. In NDSS.
-
AppScanner Taylor, V. F., Spolaor, R., Conti, M., & Martinovic, I. (2016, March). Appscanner: Automatic fingerprinting of smartphone apps from encrypted network traffic. In 2016 IEEE European Symposium on Security and Privacy (EuroS&P) (pp. 439-454). IEEE.
-
BIND Al-Naami, K., Chandra, S., Mustafa, A., Khan, L., Lin, Z., Hamlen, K., & Thuraisingham, B. (2016, December). Adaptive encrypted traffic fingerprinting with bi-directional dependence. In Proceedings of the 32nd Annual Conference on Computer Security Applications (pp. 177-188).
-
RDP Jiang, M., Gou, G., Shi, J., & Xiong, G. (2019, October). I know what you are doing with remote desktop. In 2019 IEEE 38th International Performance Computing and Communications Conference (IPCCC) (pp. 1-7). IEEE.
In order to minimize our workload using existing methods, for a new encrypted traffic analysis task, we need to do two things:
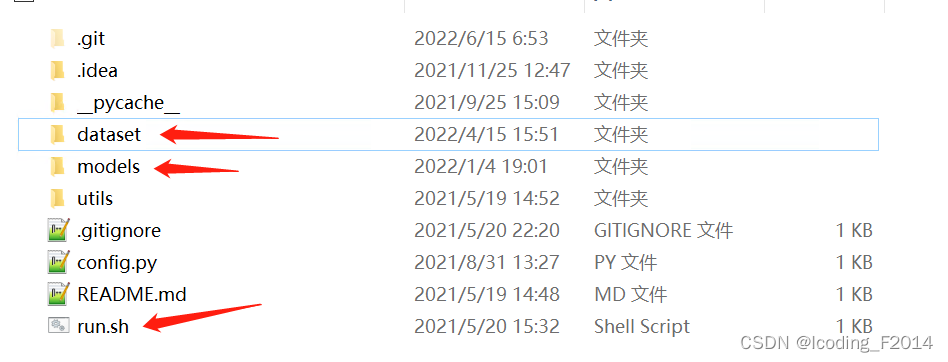
Convert the dataset in your hand into a unified json format folder, which is the dataset directory shown in the above figure. You can save your own dataset to this directory after conversion. This conversion is particularly simple, just follow the convention. Whether it is raw pcap file traffic, log files, etc., it can be easily converted. 2. Jump to the corresponding model directory, which is the models directory in the above picture, modify the dataset field in xxx_main.py, and use run.sh to execute the corresponding xxx_main.py.
**Why do you need to convert the data in advance? Why is there no one-click scripting? **
A: Because the data formats that everyone gets are all kinds of strange, there are pcap, there are logs, and each person's own data organization form is also different, so I can't write a unified data conversion script to unify everyone's situation. Therefore, I leave the task of this data conversion to the users themselves, because only the data holders know the format of their data best, and I just agree on the target format after conversion.
Why use the run.sh script to execute xxx_main.py? At present, you need to use run.sh, which contains some processes for loading the environment directory.
Because all sequence models are considered in this project, it is only necessary to prepare information such as the packet length sequence and packet direction sequence of the data stream.
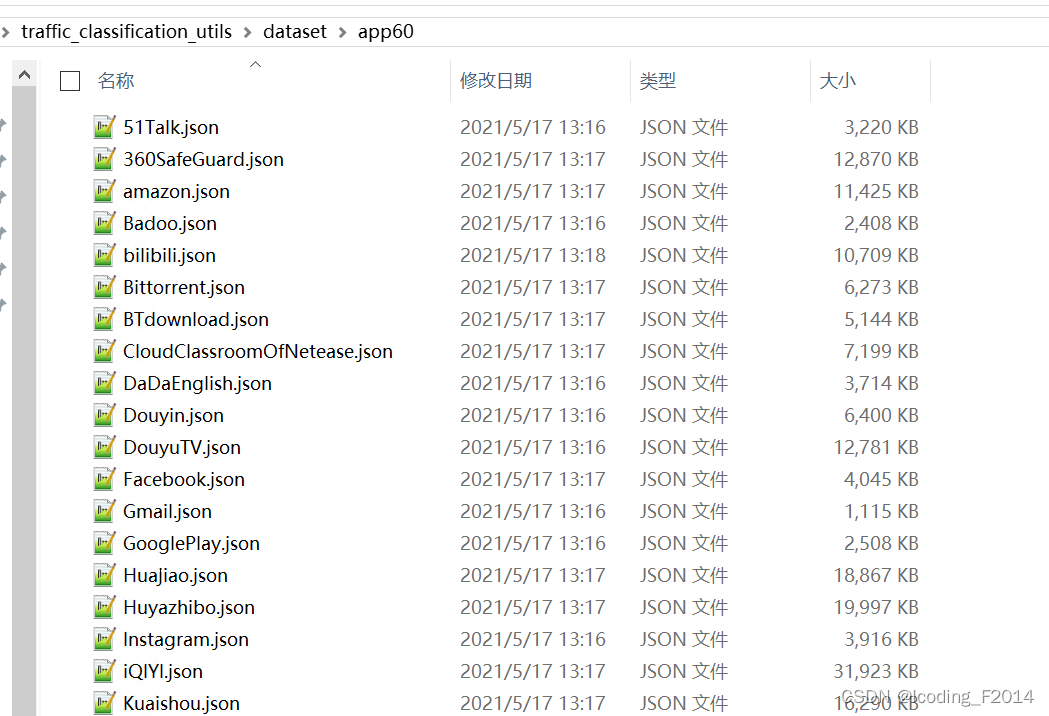
Data path: dataset/{dataset name}/{category name}.json
In the dataset directory, each subdirectory is a dataset of a task, and each task is distinguished by a folder. For example, there are currently two different datasets: app60, app320.
If you want to add a new dataset, create a new folder and give the dataset a name you like.
Enter the specified data set, and the traffic samples of each category are uniformly placed in the same json file. Therefore, there are m different jsons in this directory, then m classification will be performed, and the file name of json is the ground-truth label of the traffic sample in it.
The format of the traffic samples within each json file is as follows:
[
{//第一个样本
"packet_length": 包长序列,
"arrive_time_delta": 相邻数据包的到达时间间隔
},
{//第二个样本
"packet_length": 包长序列,
"arrive_time_delta": 相邻数据包的到达时间间隔
},
]
There are two main points to note:
-
A json file contains a large list, and each element in the list corresponds to a network flow. If there are n elements in the list, it means that there are n traffic samples in this class.
-
Each traffic is a dict with a key field: packet_length, the packet length sequence. If you also need to use the BIND model, the arrive_time_delta field is also essential. The packet length sequence is signed, and the sign indicates the direction of the data packet. A positive sign indicates that the package is sent by the Client to the Server, and a negative sign indicates that the Sever sends it to the Client. The sign is reserved because some models require this information.
Example: The json below contains two samples.
[
  {
    "packet_length": [
      194,
      -1424,
      -32,
      53,
      86,
      154,
      -274,
      -308,
      38,
      110,
      -204
    ],
    "arrive_time_delta": [
      0,
      0.0000030994415283203125,
      0.00014519691467285156,
      0.05950021743774414,
      0.05950307846069336,
      0.05950617790222168,
      1.0571942329406738,
      1.0572030544281006,
      1.0572071075439453,
      1.0572102069854736,
      2.637423038482666
    ]
  },
  {
    "packet_length": [
      177,
      -1424,
      -1440,
      -32,
      -1448,
      -99,
      126,
      852,
      -258,
      -317
    ],
    "arrive_time_delta": [
      0,
      0.000030994415283203125,
      0.0039768218994140625,
      0.009712934494018555,
      0.00972294807434082,
      0.35946083068847656,
      0.35947394371032715,
      0.35948801040649414,
      0.3595008850097656,
      1.3806648254394531
    ]
  }
]Currently I have all the models in separate folders under the models directory.
The directory is as follows. If you need any model, cd to the corresponding directory.
.
├─models
│  ├─dl
│  │  ├─awf_dataset_util
│  │  ├─beauty
│  │  ├─cnn
│  │  ├─df
│  │  ├─df_only_D
│  │  ├─fsnet
│  │  ├─graphDapp
│  │  ├─lstm
│  │  ├─sdae
│  │  ├─varcnn
│  ├─ml
│  │  ├─appscanner
│  │  ├─bind
│  │  ├─cumul
│  │  ├─rdp
In the directory of each model, there is an entry script of xxx_main_model.py, and a data directory. For example, the directory structure under the appscanner model:
appscanner
│  appscanner_main_model.py  ###an entry script
│  eval.py
│  feature_extractor.py
│  hyper_params.py
│  min_max.py
│  model.py
│  README
│  train.py
│  __init__.py
│  【1】AppScanner.pdf
│
├─data				##history models and datas
│  │  appscanner_app60_model
│  ├─appscanner_app60  ##the training-set, testing-set
│  │      X_test.pkl
│  │      X_train.pkl
│  │      X_valid.pkl
│  │      y_test.pkl
│  │      y_train.pkl
│  │      y_valid.pkl
│  │
appscanner_main_model.py is the entry of the appscanner model, you only need to modify the last few lines in it:
if __name__ == '__main__':
   appscanner = model('app60') ##Specify the dataset name required by the task. The dataset directory of the project needs to have this dataset directory.
   #appscanner.parser_raw_data()  ##Re-parse the raw traffic samples in the dataset directory and re-convert to the specific data format required by the model.
   appscanner.train()  ###Train the model
   appscanner.test()   ###Test the model
For each model class, when instantiating, you need to specify what dataset is used. During initialization, the system will automatically detect whether the data set has been processed in history (mainly to check whether there are corresponding test sets, training sets and model files in the data directory), if not, the original data will be formatted in one step Transform, divide test set, training set.
This process is done by calling parser_raw_data()! parser_raw_data() will re-shuffle the data as soon as it is executed, which is generally used for cross-validation!
Then use the run.sh script to execute this appscanner_main_model.py, and run.sh is at the root of the entire project.
./../../../run.sh appscanner_main_model.py

