Assembly
Assembly (V6 / 2021 model)
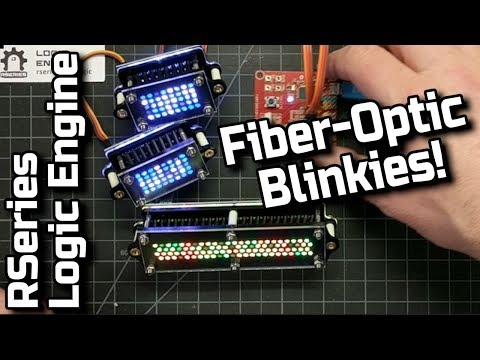
The V6 kit includes an updated rear assembly, with 112 LEDs (vs 96 LEDs on previous versions). Hardware has been refined for simpler assembly and includes hardware for club standard assemblies as well as Philip Wise's new curved rear logic assembly.V6 assembly video is still in the cutting room, but the instruction page included with the kit should suffice (also available here).
Assembly (2018 model)
Assembly is very similar to the 2016 version detailed below, but the YouTube assembly video may make things a little clearer...
Assembly (2016 model)
Also, see the assembly sheet included with the kits (PDF is here )
Assembly of the Logic Engine is relatively simple, and has been streamlined from previous versions. Each front and rear logic now uses identical hardware. The general assembly procedure is...
- Assemble a set of plastics & hardware
- Thread fiber-optic cable through the bezels (spaced 1/2" apart) and cut flush with surface
- Mount LED board to the fiber-optic assembly
- (1) Teensy Reactor board with Teensy 3.1
- (1) Rear Logic LED Board
- (2) Front Logic LED Boards
- (2) 3pin 30cm cables (22awg)
- (1) 3pin 15cm cable (22awg)
- (1) Electret microphone
- (1) 2pin cable
- (1) Rear Inner Bezel (black 1/8" acrylic)
- (1) Rear Outer Bezel (black 1/8" acrylic)
- (1) Rear Inner Screen (clear 1/16" non-glare acrylic)
- (1) Rear Outer Screen (clear 1/16" non-glare acrylic)
- (2) Front Inner Bezel (black 1/8" acrylic)
- (2) Front Outer Bezel (black 1/8" acrylic)
- (2) Front Inner Screen (clear 1/16" non-glare acrylic)
- (2) Front Outer Screen (clear 1/16" non-glare acrylic)
- (6) M3 20mm Screws
- (14) M3 30mm Screws
- (6) Brass Threaded Inserts
- (6) 1/2" spacers
- (14) M3 Hex nuts
- (28) Nylon Washers
- (1) 2.5mm Hex Key
(used to piggyback Teensy Reactor onto rear logic display)
- (1) Plastic mounting plate
- (1) 3pin 10cm cable (22awg)
- (3) 1/8" spacers, M3 10mm screws, washers & nuts
- (4) M3 35mm screws
* Sorry for the lack of photos. For a nice step by step build with lots of photos, see Christopher's build log here *
- Remove any protective film/paper form the surfaces of the plastic parts.
- Press-fit threaded inserts into the outer bezel. Note that the rear outer bezel is not asymetrical, so be sure to insert them into the correct side.
- Place a nylon washer on two 20mm screws and pass them through the inner screen and inner bezel. The inner screen should have its non-glare surface to the back, and again, check the orientation of the rear inner bezel so its holes match the pattern of the rear LED board and outer bezel.
- Place 1/2" spacers on the 20mm screws and attach this "inner assembly" to the outer bezel by screwing the 20mm screws into the threaded inserts.
- Clip the end of the fiber-optic cable with a flush-cutter. Ensure the end is relatively round and not pinched.
- Insert the fiber-optic cable through a hole in the outer bezel and push it into the corresponding hole in the inner bezel. Ensure that it is pushed close to the surface of the inner screen.
- With a sharp flush-cutter flush with the surface of the outer bezel, clip the fiber-optic cable.
- Go to step 5. Repeat until all holes have been "fibered".
- With all fibers placed, you're almost done. Place nylon washers on 30mm mounting screws (6 for rear, 4 for each front), then place the screws through the mounting holes of the LED board.
- Insert 30mm screws through the assembly so their ends poke through the outer bezel. Place the outer screen on their ends (non-glare side facing out).
- Gently screw the 30mm screws into your logic surrounds. Do not over-tighten. Alternatively place nuts on the ends of the 30mm screws (if you weren't planning on attaching to logic surrounds straight away). IMPORTANT : Overtightening mounting screws may lead to PCB damage, please pay close attention here
- Connect the LED board to the "Teensy Reactor" board using a 3-pin cable. Apply power to the Teensy Reactor board (using up to 38V into its screw terminal).
- Sit back and enjoy the blinky.
Assembly (pre-2016 models)
For previous versions, see the Older-Versions-(pre-2016) page.