-
Notifications
You must be signed in to change notification settings - Fork 18
Firmware Programming
To build and program FF OSD you will need the following parts:
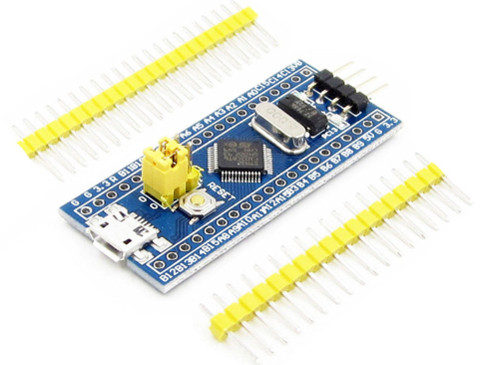
- STM32 "Blue Pill" board
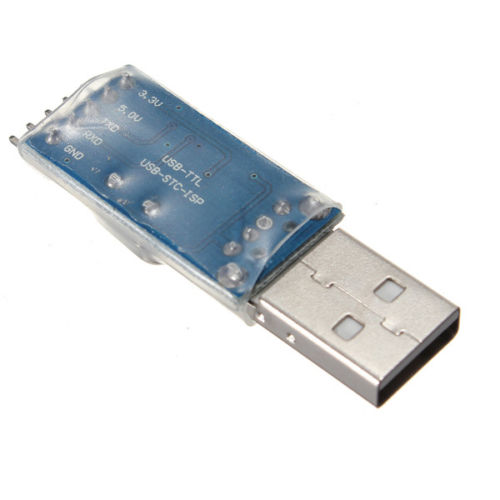
- USB-TTL serial adapter
- Firmware programming file (Download)
The "Blue Pill" is available very cheaply from many Chinese Ebay sellers for less than £2 including postage. The best search term is "STM32F103C8T6 board", sorted by lowest price first, and look for a board identical to below.
UPDATE: Please be aware of fake STM32 chips flooding the Chinese market. You may be advised to use a local source for your Blue Pill: For example, in UK they can be purchased for £3-4, you can more easily question a local seller, and you have wasted much less time if your chip does turn out to be fake.

Please note that other boards in other colours (eg. Black Pill) may have different pin configurations and may be more likely to contain counterfeit STM32 chips. I recommend to stick with the Blue Pill!
For programming you will need a USB-TTL adapter such as shown below, available for around £1-2 on Ebay. My own experience is with the PL2303HX-based adapters, which are automatically detected and initialised in Linux. In Windows the correct Prolific driver is installed, but since the cheap adapters are using cloned chips, the driver may fail to initialise the device. In this case the driver must be replaced by an older version and auto-update disabled for the driver, as described here.

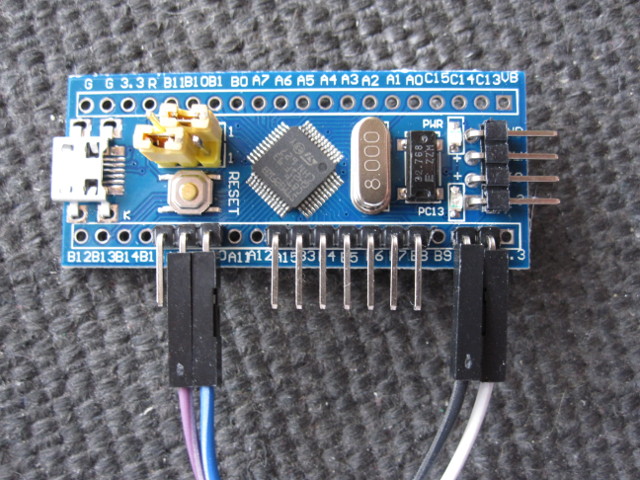
Now adjust the yellow boot jumpers on the STM32 board and attach the Dupont jumper cables supplied with the USB-TTL adapter as shown. Note that 2.54mm header pins have been soldered for this purpose: you may wish to do similar at least for 5V, G, A9 and A10. In this example the cables connect back to the following USB-TTL pins: White to GND, Black to 5V, Purple to RXD, Blue to TXD.

Download the firmware zip file from here and program according to OS-specific instructions below. Once the device is programmed you should set both yellow boot jumpers to 0. This will cause the programmed FF OSD firmware to run automatically when powered on.
Windows: The programming process is described, along with suitable Windows software, on the Cortex firmware webpage.
Linux: The firmware HEX image can now be programmed with the stm32flash command-line utility:
 # unzip FF_OSD-v1.1.zip
 # sudo stm32flash -b 115200 -vw FF_OSD-v1.1/FF_OSD-v1.1.hex /dev/ttyUSB0
Finally, you may configure the firmware via the serial line. Connect to the console via a serial terminal at 115200 baud, 8 data bits, no parity, 1 stop bit, and reset the STM32 board. On Windows you could use PuTTY, among many other options. On Linux, you can use Python's miniterm utility:
# sudo miniterm.py /dev/ttyUSB0 115200
While connected to the console, press the reset button to view the current configuration and the serial key bindings.
Note that there are other methods for configuring the firmware, via rotary encoder or Amiga keyboard. See the wiki page describing Hardware Connections.