Animation library for LÖVE.
In order to build animations more easily, anim8 divides the process in two steps: first you create a grid, which is capable of creating frames (Quads) easily and quickly. Then you use the grid to create one or more animations.
Since anim8 uses LÖVE's graphical functions, and they change from version to version, you must choose the version of anim8 which is compatible with your LÖVE.
- The current version of anim8 is v2.1. It is compatible with LÖVE 0.9.x and 0.10.x
- The last version of anim8 compatible with LÖVE 0.8.x was anim8 v2.0.
local anim8 = require 'anim8'

local image, animation

function love.load()
  image = love.graphics.newImage('path/to/image.png')
  local g = anim8.newGrid(32, 32, image:getWidth(), image:getHeight())
  animation = anim8.newAnimation(g('1-8',1), 0.1)
end

function love.update(dt)
  animation:update(dt)
end

function love.draw()
  animation:draw(image, 100, 200)
end
You can see a more elaborated example in the demo branch.
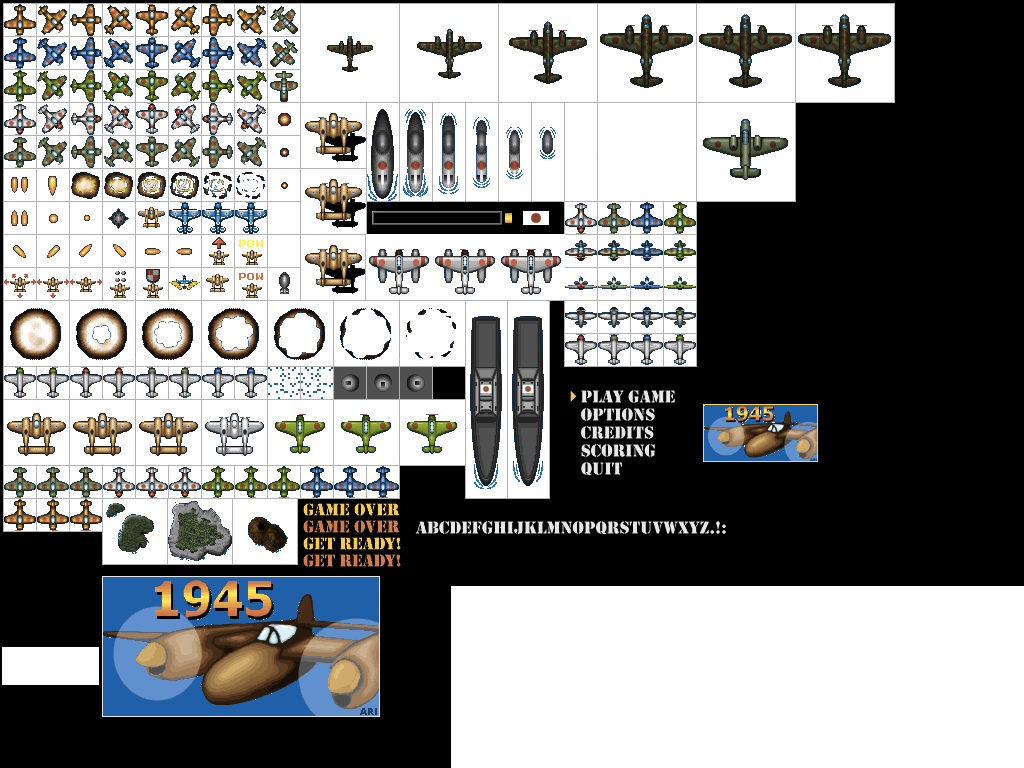
That demo transforms this spritesheet:
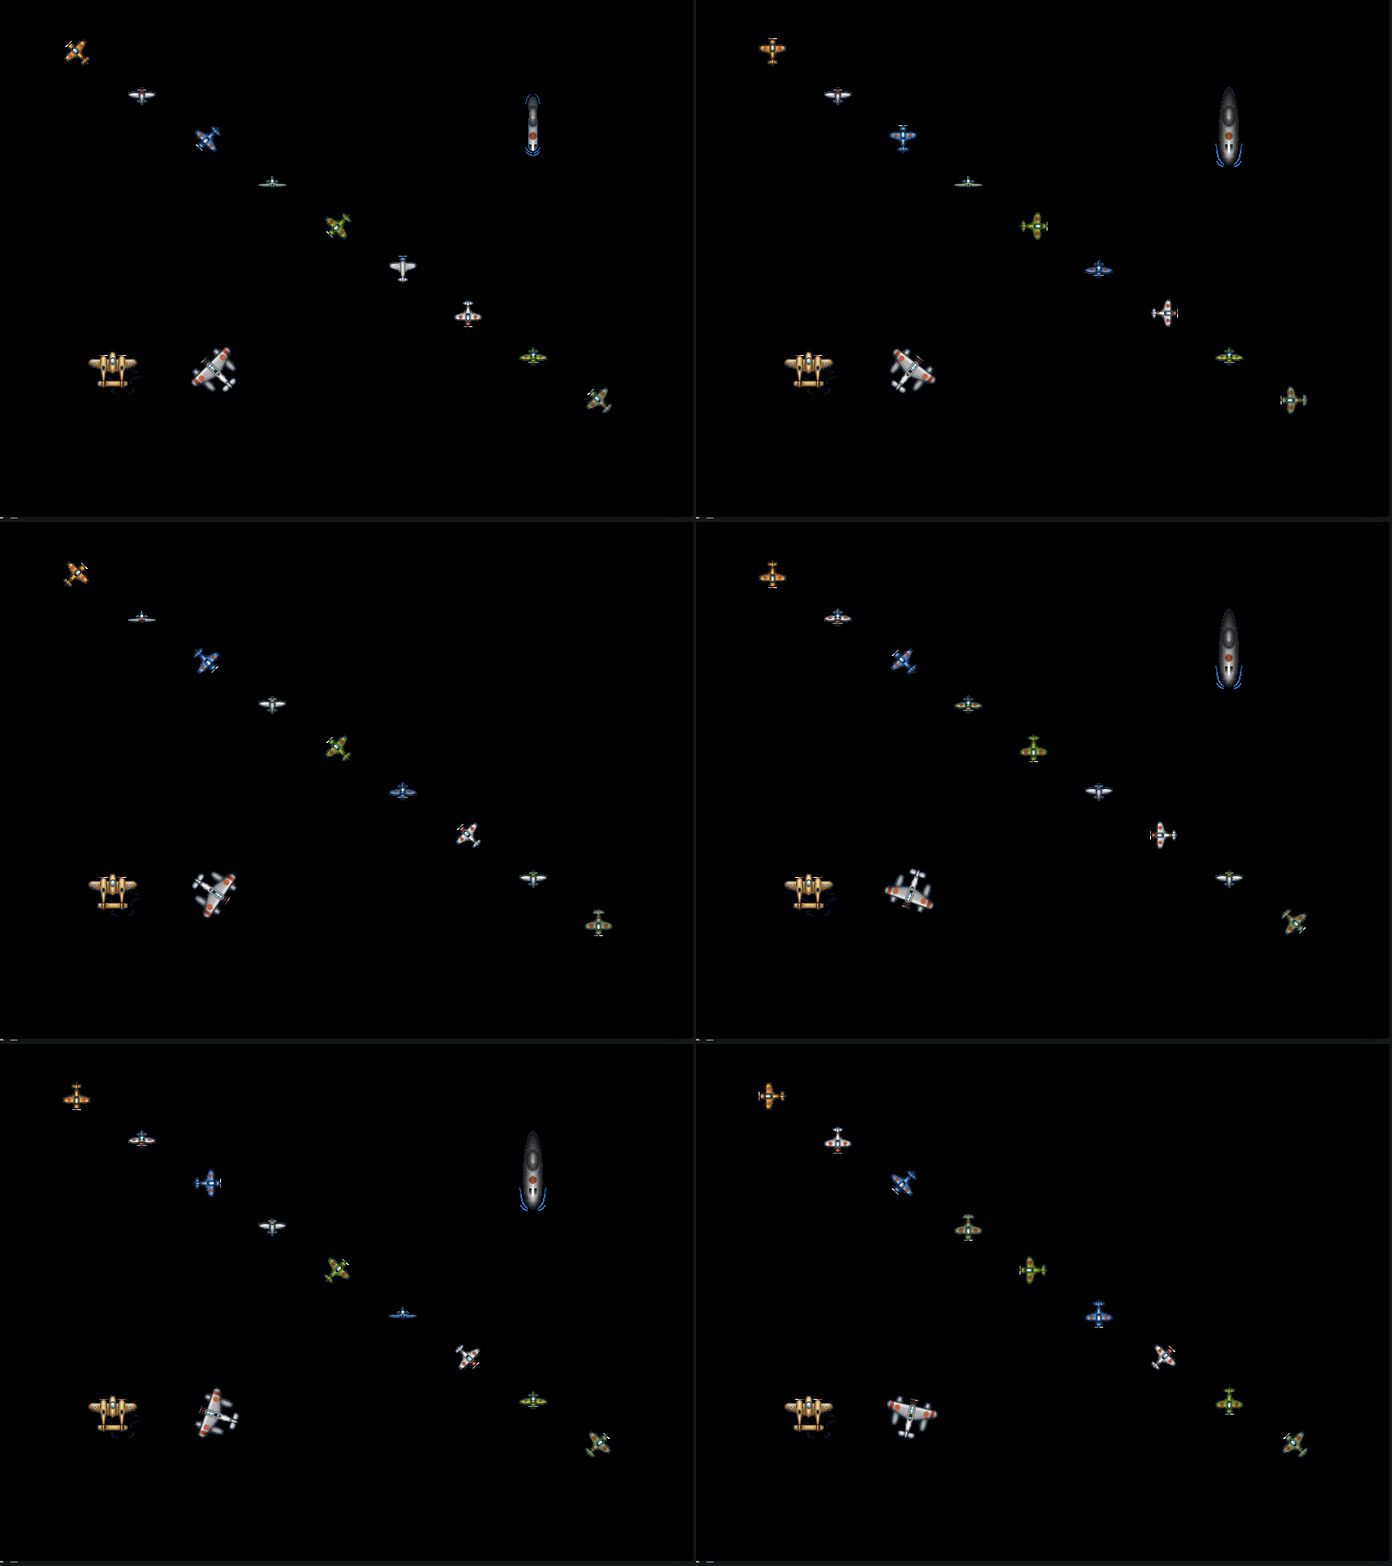
Into several animated objects:
Grids have only one purpose: To build groups of quads of the same size as easily as possible. In order to do this, they need to know only 2 things: the size of each quad and the size of the image they will be applied to. Each size is a width and a height, and those are the first 4 parameters of @anim8.newGrid@.
Grids are just a convenient way of getting frames from a sprite. Frames are assumed to be distributed in rows and columns. Frame 1,1 is the one in the first row, first column.
This is how you create a grid:
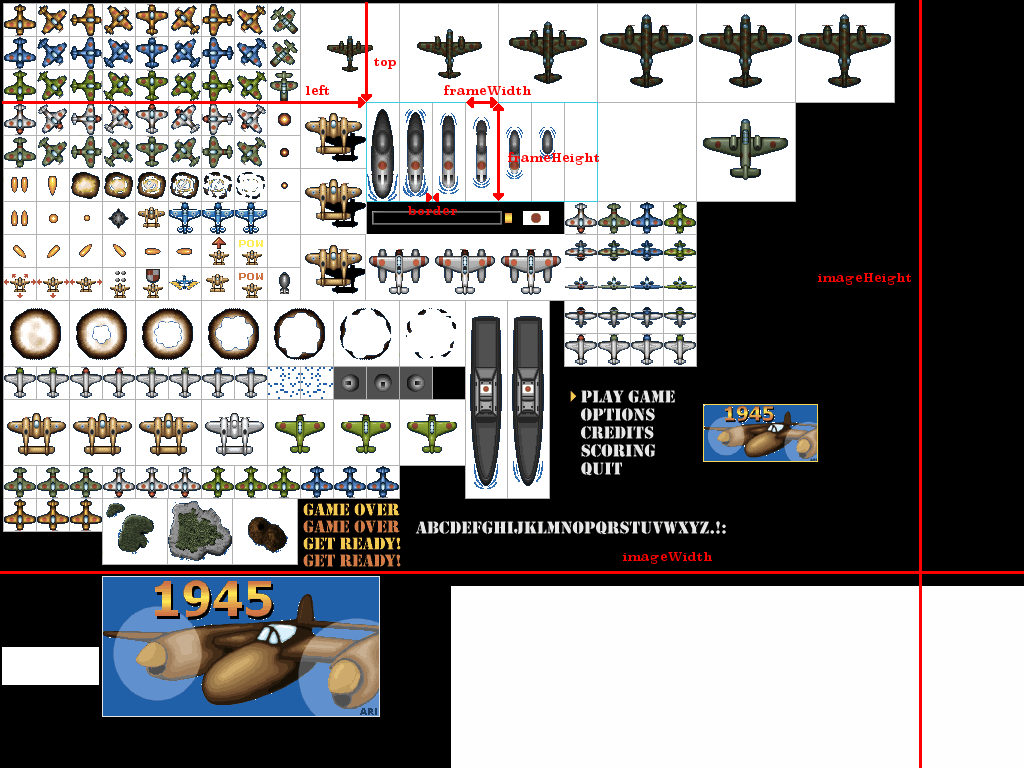
anim8.newGrid(frameWidth, frameHeight, imageWidth, imageHeight, left, top, border):frameWidthandframeHeightare the dimensions of the animation frames - each of the individual "sub-images" that compose the animation. They are usually the same size as your character (so if the character is 32x32 pixels,frameWidthis 32 and so isframeHeight)imageWidthandimageHeightare the dimensions of the image where all the frames are. In LÖVE, they can be obtained by doingimage:getWidth()andimage:getHeight().leftandtopare optional, and both default to 0. They are "the left and top coordinates of the point in the image where you want to put the origin of coordinates of the grid". If all the frames in your grid are the same size, and the first one's top-left corner is 0,0, you probably won't need to useleftortop.borderis also an optional value, and it also defaults to zero. Whatborderdoes is allowing you to define "gaps" between your frames in the image. For example, imagine that you have frames of 32x32, but they have a 1-px border around each frame. So the first frame is not at 0,0, but at 1,1 (because of the border), the second one is at 1,33 (for the extra border) etc. You can take this into account and "skip" these borders.
To see this a bit more graphically, here are what those values mean for the grid which contains the "submarine" frames in the demo:
Grids only have one important method: Grid:getFrames(...).
Grid:getFrames accepts an arbitrary number of parameters. They can be either numbers or strings.
- Each two numbers are interpreted as quad coordinates in the format
(column, row). This way,grid:getFrames(3,4)will return the frame in column 3, row 4 of the grid. There can be more than just two:grid:getFrames(1,1, 1,2, 1,3)will return the frames in {1,1}, {1,2} and {1,3} respectively. - Using numbers for long rows or columns is tedious - so grids also accept strings indicating range plus a row/column index. Diferentiating rows and columns is based on the order in which the range and index are provided. A row can be fetch by calling
grid:getFrames('range', rowNumber)and a column by callinggrid:getFrames(columnNumber, 'range'). The previous column of 3 elements, for example, can be also expressed like this:grid:getFrames(1,'1-3'). Again, there can be more than one string-index pair (grid:getFrames(1,'1-3', '2-4',3)) - It's also possible to combine both formats. For example:
grid:getFrames(1,4, 1,'1-3')will get the frame in {1,4} plus the frames 1 to 3 in column 1
But you will probably never use getFrames directly. You can use a grid as if it was a function, and getFrames will be called. In other words, given a grid called g, this:
g:getFrames('2-8',1, 1,2)Is equivalent to this:
g('2-8',1, 1,2)This is very convenient to use in animations.
Let's consider the submarine in the previous example. It has 7 frames, arranged horizontally.
If you make its grid start on its first frame (using left and top), you can get its frames like this:
                           -- frame, image,    offsets, border
    local gs = anim8.newGrid(32,98, 1024,768,  366,102,   1)

    local frames = gs('1-7',1)
However that way you will get a submarine which "emerges", then "suddenly disappears", and emerges again. To make it look more natural, you must add some animation frames "backwards", to give the illusion of "submersion". Here's the complete list:
local frames = gs('1-7',1, '6-2',1)Animations are groups of frames that are interchanged every now and then.
local animation = anim8.newAnimation(frames, durations, onLoop)framesis an array of frames (Quads in LÖVE argot). You could provide your own quad array if you wanted to, but using a grid to get them is very convenient.durationsis a number or a table. When it's a number, it represents the duration of all frames in the animation. When it's a table, it can represent different durations for different frames. You can specify durations for all frames individually, like this:{0.1, 0.5, 0.1}or you can specify durations for ranges of frames:{['3-5']=0.2}.onLoopis an optional parameter which can be a function or a string representing one of the animation methods. It does nothing by default. If specified, it will be called every time an animation "loops". It will have two parameters: the animation instance, and how many loops have been elapsed. The most usual value (apart from none) is the string 'pauseAtEnd'. It will make the animation loop once and then pause and stop on the last frame.
Animations have the following methods:
animation:update(dt)Use this inside love.update(dt) so that your animation changes frames according to the time that has passed.
animation:draw(image, x,y, angle, sx, sy, ox, oy, kx, ky)Draws the current frame in the specified coordinates with the right angle, scale, offset & shearing. These parameters work exactly the same way as in love.graphics.draw.
The only difference is that they are properly recalculated when the animation is flipped horizontally, vertically or both. See getFrameInfo below for more details.
animation:gotoFrame(frame)Moves the animation to a given frame (frames start counting in 1).
animation:pause()Stops the animation from updating (@animation:update(dt)@ will have no effect)
animation:resume()Unpauses an animation
animation:clone()Creates a new animation identical to the current one. The only difference is that its internal counter is reset to 0 (it's on the first frame).
animation:flipH()Flips an animation horizontally (left goes to right and viceversa). This means that the frames are simply drawn differently, nothing more.
Note that this method does not create a new animation. If you want to create a new one, use the clone method.
This method returns the animation, so you can do things like local a = anim8.newAnimation(g(1,'1-10'), 0.1):flipH() or local b = a:clone():flipV().
animation:flipV()Flips an animation vertically. The same rules that apply to flipH also apply here.
animation:pauseAtEnd()Moves the animation to its last frame and then pauses it.
animation:pauseAtStart()Moves the animation to its first frame and then pauses it.
animation:getDimensions()Returns the width and height of the current frame of the animation. This method assumes the frames passed to the animation are all quads (like the ones created by a grid).
animation:getFrameInfo(x,y, r, sx, sy, ox, oy, kx, ky)This functions returns the parameters that would be passed to love.graphics.draw when drawing this animation:
frame, x, y, r, sx, sy, ox, oy, kx, kyframeis the currently active frame for the animation (usually a quad produced by a grid)x,yare the same coordinates passed as parameter togetFrame(there are no changes)ris the same angle passed togetFrame, with no changes unless it isnil, in which case it becomes 0.sx,syare the scale values, with their sign changed if the animation is flipped vertically or horizontallyox,oyare the offset values, with the width or height properly substracted if the animation is flipped. 0 is used as a initial value for these calculations if nil was passed.kx,kyare the shearing factors, changed depending on the flip status.
The getFrame method can be used when working with spriteBatches. Here's how it can be used for adding & setting the corresponding quad in a spritebatch:
local id = spriteBatch:add(animation:getFrameInfo(x,y,r,sx,sy,ox,oy,kx,ky))

...

spriteBatch:set(id, animation:getFrameInfo(x,y,r,sx,sy,ox,oy,kx,ky))
You can see an example of this in the spritebatch-demo branch.
Just copy the anim8.lua file wherever you want it. Then require it wherever you need it:
local anim8 = require 'anim8'Please make sure that you read the license, too (for your convenience it's included at the beginning of the anim8.lua file).
This project uses busted for its specs. If you want to run the specs, you will have to install it first. Then just execute the following from the root folder:
busted


