This is a brief guide to extending the My-TTGO-Watch project by developing new applications. Firstly a small warning - there is no separation between the watch operating system and running applications or indeed between the various applications. Everything runs in one memory space so any small mistake in an application you make can potentially cause the system to crash, reboot lock up etc.
You might wonder if it's safe to experiment with your watch or do you risk 'bricking' it or getting into an unrecoverable situation? The good news is that I made lots of mistakes when writing software for the watch including several reboot loops and rendering the watch seemingly non responsive for a while but I was always able to recover by flashing the firmware again from my PC so based on my limited experience it seems safe to do some experimental stuff!
- PlatformIO (installed as per https://docs.platformio.org/en/latest/core/installation.html)
- Sharandac Firmware https://github.com/sharandac/My-TTGO-Watch
- Your text editor of choice
The project is structured as follows:
My-TTGO-Watch
|
src
|--- my-ttgo-watch.ino                                   // <--- main project file
 '-- app                                                 // <--- 'apps'
      '-- alarm_clock
      '-- crypto_ticker
      '-- example_app
      '-- IRController
      '-- osmand
      '-- powermeter
      '-- stopwatch
      '-- weather
 '-- ftpserver                                           // <--- FTP server
 '-- gui                                                 // <--- GUI elements
       '-- font
       '-- images
       '-- mainbar
       '-- png_decoder
       '-- sound
 '-- hardware                                            // <--- hardware interfaces (also memory management, OTA updates etc)
        '-- driver
 '-- webserver
The project is built from a number of different components but two key ones are:
- LVGL (https://lvgl.io/) - Graphics library. Important to know for apps. Well documented on their website.
- FreeRTOS (https://www.freertos.org/) - Operating system. (Might not need to know much about it unless doing weird/advanced stuff)
Adding a new app is quite straightforward and consists of the following actions:
- Add application source files under 'app' directory
- Include necessary lines in the my-ttgo-watch.ino main project file to handle setup/registration of the app
(n.b:- It is NOT necessary to perform any other actions like editing the makefile)
For example if we would like to create a simple 'soundboard' application to play certain audio files in response to button presses we would first create the folder under app to contain it:
 '-- app                                                 // <--- 'apps'
      '-- alarm_clock
      '-- crypto_ticker
      '-- example_app
      '-- IRController
      '-- osmand
      '-- powermeter
      '-- soundboard                                     // <--- added
      '-- stopwatch
      '-- weather
Next we can add the source files using either example_app in the main My-TTGO-Watch repo or the stripped down skeleton_app in this repo as a guide. A minimal app will have something like:
soundboard_app.cpp                                      // responsible for setup of the app and registration of it's icon etc
soundboard_app.h                                        // header file for the above
soundboard_app_main.cpp                                 // main part of the application launched when the user clicks on the icon
soundboard_app_main.h                                   // header file for the above
images/soundboard_app_64px.c                            // image assets encoded in LVGL format (more on this in separate section below)
It's possible to add additional tiles for e.g settings (example_app shows how to do this) and in that case there will be additional source files for those.
Rather than do everything 'from scratch' you can copy example_app or skeleton_app and simply rename the files as appropriate. Next replace the example app name where it appears in each file (using e.g the sed command or 'find and replace all' in your text editor) Lastly you need to replace the app icon with something custom using this process:
The LVGL project provide an image convertor at https://lvgl.io/tools/imageconverter which can be used to convert images into the appropriate C array format for LVGL.
Start by creating a source image in the following format:
- 64px x 64px
- PNG format
- Transparent background
Then in the image convertor choose:
- True color with alpha
- Output format C array
and give the image an appropriate name such as soundboard_app_64px and click 'convert' and a file will be generated and saved to your computer with the .c extension.
The generated file may need adjusting in the header as follows:
#if defined(LV_LVGL_H_INCLUDE_SIMPLE)
#include "lvgl.h"
#else
#include "../lvgl/lvgl.h"
#endif
may need to be changed to:
#include "lvgl/lvgl.h"
The generated file should go in the images directory within your app.
'Registering' the app is simply a matter of including your header file in the main watch project file and calling your setup function.
In my-ttgo-watch.ino you need to add your header:
#include "app/weather/weather.h"
#include "app/stopwatch/stopwatch_app.h"
#include "app/alarm_clock/alarm_clock.h"
#include "app/crypto_ticker/crypto_ticker.h"
#include "app/example_app/example_app.h"
#include "app/osmand/osmand_app.h"
#include "app/soundboard/soundboard_app.h"                 // <-- added
#include "app/IRController/IRController.h"
#include "app/powermeter/powermeter_app.h"
The lower down in the file:
    /*
     * add apps and widgets here!!!
     */
    weather_app_setup();
    stopwatch_app_setup();
    alarm_clock_setup();
    crypto_ticker_setup();
    example_app_setup();
    osmand_app_setup();
    soundboard_app_setup();                                  // <-- added
    IRController_setup();
    powermeter_app_setup();
The setup function registers your apps tiles and performs setup on them (perhaps just the one main tile or optionally others like setup, config etc) and also adds an icon for the app on the launcher (registering a callback function for when it's clicked) and may also perform some actions like loading a saved config or registering a system widget.
// setup routine for example app
void soundboard_app_setup( void ) {

    // add a tile for the main part of the application
    soundboard_app_main_tile_num = mainbar_add_app_tile( 1, 1, "Soundboard" );

    // register the icon in the launcher with associated callback
    // n.b :- images declared like:
    // LV_IMG_DECLARE(soundboard_64px);
    soundboard_app = app_register( "sound\nboard", &soundboard_64px, enter_soundboard_app_event_cb );

    // perform main tile setup actions
    soundboard_main_tile_setup( soundboard_app_main_tile_num );
}
The callback handler for launching the app is something pretty generic like this:
static void enter_soundboard_app_event_cb( lv_obj_t * obj, lv_event_t event ) {
    switch( event ) {
        case( LV_EVENT_CLICKED ):       statusbar_hide( true );
                                        mainbar_jump_to_tilenumber( soundboard_app_main_tile_num, LV_ANIM_OFF );
                                        break;
    }
}
The main tile setup function is the place where we can add some buttons, text labels or other LVGL widgets (per the docs at https://docs.lvgl.io/v7/en/html/widgets/index.html where examples are provided for each type)
void soundboard_app_main_setup( uint32_t tile_num ) {

    soundboard_app_main_tile = mainbar_get_tile_obj( tile_num );
    lv_style_copy( &soundboard_app_main_style, mainbar_get_style() );

    lv_obj_t * exit_btn = lv_imgbtn_create( soundboard_app_main_tile, NULL);
    lv_imgbtn_set_src(exit_btn, LV_BTN_STATE_RELEASED, &exit_32px);
    lv_imgbtn_set_src(exit_btn, LV_BTN_STATE_PRESSED, &exit_32px);
    lv_imgbtn_set_src(exit_btn, LV_BTN_STATE_CHECKED_RELEASED, &exit_32px);
    lv_imgbtn_set_src(exit_btn, LV_BTN_STATE_CHECKED_PRESSED, &exit_32px);
    lv_obj_add_style(exit_btn, LV_IMGBTN_PART_MAIN, &soundboard_app_main_style );
    lv_obj_align(exit_btn, soundboard_app_main_tile, LV_ALIGN_IN_BOTTOM_RIGHT, -10, -10 );
    lv_obj_set_event_cb( exit_btn, exit_soundboard_app_main_event_cb );
}
(n.b:- It's important to create objects in the main tile setup attached to the specific application tile - using lv_scr_act() for the active screen works ok elsewhere but will add items to the watches main time display if used here!)
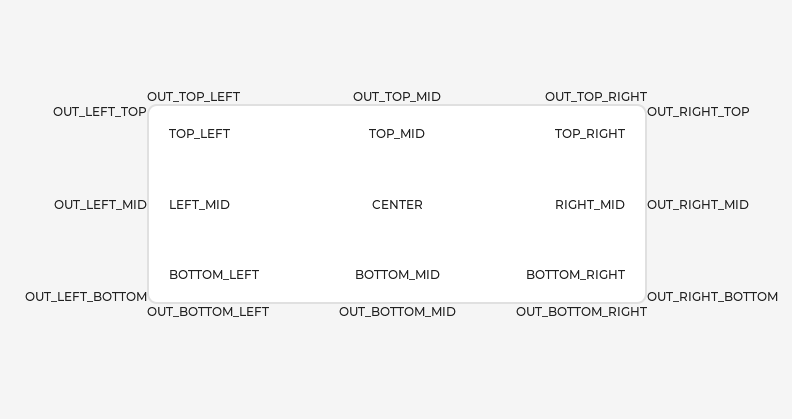
So far a button has been created in the bottom left that exits the application. It's possible to place objects elsewhere as follows:
For this example soundboard application we need to add a few more buttons to the main tile:
void soundboard_app_main_setup( uint32_t tile_num ) {

    soundboard_app_main_tile = mainbar_get_tile_obj( tile_num );
    lv_style_copy( &soundboard_app_main_style, mainbar_get_style() );

    // 0
    lv_obj_t * zero_btn = lv_imgbtn_create( soundboard_app_main_tile, NULL);
    lv_imgbtn_set_src(zero_btn, LV_BTN_STATE_RELEASED, &button_64px);
    lv_imgbtn_set_src(zero_btn, LV_BTN_STATE_PRESSED, &button_64px);
    lv_imgbtn_set_src(zero_btn, LV_BTN_STATE_CHECKED_RELEASED, &button_64px);
    lv_imgbtn_set_src(zero_btn, LV_BTN_STATE_CHECKED_PRESSED, &button_64px);
    lv_obj_add_style(zero_btn, LV_IMGBTN_PART_MAIN, &soundboard_app_main_style );
    lv_obj_align(zero_btn, soundboard_app_main_tile, LV_ALIGN_IN_TOP_LEFT, 0, 0 );
    lv_obj_set_event_cb( zero_btn, enter_soundboard_app_zero_event_cb );

    // 1
    lv_obj_t * one_btn = lv_imgbtn_create( soundboard_app_main_tile, NULL);
    lv_imgbtn_set_src(one_btn, LV_BTN_STATE_RELEASED, &button_64px);
    lv_imgbtn_set_src(one_btn, LV_BTN_STATE_PRESSED, &button_64px);
    lv_imgbtn_set_src(one_btn, LV_BTN_STATE_CHECKED_RELEASED, &button_64px);
    lv_imgbtn_set_src(one_btn, LV_BTN_STATE_CHECKED_PRESSED, &button_64px);
    lv_obj_add_style(one_btn, LV_IMGBTN_PART_MAIN, &soundboard_app_main_style );
    lv_obj_align(one_btn, soundboard_app_main_tile, LV_ALIGN_IN_TOP_RIGHT, 0, 0 );
    lv_obj_set_event_cb( one_btn, enter_soundboard_app_one_event_cb );

    // 2
    lv_obj_t * two_btn = lv_imgbtn_create( soundboard_app_main_tile, NULL);
    lv_imgbtn_set_src(two_btn, LV_BTN_STATE_RELEASED, &button_64px);
    lv_imgbtn_set_src(two_btn, LV_BTN_STATE_PRESSED, &button_64px);
    lv_imgbtn_set_src(two_btn, LV_BTN_STATE_CHECKED_RELEASED, &button_64px);
    lv_imgbtn_set_src(two_btn, LV_BTN_STATE_CHECKED_PRESSED, &button_64px);
    lv_obj_add_style(two_btn, LV_IMGBTN_PART_MAIN, &soundboard_app_main_style );
    lv_obj_align(two_btn, soundboard_app_main_tile, LV_ALIGN_IN_LEFT_MID, 0, 0 );
    lv_obj_set_event_cb( two_btn, enter_soundboard_app_two_event_cb );

    // 3
    lv_obj_t * three_btn = lv_imgbtn_create( soundboard_app_main_tile, NULL);
    lv_imgbtn_set_src(three_btn, LV_BTN_STATE_RELEASED, &button_64px);
    lv_imgbtn_set_src(three_btn, LV_BTN_STATE_PRESSED, &button_64px);
    lv_imgbtn_set_src(three_btn, LV_BTN_STATE_CHECKED_RELEASED, &button_64px);
    lv_imgbtn_set_src(three_btn, LV_BTN_STATE_CHECKED_PRESSED, &button_64px);
    lv_obj_add_style(three_btn, LV_IMGBTN_PART_MAIN, &soundboard_app_main_style );
    lv_obj_align(three_btn, soundboard_app_main_tile, LV_ALIGN_IN_RIGHT_MID, 0, 0 );
    lv_obj_set_event_cb( three_btn, enter_soundboard_app_three_event_cb );

    lv_obj_t * exit_btn = lv_imgbtn_create( soundboard_app_main_tile, NULL);
    lv_imgbtn_set_src(exit_btn, LV_BTN_STATE_RELEASED, &exit_32px);
    lv_imgbtn_set_src(exit_btn, LV_BTN_STATE_PRESSED, &exit_32px);
    lv_imgbtn_set_src(exit_btn, LV_BTN_STATE_CHECKED_RELEASED, &exit_32px);
    lv_imgbtn_set_src(exit_btn, LV_BTN_STATE_CHECKED_PRESSED, &exit_32px);
    lv_obj_add_style(exit_btn, LV_IMGBTN_PART_MAIN, &soundboard_app_main_style );
    lv_obj_align(exit_btn, soundboard_app_main_tile, LV_ALIGN_IN_BOTTOM_RIGHT, -10, -10 );
    lv_obj_set_event_cb( exit_btn, exit_soundboard_app_main_event_cb );
}
The next step is to add actions to the callbacks when the buttons are pressed to play mp3 files from SPIFFS. For example:
static void enter_soundboard_app_three_event_cb( lv_obj_t * obj, lv_event_t event ) {
    switch( event ) {
        case( LV_EVENT_CLICKED ):      sound_play_spiffs_mp3( "/sound3.mp3" );
                                       break;
    }
}
MP3 files should be generated with modest parameters like e.g:
- 32 kbps
- 16 kHz
- Monaural
I downloaded some sound effects in WAV format from the BBC archive at https://sound-effects.bbcrewind.co.uk and simply converted them. The most important thing seems to be keeping the paramaters set low (as if the MP3 is too high quality the watch may crash during playback)
Now the application can be built. Add the mp3 files to the data directory in the root of the My-TTGO-Watch project and run:
pio -t run uploadfs
Then build the project:
pio -t run upload
At this point the app can be launched and the interface should look like this:

To debug any issues with your application use the serial terminal. For example on Linux I connect to the watch (attached to the computer via USB cable) with:
minicom --device /dev/ttyUSB0
and here debugging messages can be viewed both from your application and also the 'guru meditation' errors produced when the OS crashes.