Home
- Super Kudos Deployment Guide
To begin, you will need:
- An Azure subscription where you can create the following kinds of resources:
- App Service
- App Service Plan
- SQL database
- Managed Identity
- Event Hubs Namespace
- Storage Account
Register two Azure AD applications in your tenant's directory:
- One for the Dashboard.
- Another for the Graph permissions.
Make sure to follow the necessary steps to register each application properly.
To get started, log in to the Azure Portal using your subscription credentials. Once you're in, navigate to the "App registrations" blade by clicking on the App registrations blade.
- Click on the New registration button, which can be found in the top toolbar of the App registrations blade.
-
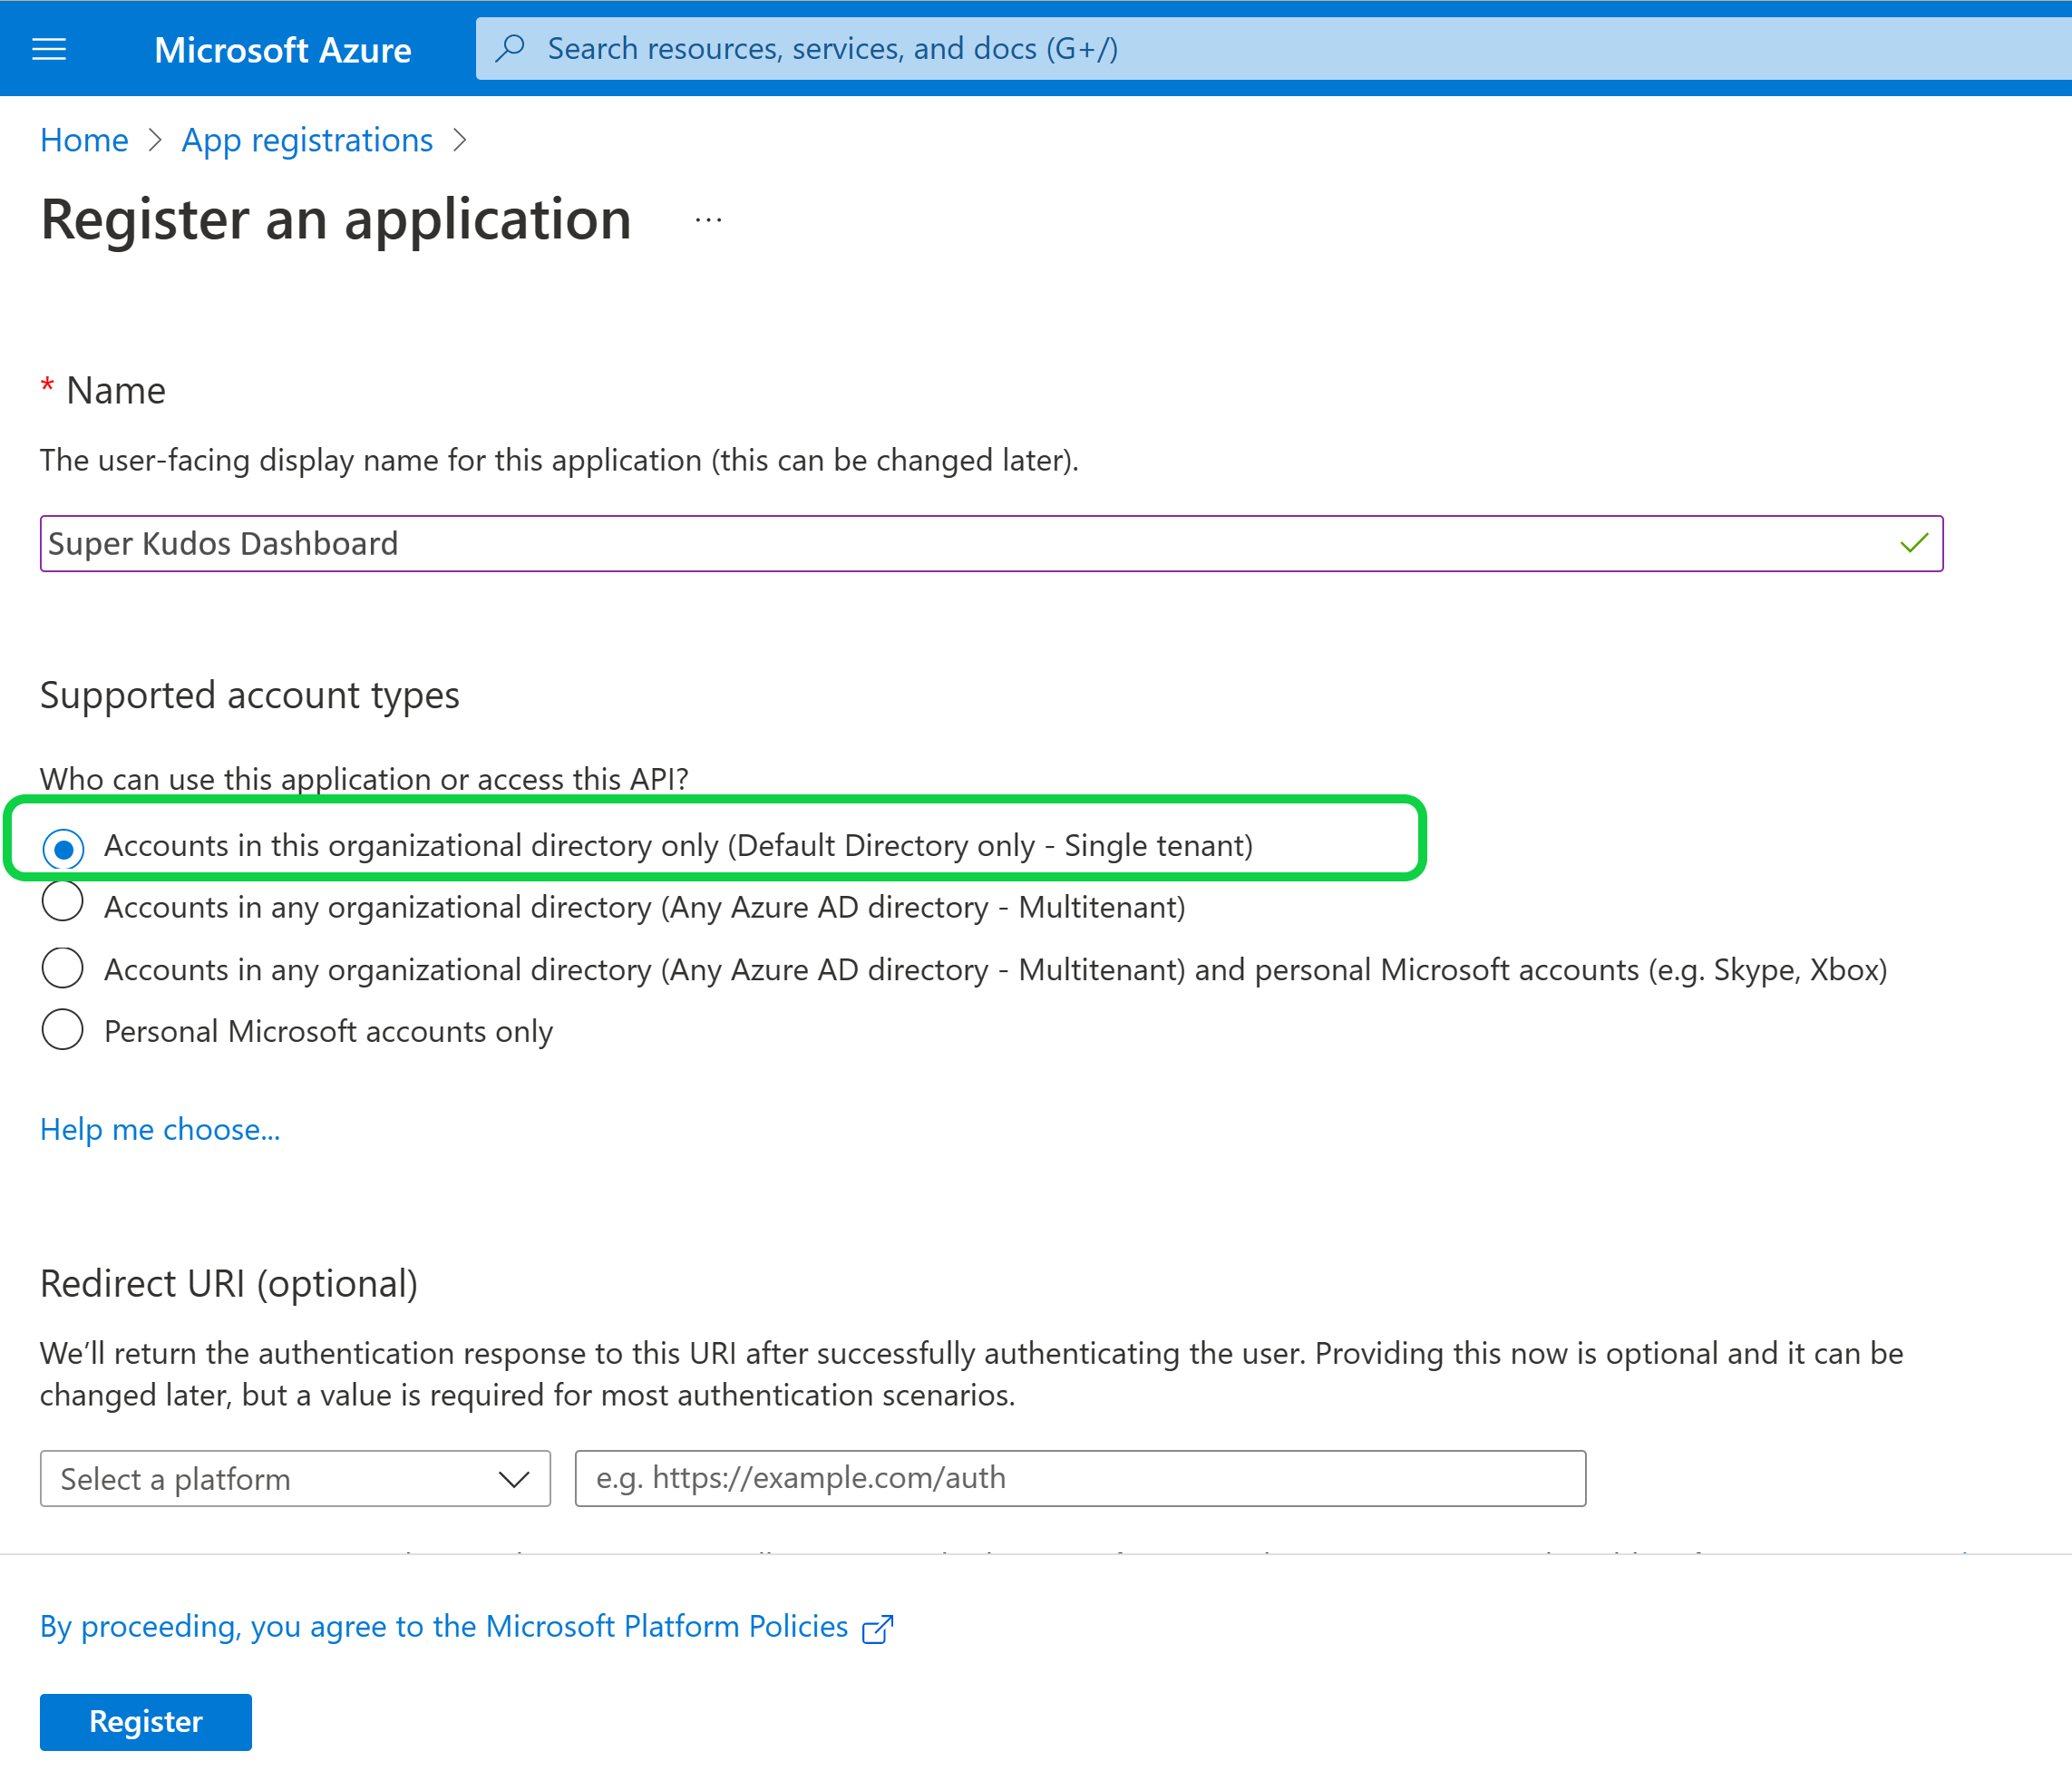
Name: If you are using the default deployment template, we recommend naming your Teams App Kudos Dashboard. However, if you have customized your deployment, you may choose a different name that aligns with your organization's naming conventions..
-
Supported account types: Under Supported account types, select Accounts in this organizational directory (Default directory only - Single tenant) as shown in the image below. This option allows only users in your organization's default directory to access the app.
-
Leave the "Redirect URI" field blank for now.
-
Click on the Register button to complete the registration process.
-
After you have successfully registered the app, you will be redirected to the app's Overview page. Here, please copy the Application (client) ID, as it will be required for later steps in the process. Additionally, please verify that the 'Supported account types' is set to 'Single organization' to ensure that the app can only be accessed by users in your organization's default directory only.

- From the Overview page of the registered app, go to the side rail in the Manage section and select the Certificates & secrets section. Here, under Client secrets', click on + New client secret to create a new secret for your app. Enter a description for the secret, and choose an expiration date based on your organization's security policies. Once you have filled out the necessary fields, click on Add to generate the new client secret. Client secrets are used to authenticate the app when making API calls to Azure services and should be treated as sensitive information.
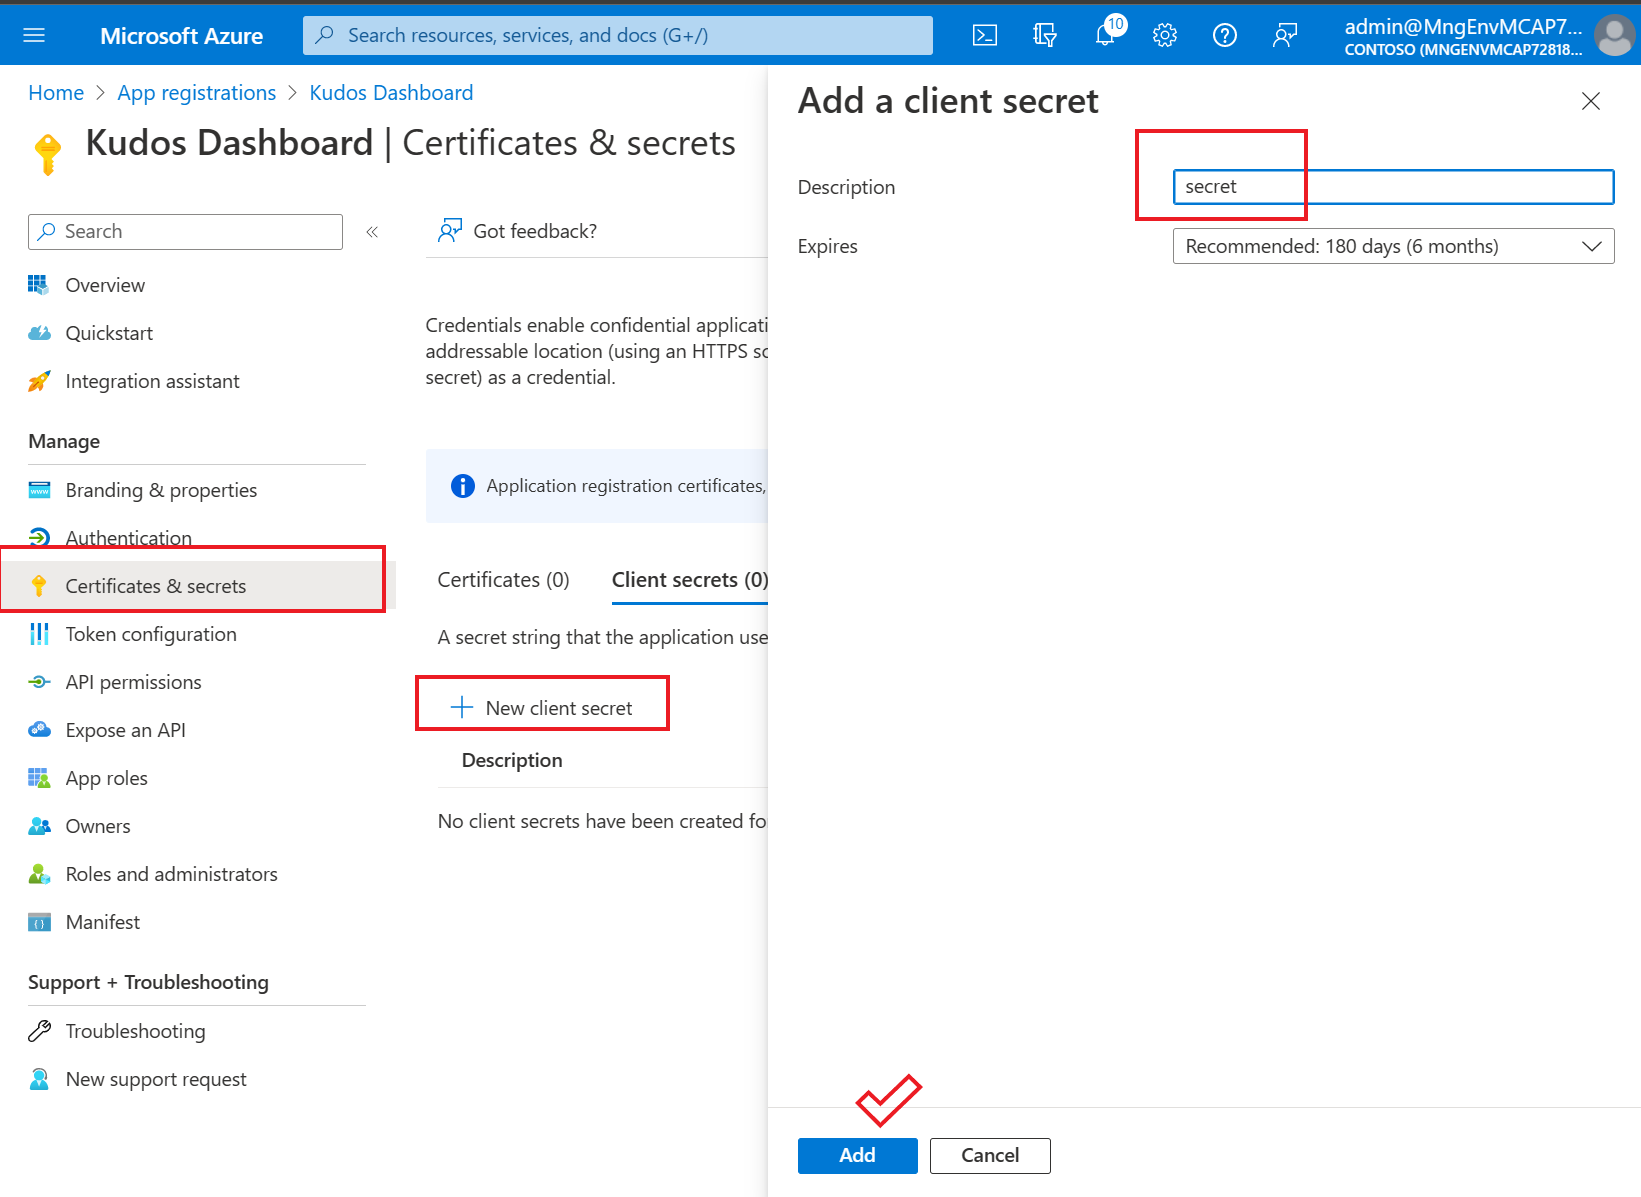
- After creating the client secret, you will be redirected to the Certificates & secrets section where you should see the new secret listed under Client secrets. Here, copy the value of the client secret as it will be required for later steps in the process. The client secret is a confidential string that is used to authenticate the app when making API calls to Azure services. It should be kept secure and not shared with unauthorized individuals.

This application registration is used by the Microsoft Graph service to get user information, like name and photo.
- Go back to "App registrations", then repeat steps 1-5 to create another Azure AD application for the notification bot.
-
Name: Name of your Teams App - if you are following the template for a default deployment, we recommend "Kudos Graph".
-
Supported account types: Select "Accounts in this organizational directory only".
-
Leave the "Redirect URI" field blank for now.
At this point you should have the following 6 values:
i. Application (client) ID for the Kudos Dashboard app. ii. Client secret for the Kudos Dashboard app. iii. Application (client) Id for the Kudos Notification. iv. Client secret for the Kudos Notification. v. Application (client) Id for the Kudos Graph. vi. Client secret for the Kudos Graph.
We recommend that you copy the values, we will need them later.
-
Click on the Deploy to Azure button below.

-
When prompted, log in to your Azure subscription.
-
Azure will create a "Custom deployment" based on the Kudos ARM template and ask you to fill in the template parameters.
Note: Please ensure that you don't use underscore (_) or space in any of the field values otherwise the deployment may fail.
-
Select a subscription and a resource group.
- We recommend creating a new resource group.
-
Enter a Base Resource Name, which the template uses to generate names for the other resources.
- The
[Base Resource Name]must be available. For example, if you selectmykudosas the base name, the namemykudosmust be available (not taken); otherwise, the deployment will fail with a Conflict error. - Please make sure to limit the base resource name with maximum of 18 characters.
- Remember the base resource name that you selected. We will need it later.
- The
-
Update the following fields in the template:
i. Dashboard Client ID: The application (client) ID of the Microsoft Teams Kudos Dashboard tab application. (from Step 1)
ii. Dashboard Client Secret: The client secret of the Microsoft Teams Kudos Dashboard tab app. (from Step 1)
iii. Graph Client ID: The application (client) ID of the Microsoft Graph app. (from Step 1)
iv. Graph Client Secret: The client secret of the Microsoft Graph app. (from Step 1)
-
Click on Review + create button to start the validation process.

- Make sure that the validation passed. Click on Create to agree with the Azure terms and conditions and to start the deployment.

- Wait for the deployment to finish.

You can also check the progress of the deployment from the "Notifications" pane of the Azure Portal. It may take up to half hour for the deployment to finish.

- Make sure that the deployment is successfully completed, and click on Go to resource group.
-
Go to App Registrations page here and open the kudos Dashboard app you created (in Step 1) from the application list.
-
Under Manage, click on Authentication to bring up authentication settings.
i. Click on Add a platform and then on Web:

ii. Add a new entry to Redirect URIs: Enter https://%appDomain%/auth-end.html for the URL e.g. https://superkudosdashboard.azurewebsites.net/auth-end.html.
iii. Click Configure to commit your changes.
iv. Click Save to commit your changes.
- Back under Manage, click on Expose an API.
i. Click on the Set link next to Application ID URI:

ii. Change the value to api://%appDomain%/appclientid e.g. api://superkudosdashboard.azurewebsites.net/5497dd82-0b52-4ab0-b0d6-e96d35d46cba.

iii. Click Save to commit your changes.
iv. Click on Add a scope, under Scopes defined by this API. In the flyout that appears, enter the following values:
- Scope name: access_as_user
- Who can consent?: Admins and users
- Admin and user consent display name: Teams can access app’s web APIs
- Admin and user consent description: Allows Teams to call the app’s web APIs as the current user.
- User consent display name: Teams can access app’s web APIs and make requests on your behalf
- User consent description: Enable Teams to call this app’s web APIs with the same rights that you have
v. Click Add scope to commit your changes.

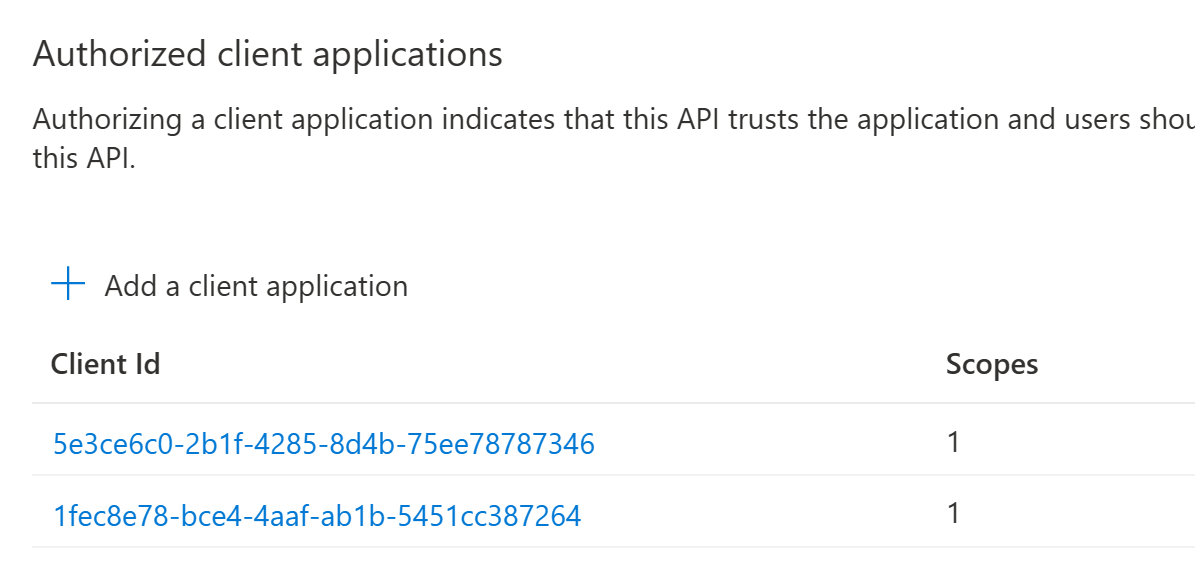
vi. Click Add a client application, under Authorized client applications. In the flyout that appears, enter the following values:
-
Client ID:
5e3ce6c0-2b1f-4285-8d4b-75ee78787346(this value is fixed and it corresponds to the Microsoft Teams Web Client) -
Authorized scopes: Select the scope that ends with
access_as_user. (There should only be 1 scope in this list.) -
Click Add application to commit your changes.
-
Client ID:
1fec8e78-bce4-4aaf-ab1b-5451cc387264(this value is fixed and it corresponds to the Microsoft Teams Desktop app) -
Authorized scopes: Select the scope that ends with
access_as_user. (There should only be 1 scope in this list.) -
Click Add application to commit your changes.
-
Go to App Registrations page here and open the Kudos Graph app you created (in Step 1) from the application list.
-
Select API Permissions blade from the left hand side.
-
Click on Add a permission button to add permission to your app.
-
Under "Commonly used Microsoft APIs", select Microsoft Graph:

-
Select Application permissions and check the following permissions:
- User.Read.All
- Directory.Read.All
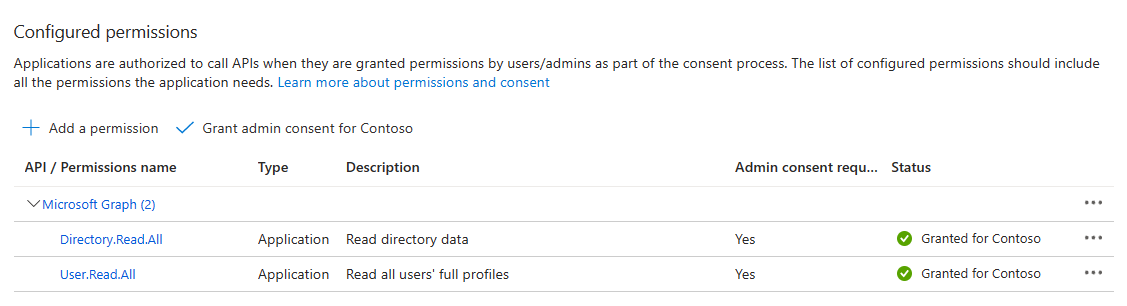
5 Click on Add Permissions to commit your changes.
Navigate to the Kudos resource group that you have deployed the resources.
-
Find the App Service that ends with the gateway sufix and click on it.
-
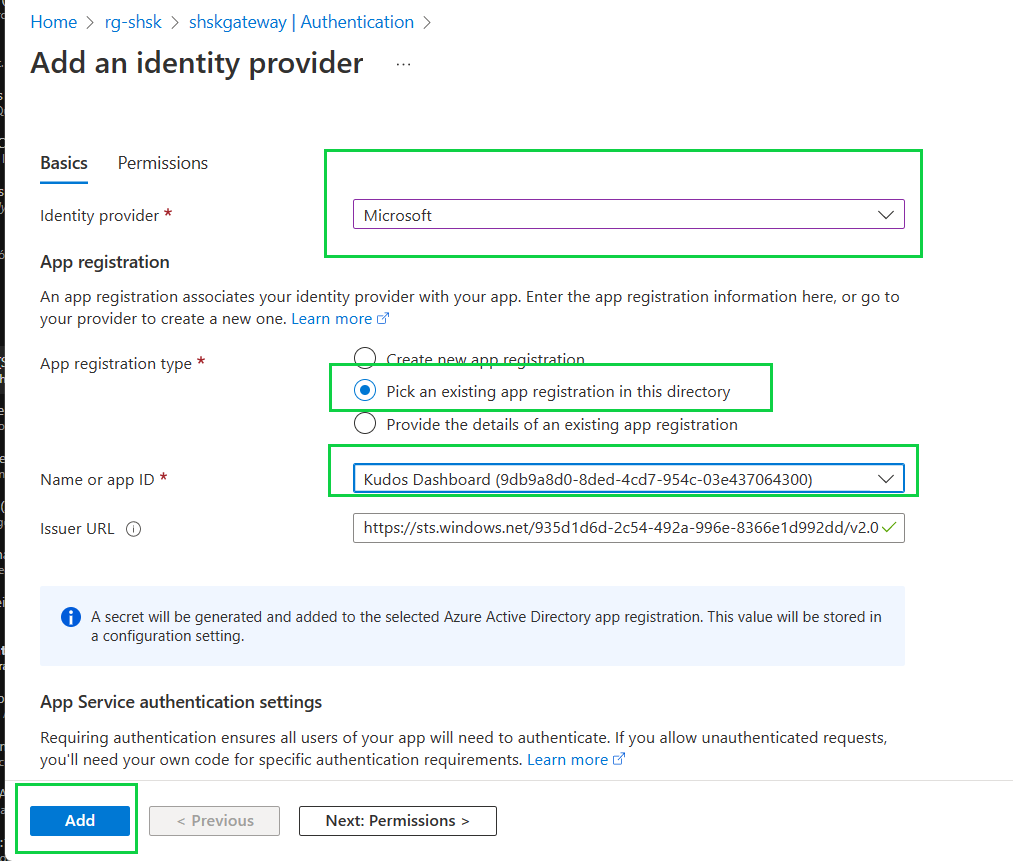
Click on the Authentication item, from the settings session, and click on Add identity provider:

-
Select Microsoft as identity provider.
-
Select the second item, Pick an existing app registration in this directory.
-
Select the App registration (the first one that you created) for the Kudos Dashboard.
-
Click on save.
-
Find the App Service that ends with the kudos suffix and click on it.
-
Repeat the steps from 2-6 from the previous Gateway session.
-
Find the App Service that ends with the graph suffix and click on it.
-
Repeat the steps from 2-6 from the previous Gateway session.
We need to create the SQL Server database.
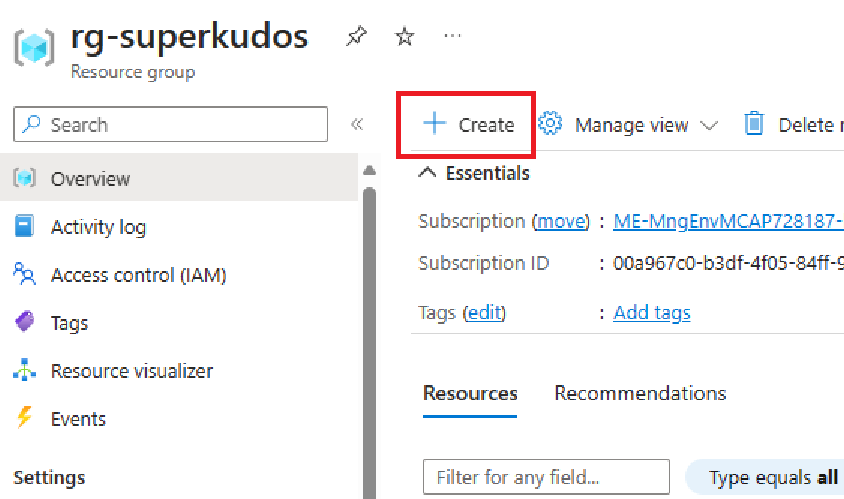
- Navigate to your resource group and click on Create to add a new resource:
- Search fro "SQL Database" and select it from the results.

- In the “SQL Database” page, click the “Create” button.

-
In the “Basics” tab of the “Create SQL Database” page, select your subscription and the resource group where you want to create the new database.
-
Enter a unique name for the new database.
-
Configure the server settings by creating a new one.
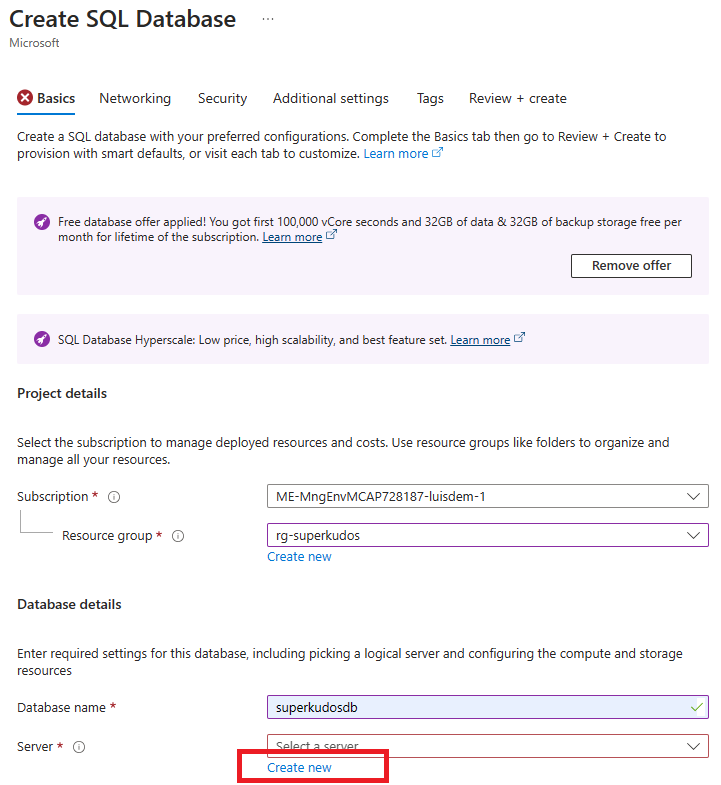
-
Enter a unique name for the new server in the “Server name” field.
-
Choose the location for the new server by selecting a region from the “Location” dropdown list.
-
Keep the “SQL Authentication” method set to “Use Azure Active Directory only authentication”.
-
Click on the “Set admin” button and choose one user available in your environment from the list of users.
-
Click the “Select” button to save the new server settings.
After completing these steps, the new SQL Database server will be created with the specified name, location, and authentication method.
- Click on the “Review + create” button to review your settings. Then, click on the “Create” button to create the new database. The deployment process will start, and after it is complete, the new Azure SQL Database will be added to the selected resource group.
To provide access to the App Services to a Database, you can follow these steps:
- In the SQL Server, click on Access Control (IAM) and then click on Add role assignment.
- Click on the Privileged administrator roles tab, select Contributor and click on Next.
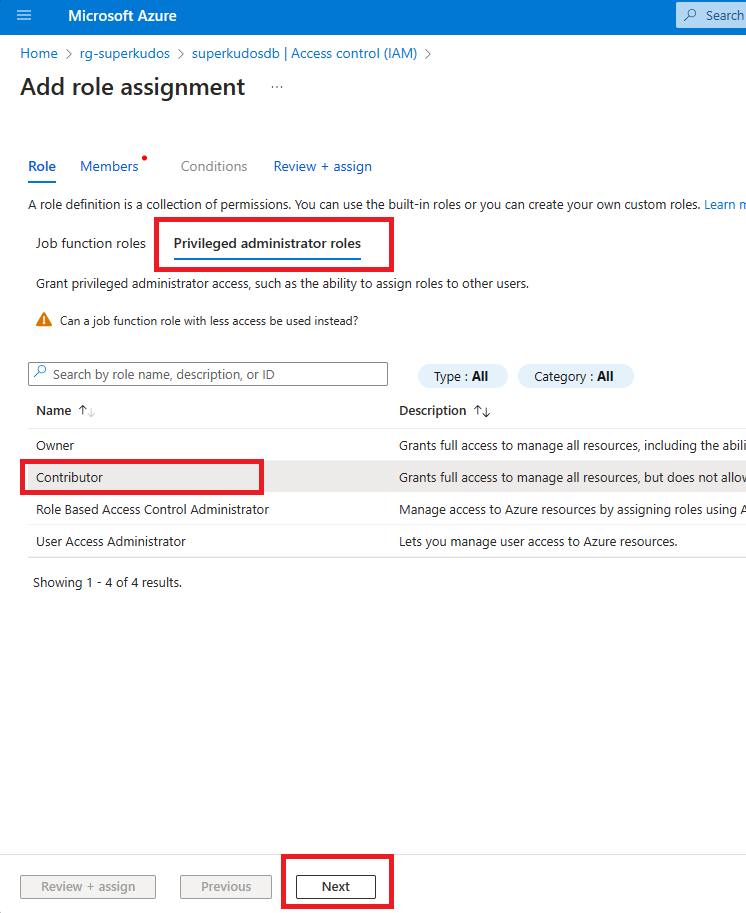
- Select Managed Identity and then click on Select members.
- In the Managed identity combo, click on App Service.
- In the Select combo, select the 3 app services: Graph and Kudos.

- Click on Select and then on Review + assign.
This will provide the selected App Services with access to the Database.
To set the SQL Database Connection String, you can follow these steps:
-
Navigate to SQL databases and click on the database.
-
Click on Connection strings and copy the value of the first session ADO.NET (Microsoft Entra passwordless authentication).
-
Navigate to the msgraph App Service (in your case, superkudosmsgraph) and click on Configuration.
-
In the Application session tab, search for the setting ConnectionStrings__AZURE_SQL_CONNECTIONSTRING and click on it.
-
In the Value field, add the connection string value that was copied.

This will set the SQL Database Connection String for the msgraph App Service.
🔁 Repeat those steps for the App Services Kudos.
To create a user in the database for the user of each app service, you can follow these steps:
- Click on Networking and then click on Selected networks from public network access.
- In the Firewall rules session, click on Add your client IPv4 address and then click on Save.
- Navigate to SQL databases and click on the database.
- Click on Query Editor (preview) and access the database through your admin user.

- Run the following command to create the user for the MS Graph App Service and to grant its access. Replace the superkudosmsgraph by the user for your app service:
create user superkudosmsgraph from EXTERNAL PROVIDER

ALTER ROLE db_datareader ADD MEMBER superkudosmsgraph;
ALTER ROLE db_datawriter ADD MEMBER superkudosmsgraph;
ALTER ROLE db_ddladmin ADD MEMBER superkudosmsgraph;
🔁 Repeat those steps for the App Service Kudos.
To add the badges reward based on the number of kudos sent, execute the following SQL commands:
INSERT INTO BadgeRules ([Description], ImageName, ActionType, Initial, Final) VALUES ('First Kudos Sent', '1kudossent.png', 'send_kudos', 1, 9)
INSERT INTO BadgeRules ([Description], ImageName, ActionType, Initial, Final) VALUES ('10 Kudos sent', '1kudossent.png', 'send_kudos', 10, 49)
INSERT INTO BadgeRules ([Description], ImageName, ActionType, Initial, Final) VALUES ('50 kudos sent', '10kudossent.png', 'send_kudos', 50, 99)
INSERT INTO BadgeRules ([Description], ImageName, ActionType, Initial, Final) VALUES ('100 kudos sent', '100kudossent.png', 'send_kudos', 100, null)
INSERT INTO BadgeRules ([Description], ImageName, ActionType, Initial, Final) VALUES ('10 kudos sent', '10kudosreceived.png', 'received_kudos', 10, 49)
INSERT INTO BadgeRules ([Description], ImageName, ActionType, Initial, Final) VALUES ('50 kudos sent', '50kudosreceived.png', 'received_kudos', 50, 99)
INSERT INTO BadgeRules ([Description], ImageName, ActionType, Initial, Final) VALUES ('100 kudos sent', '100kudosreceived.png', 'received_kudos', 100, null)-
Navigate to the storage account that finishes with storage, in my case, superkudosstorage.
-
Click on Containers and then on ** + Container**.
-
Name it images and click create.

- Click on the images container.

- Click on Upload, select the images from the Badges folder and click on Upload.

-
Navigate to the storage account that ends with storage, in my case, superkudosstorage.
-
Click on Access Keys.
-
Copy the Connection String.

-
Navigate to the App Service Super Kudos Dashboard.
-
Click on Configurations.
-
Click on the Storage_ConnectionString and paste the connection string value that you copied.
-
Click Ok and then Save.
Run the following code to create the procedure:
SET ANSI_NULLS ON
GO
SET QUOTED_IDENTIFIER ON
GO
CREATE PROCEDURE [dbo].[SP_GETTOPCONTRIBUTORS]
  @top int = 10,
  @ManagerId uniqueidentifier = null
AS

  DECLARE @ScorePointsId INT,
      @KudosSent INT,
      @KudosReceived INT,
      @LikesSent INT,
      @LikesReceived INT,
      @CommentsSent INT,
      @CommentsReceived INT;

  SELECT TOP 1
      @ScorePointsId = ScorePointsId,
      @KudosSent = KudosSent,
      @KudosReceived = KudosReceived,
      @LikesSent = LikesSent,
      @LikesReceived = LikesReceived,
      @CommentsSent = CommentsSent,
      @CommentsReceived = CommentsReceived
  FROM dbo.ScorePoints;

  WITH UserPoints AS (


SELECT
  KR.ToPersonId user_id,
  SUM(@KudosReceived) AS total_points
FROM
  Kudos K
  JOIN KudosReceiver KR
      ON K.KudosId = KR.KudosId
WHERE
  KR.ToPersonId IS NOT NULL
GROUP BY
  KR.ToPersonId

UNION ALL
  SELECT
  frompersonid AS user_id,
  SUM(@KudosSent) AS total_points
FROM
  Kudos k

WHERE
  k.frompersonid IS NOT NULL
GROUP BY
  frompersonid
UNION ALL

 SELECT
  PersonId,
  SUM(@LikesSent) AS total_points
FROM
  KudosLike l

WHERE
  l.PersonId IS NOT NULL
GROUP BY
  PersonId

UNION ALL

SELECT
      KR.toPersonId AS user_id,
  SUM(@LikesReceived) AS total_points
  FROM
      DBO.KUDOS K
  JOIN KUDOSLIKE KL
      ON K.KUDOSID = KL.KUDOSID

  JOIN KudosReceiver KR
      ON K.KudosId = KR.KudosId
WHERE
  KR.ToPersonId IS NOT NULL
GROUP BY
  KR.toPersonId

UNION ALL

SELECT
  FromPersonId,
  SUM(@CommentsSent) AS total_points
FROM
  Comments r

WHERE
  r.FromPersonId IS NOT NULL
GROUP BY
  FromPersonId

  UNION ALL

  SELECT
      KR.toPersonId AS user_id,
  SUM(@CommentsReceived) AS total_points
  FROM
      DBO.KUDOS K
  JOIN Comments KC
      ON K.KUDOSID = KC.KUDOSID

  JOIN KudosReceiver KR
      ON K.KudosId = KR.KudosId
  WHERE
      KR.toPersonId IS NOT NULL
GROUP BY
  KR.toPersonId


)
SELECT
up.user_id as UserId,
p.DisplayName,
ISNULL(p.Photo96x96,'') Photo,
SUM(up.total_points) AS TotalPoints
FROM
UserPoints up
INNER JOIN UserProfiles p
on up.user_id = p.UserProfileId
WHERE (@ManagerId is null or p.ManagerId = @ManagerId)
GROUP BY
up.user_id,p.DisplayName,
p.Photo96x96
ORDER BY
TotalPoints DESC
GO
Grant the execution permission to the user of the kudos app service:
GRANT EXECUTE ON OBJECT::dbo.SP_GETTOPCONTRIBUTORS TO superkudoskudos;
I need to fix it, but for now, let's remove the following foreign key:
alter table AdminUsers drop constraint FK_AdminUsers_UserProfiles_UserProfileId
alter table [dbo].[Kudos] drop constraint FK_Kudos_UserProfiles_FromPersonId
alter table [dbo].[KudosReceiver] drop constraint FK_KudosReceiver_UserProfiles_ToPersonId
alter table [dbo].[KudosLike] drop constraint FK_KudosLike_UserProfiles_PersonIdKudos app comes with 2 applications – Kudos Dashboard Tab app and Kudos Notification bot app. The Tab application is intended for employees to send and visualize kudos and the Agent notification application is intended for employees who want to receive kudos messages notifications.
Make sure you have cloned the app repository locally.
- Copy the
MyKudosDashboard\Templates\Dashboard\folder to another folder.

-
Open the manifest.json file and change the
<<kudosDashboardAppDomain>>placeholder to be the%appDomain%of the kudos dashboard app service value e.g. "kudosdashboard.azurewebsites.net". -
Change the
<<kudosDashboardClientId>>placeholder to be the%appClientId%value - this is your Kudos Dashboard AD application's ID created in the first step, e.g. 5497dd82-0b52-4ab0-b0d6-e96d35d46cba. -
Save the
manifest.json.
Follows my sample:
{
    "$schema": "https://developer.microsoft.com/en-us/json-schemas/teams/v1.13/MicrosoftTeams.schema.json",
    "manifestVersion": "1.13",
    "version": "1.0.0",
    "id": "fb65077d-ee8e-4755-a0fa-e646e0109484",
    "packageName": "com.microsoft.teams.kudos.tabapp",
    "developer": {
        "name": "Luis Demetrio",
        "websiteUrl": "https://github.com/luishdemetrio/MyKudosDashboard",
        "privacyUrl": "https://github.com/luishdemetrio/MyKudosDashboard",
        "termsOfUseUrl": "https://github.com/luishdemetrio/MyKudosDashboard"
    },
    "icons": {
        "color": "color.png",
        "outline": "outline.png"
    },
    "name": {
      "short": "Super Kudos",
      "full": "Allows employees to recognize and appreciate each other's efforts in the workplace."
    },
    "description": {
        "short": "Super Kudos",
        "full": "Allows employees to recognize and appreciate each other's efforts in the workplace."
    },
    "accentColor": "#FFFFFF",
    "bots": [],
    "composeExtensions": [],
    "configurableTabs": [
        {
            "configurationUrl": "https://superkudosdashboard.azurewebsites.net/config",
            "canUpdateConfiguration": true,
            "scopes": [
                "team",
                "groupchat"
            ]
        }
    ],
    "staticTabs": [
        {
            "entityId": "index",
            "name": "Personal Tab",
            "contentUrl": "https://superkudosdashboard.azurewebsites.net/tab",
            "websiteUrl": "https://superkudosdashboard.azurewebsites.net/tab",
            "scopes": [
                "personal"
            ]
        }
    ],
    "permissions": [
        "identity",
        "messageTeamMembers"
    ],
    "validDomains": [
        "https://superkudosdashboard.azurewebsites.net"
    ],
    "webApplicationInfo": {
        "id": "5497dd82-0b52-4ab0-b0d6-e96d35d46cba",
        "resource": "api://superkudosdashboard.azurewebsites.net/5497dd82-0b52-4ab0-b0d6-e96d35d46cba"
    }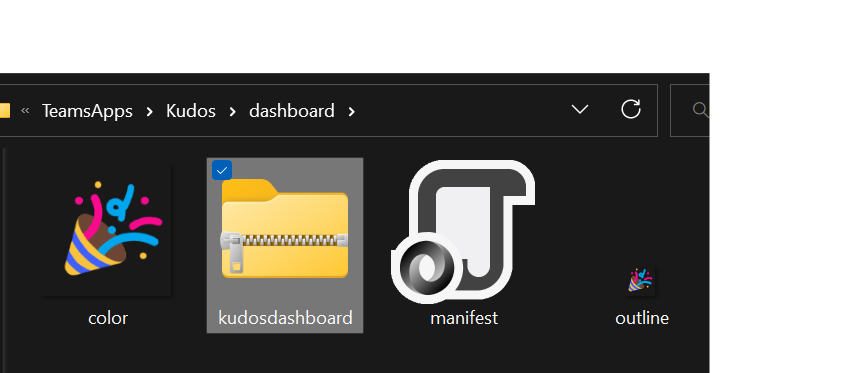
}- Create a ZIP package with the
manifest.json,color.png, andoutline.png. The two image files are the icons for your app in Teams.- Name this package
kudosdashboard.zip, so you know that this is the app for the Kudos Dashboard tab. - Make sure that the 3 files are the top level of the ZIP package, with no nested folders.
- Name this package
- Copy the
MyKudosDashboard\Templates\notification\folder to another folder.

-
Change the
<<botId>>placeholder to be the client id of the Kudos Notification bot app created on the step 1, e.g. "74232144-cede-4a57-a813-b07a6553ab66". -
Add the validDomains setting to be the
%appDomain%value of your bot web application, e.g. "https://kudosnotification.azurewebsites.net". -
Save the
manifest.json.
Follows my sample:
{
  "$schema": "https://developer.microsoft.com/en-us/json-schemas/teams/v1.14/MicrosoftTeams.schema.json",
  "manifestVersion": "1.14",
  "version": "1.0.0",
  "id": "ae64e05c-e357-428a-8d04-e4c3b650cc56",
  "packageName": "com.microsoft.teams.extension",
  "developer": {
    "name": "Luis Demetrio",
    "websiteUrl": "https://github.com/luishdemetrio/MyKudosDashboard",
    "privacyUrl": "https://github.com/luishdemetrio/MyKudosDashboard",
    "termsOfUseUrl": "https://github.com/luishdemetrio/MyKudosDashboard"
  },
  "icons": {
    "color": "color.png",
    "outline": "outline.png"
  },
  "name": {
    "short": "Kudos",
    "full": "Allows employees to recognize and appreciate each other's efforts in the workplace."
  },
  "description": {
    "short": "Kudos",
    "full": "Allows employees to recognize and appreciate each other's efforts in the workplace."
  },
  "accentColor": "#FFFFFF",
  "bots": [
    {
      "botId": "74232144-cede-4a57-a813-b07a6553ab66",
      "scopes": [
        "personal",
        "team",
        "groupchat"
      ],
      "supportsFiles": false,
      "isNotificationOnly": false
    }
  ],
  "composeExtensions": [],
  "configurableTabs": [],
  "staticTabs": [],
  "permissions": [
    "identity",
    "messageTeamMembers"
  ],
  "validDomains": [
    "https://kudosnotification.azurewebsites.net"
  ]
}- Create a ZIP package with the
manifest.json,color.png, andoutline.png. The two image files are the icons for your app in Teams.- Name this package
kudosnotification.zip, so you know that this is the bot for the Kudos Notification. - Make sure that the 3 files are the top level of the ZIP package, with no nested folders.
- Name this package
- Open Microsoft Teams, click on Apps, manage your Apps and Upload an App.

For more information, please check this post https://learn.microsoft.com/en-us/microsoftteams/upload-custom-apps
- Click on the Upload a custom app item from the flyout that will appear:

- Select the ZIP package that you have created in the previous step:

- Click on Add:

- Repeat the steps of the previous session for the Kudos Notification Bot.