Framework for NeoPixel lightstrips to be controlled by an Apache2 Webserver on a Raspberry Pi B+ via PHP.
Stay up to date with the newest changes! Check out the changelog.
Connect raspberry pi to mobile hotspot only. If the raspberry pi was previously connected to a wifi/ethernet connection, edit /etc/wpa_supplicant/wpa_supplicant.conf to only include the mobile hotspot's credentials. Now, whenever the pi is powered on, it looks for that network and auto connects.
Open a terminal and type:
ifconfig
Take a note of where it says "inet" under the section labeled
wlan0
The number in question should look something like "172.16.123.12." This is the ip address of the raspberry pi. It's important, and we'll use this later.
Go to the browser of your choice and type in:
http://your pi's ip address/
Go to the iPhone app and type in the ip address that we looked at before in the field.
Go to the Android app and type in the ip address that we looked at before in the field.
Select the light mode based on the lists provided, but remember to turn off the lights when you're done!
The raspberry pi is an incredibly versatile machine. It's low cost and highly efficient. It can run headless on a full desktop version of Linux. Certian boards have bluetooth connectivity and wifi chip built in. I love this machine with a passion, and I wanted to explore what the pi could do for me. It hasn't let me down yet.
Our objectives are relatively simple, and can be read in the requirements. Our design can be seen in the design document. Working test plans can be seen in the wiki. MUCH more information about how I set everything up is in those documents, along with wiring diagrams, noted vulnerabilities, and constraints.
Essentially, we're using a mobile phone's wifi hotspot to send information to the raspberry pi and NeoPixel light strips. Why can't we use bluetooth/OBEX server? Bluetooth is incredibly hard to understand (despite it's ease of use on the user's end) and hard to validate with iPhones. OBEX server capabilites are only easily available on Android phones, as well. I could convert the pi into a wireless access point and connect a mobile device to that wifi access point to send commands to the pi, but that takes away internet capabilities from the user's mobile device. I couldn't very well make a hard P2P connection, because that would also take away the user's internet connectivity. My options were limited.
I ended up connecting the raspberry pi to the mobile device's hotspot (thus creating a LAN with the mobile device + pi, and keeping internet connectivity). With the LAN network, I was able to access the pi's apache webserver and using php's $_GET functionality, I was able to send start and stop specific python scripts that controlled the NeoPixel lightstrips.
Read the design document for a more technical description of what I did, and wiring diagrams.
Wire up the NeoPixel strip first. To do that, you need
- rosin core solder DO NOT USE ANYTHING ELSE
- soldering iron
- M2M, M2F, F2F wires that can hold ~5V
- wire strippers
- electrical tape/wire nut
- a steady hand
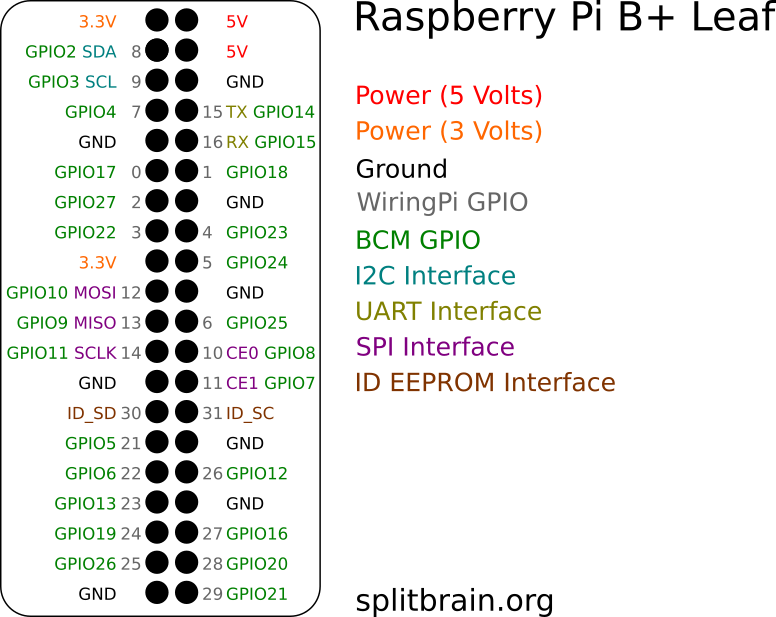
NeoPixel light strips come with GND, 5V, Din, and DGND wires. I wanted to connect the 5V and GND to a breadboard to free up space on the pi's GPIO pins, so I can have space for more lightstrips in the future. I connected the Din and DGND directly to the raspberry pi's GPIO pins. In my case I used a pi 3B+, and followed this diagram https://raw.githubusercontent.com/splitbrain/rpibplusleaf/master/rpiblusleaf.png
I then set up and powered the breadboard. Check the design document to see how I did that.
After soldering and making sure that the soldering was covered by electrical tape/wire nuts, I attached the 5V and GND to the breadboard, the Din to the GPIO pin of my choice, and the DGND to a GND pin on the pi. I think I can connect a DGND to a GND on the breadboard, but I didn't want to take any chances on my first go-round.
Make sure your soldering is covered, and do it in a place that you're okay with catching on fire! You don't know what's going to happen, especially if you're inexperienced with soldering like me.
Enable I2C by typing in the terminal:
sudo raspi-config
Enable I2C. The prompt will ask to reboot. Do so now.
To control NeoPixels, I used a python library called Adafruit CircuitPython NeoPixel found here. It's important to note that the library depends on Adafruit CircuitPython, which can be found here.
Time to test the lightstrip for the first time!
It's extremely important to note that CircuitPython NeoPixel are Python3.x scripts must be run as root. This is because the scripts access GPIO pins directly. If you don't have Python3.x, get it now.
Navigate to wherever you cloned the CircuitPython NeoPixel library and navigate to the "examples" folder. Type in:
sudo python3 neopixel_simpletest.py
Congratulations!
If you get an error, make sure you have python3 installed. Make sure your libraries were installed correctly. Check your wiring again (that can get confusing).
Installing a webserver is relatively easy. Type:
sudo apt-get update
sudo apt-get upgrade
sudo apt-get install apache2 -y
Then, install php7.0:
sudo apt-get php
Test out the webserver by going to "http://localhost" or "http://theipaddressoftheraspberrypi/". It should appear with the apache2 page saying the webserver is working. If you want a hostname to call your pi, to connect to something fancier, I suggest following this tutorial. For some reason, I was having trouble connecting directly to the pi's hostname when testing the webserver on the LAN on a mobile phone, but I got it working using the ip address (using the hostname on a PC worked flawlessly, oddly enough).
On the pi's side, everything will be installed under "/var/www/html".
We're almost there! Type:
cd /var/www
git clone https://github.com/moshulu/sno
This clones this repository into the file system, so the webserver can read it. It should automatically set the homepage as index.php instead of index.html.
Remember when we installed the NeoPixel CircuitPython library, and we said that commands must be run as the root user? Well, we've gotta give permissions to users that connect to the webserver to run commands with "sudo" in them!
Type in a command prompt:
sudo visudo
...and all the way at the bottom of the file type in:
www-data ALL = NOPASSWD: ALL
That should do it.
Check that you have all of these things done:
- Hotspot enabled
- Pi connected to the hotspot
Now you can go to the sno website and try to test the lightstrips with the scripts provided in this repository. Everything is powered by PHP $_GET calls, which execute python scripts using the NeoPixel library.