This repository has been archived. There will likely be no further development on the project and security vulnerabilities may be unaddressed.
The Router Mesh is the second of the three models found in the NGINX Microservices Reference Architecture (MRA).
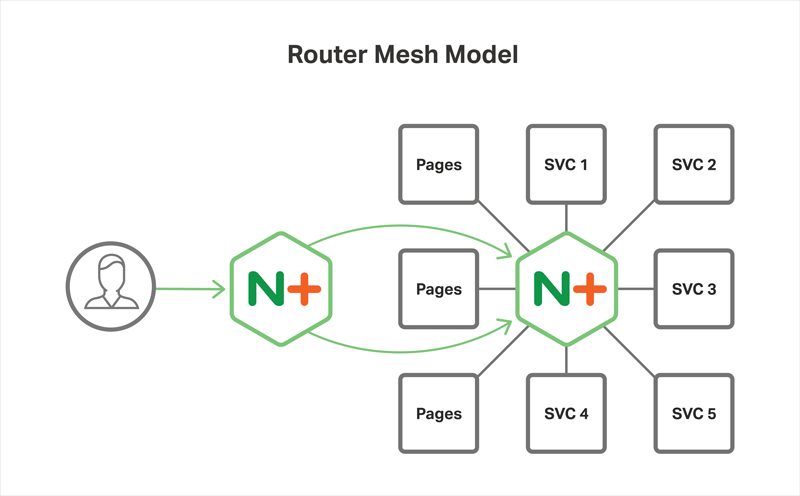
The Router Mesh places NGINX as a reverse proxy server in front of application servers in addition to a single instance of NGINX or NGINX Plus which is configured to route requests to all of the microservices in the system.
When deploying the Router Mesh Architecture, you can use open source NGINX, NGINX Plus, or a combination of the two. However, a deployment with open source NGINX is suitable only for test or development use cases, because NGINX does not support service discovery in a way that makes it practical to scale or change the IP addresses of microservices. For more details, see Deploying with NGINX Plus.
This repository consists of a single docker-compose.yml file which creates four containers, each with their own Dockerfile.
-
Proxy
- The proxy container simply runs NGINX as a reverse proxy. This is the public facing container which handles requests from clients. The requests are routed to the service in the web container
-
Router Mesh
- As you might expect by its name, the Router Mesh container is the core of the Router Mesh Architecture. The Router Mesh instance of NGINX is configured with connection information for all of the services in the architecture, and manages requests between them.
-
Web
- The web container is a simple PHP application consisting of a single web page rendered dynamically by a twig template served by the PHP 5 built-in server. The content for the template comes from a request that the PHP class makes to the backend container
-
Backend
- The backend container is a simple rails app that runs on unicorn. Requests to the
/backendroute will render the static content that is defined in the app.rb.
- The backend container is a simple rails app that runs on unicorn. Requests to the
- Git
- Docker 1.13.0+
- NGINX Plus Developer License, if using NGINX Plus in a test or development environment (see Deploying with NGINX Plus)
-
Clone the repository and change into the project directory. You can also download the repository as a ZIP file from here.
git clone git@github.com:nginxinc/router-mesh-architecture.git cd router-mesh-architecture -
Build the microservice images
docker-compose build -
Run the application
docker-compose up -
Wait for log output from the containers to appear in the shell/terminal, indicating that they are up and running.
-
Open a browser and navigate to https://localhost/.
-
The browser will display an SSL warning because the build process creates a self-signed certificate. You can safely dismiss this warning in order to view the main page.
After you dismiss the warning, this appears in the browser window:
The shell/terminal window where you ran the docker-compose command will contain output from the NGINX instances running in the containers, indicating that the instances are handling requests.
To gracefully shutdown the containers and return to the command prompt, type ctrl-c.
Any time you want to restart the containers, use the docker-compose command in the directory which contains the docker-compose.yml file.
For production deployments of the Router Mesh, you need to run NGINX Plus instead of open source NGINX because the open source version does not support service discovery in a way that makes it practical to scale well or adjust to changes in the IP addresses and port numbers of microservices. Specifically, port numbers are usually assigned dynamically to microservices running in containers, and open source NGINX does not support DNS SRV records which include the necessary port information. For a thorough discussion of service discovery in NGINX and NGINX Plus, see our blog.
You can, of course, use NGINX Plus in a development or test environment as well as in production. For development and test use cases, you qualify for a free NGINX Plus Developer License, which you can request here. For production use cases, you must have a paid NGINX Plus subscription.
To deploy the Router Mesh with NGINX Plus, first perform the steps in Deploying with Open Source NGINX then, perform the following steps:
Download the nginx-repo.crt and nginx-repo.key files for your NGINX Plus Developer License or subscription, and move them to the root directory of this project. You can then copy both of these files to the /etc/nginx/ssl directory of each microservice using the commands below:
cp nginx-repo.crt nginx-repo.key <path-to-repository>/router-mesh-architecture/proxy/etc/ssl/nginx
cp nginx-repo.crt nginx-repo.key <path-to-repository>/router-mesh-architecture/router-mesh/etc/ssl/nginx
You will also need to modify each Dockerfile to install NGINX Plus. In each Dockerfile, change the value of the USE_NGINX_PLUS environment variable from false to true
ENV USE_NGINX_PLUS=true
The locations of the Dockerfiles with the environment variable are:
proxy/Dockerfile
router-mesh/Dockerfile
In this early release of the Router Mesh repository, your SSL certificate and key files must be named certificate.pem and key.pem. This will change in a future release.
Rename the certificate and key files to certificate.pem and key.pem, respectively
cp <cert-file-name> certificate.pem
cp <key-file-name> key.pem
Copy the newly renamed certificate and key files to each of the containers in order to make sure that the self-signed certificate warning does not occur:
cp certificate.pem key.pem <path-to-repository>/router-mesh-architecture/proxy/etc/ssl/nginx/
cp certificate.pem key.pem <path-to-repository>/router-mesh/router-mesh/etc/ssl/nginx/
Then rebuild all of the microservice images
docker-compose build
And run the application
docker-compose up
When you open https://localhost in your browser, you should see the same message and page that is displayed in Step 6 above.
If you are using NGINX Plus, navigate to https://localhost/status.html and you will see the server status information.
See also the list of contributors who participated in this project.
This project is licensed under the BSD 2-Clause License - see the LICENSE file for details

