-
Notifications
You must be signed in to change notification settings - Fork 196
staticman.yml
Staticman is a comment engine for static sites that was developed by Eduardo Boucas. Unlike Disqus and other similar comment engine, all content is hosted directly on your site rather than on someone else's server.
Note: If you need any assistance with Staticman, please don't hesitate to contact @VincentTam on GitHub or GitLab. Additionally, check his blog for more ways to contact him.
- Setting up your own Staticman API instance on Heroku
- Initiate in
config.toml - Initiate in
staticman.yml - Optional
- Open a Heroku account.
- Click the "deploy to Heroku" button in Staticman's README: https://github.com/eduardoboucas/staticman/.
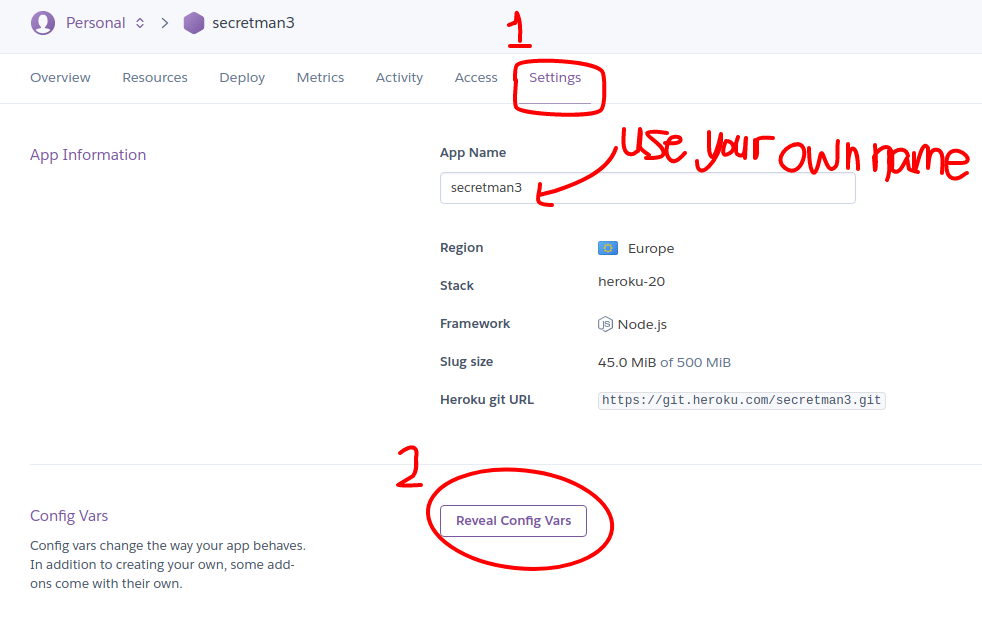
- Input your own app name, so that the URL for your app would be
yourapp dot herokuapp dot com. - Leave the Heroku page open, and proceed to the next stage.
Follow either one of the three sub-sections.
Create a GitHub apps: https://docs.github.com/en/developers/apps/creating-a-github-app. You can leave the default values unchanged, except for the mandatory fields.
- Homepage URL: for display purpose only for your GitHub App page
- Webhook URL: I tried
<your-api>/v1/webhook. - Contents: Read & Write
- Pull Requests: Read & Write
Then generate a RSA keypair at the bottom of the page. A RSA private key would be automatically downloaded.
I recommend making this app private and personal.
Don't forget to install this app to the GitHub repo for your static website after having finished the setup in the next section.
To know more, you may see Jan Hajek's article about Staticman v3.
Note: There is no need to hit the /connect route in Staticman v3 because we're using a GitHub App instead of a GitHub bot account here.
-
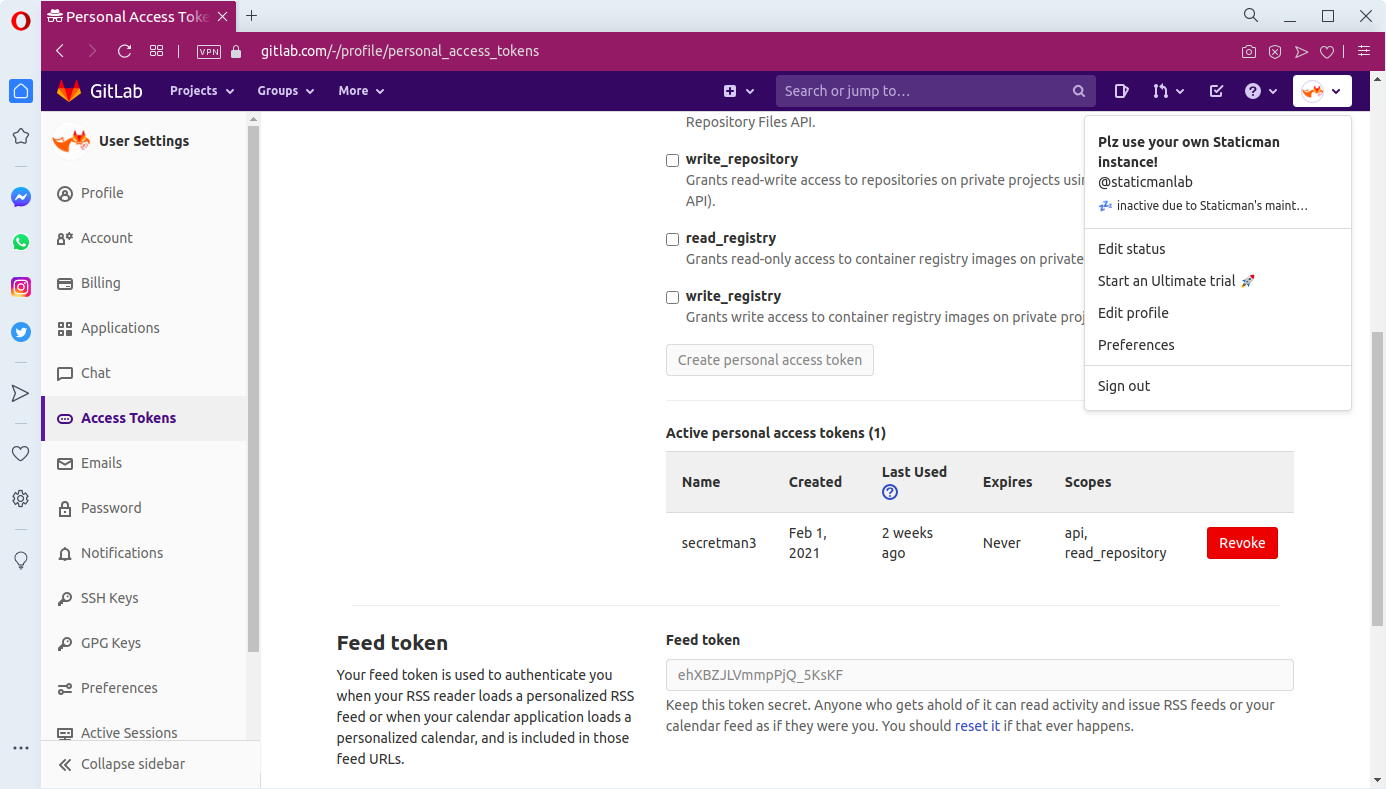
Create a GitLab bot account and obtain a personal access token with scopes
apiandread_repository.
-
Add your GitLab bot account as a developer to your GitLab repo for your static website. This can be done by going to your project, then Settings → Members → Invite member, and finally searching for your GitLab bot.
Note: There is no need to hit the /connect route in Staticman v3 because once a GitLab account is invited to a GitLab repo, it can start committing to the GitLab repo. Unlike GitHub, there's no need for the invited GitLab account to accept the invitation.
Since Framagit is a fork of GitLab, the overall setup is the same as that for GitLab. The only difference is that you need to add an extra environment variable GITLAB_BASE_URL with value https://framagit.org.
Here're the necessary variables to get the instance running.
| variable | explanation |
|---|---|
NODE_ENV |
production |
RSA_PRIVATE_KEY |
RSA private key generated by openssl genrsa -out key.pem
|
GITHUB_APP_ID |
GitHub App ID (for v3 with a GitHub App) |
GITHUB_PRIVATE_KEY |
RSA private key downloaded from GitHub (for v3 with a GitHub App) |
GITLAB_TOKEN |
token of your GitLab bot (for v3 with a GitLab bot) |
GITLAB_BASE_URL |
URL of your custom GitLab instance (for v3 with a custom GitLab instance other than GitLab.com) |

To store a multi-line RSA private key, you may first input the environment variable name. Then click the pen icon 🖊️ on the right in order to show a text area for editing. A simple copy and paste would do, as shown in the screenshot below.

To know more about the API variables, the best way is to read https://github.com/eduardoboucas/staticman/blob/master/config.js.
Complete the Staticman parameters within the config.toml.
[params.staticman]
  enabled             = false
  api                 = ""  # No Trailing Slash
  gitProvider         = "github"
  username            = ""
  repo                = ""
  branch              = ""

  [params.staticman.recaptcha]
    siteKey           = ""
encryptedKey = ""- enabled
- Sets whether to use Staticman for comments.
- api
- Defines link to Staticman API.
- gitProvider, username, repo, & branch
- Defines the path to post comments to.
- siteKey & encryptedKey
- Defines the keys required for reCAPTCHA to work.
Within the exampleSite directory, there is a Staticman config file named
staticman.yml. This file should be moved to the root directory of your site
(the same location as your config.toml).
- branch
- Sets which branch to commit comments to.
- moderation
- Sets whether to moderate comments through pull requests or not. Default to
true. - reCaptcha: enabled
- Sets whether to enable reCAPTCHA.
- reCaptcha: siteKey & encryptedKey
- Defines the keys required for reCAPTCHA to work. Please see the Optional: reCAPTCHA below for additional information.
If you are working on GitLab/Framagit and you have set moderation: false,
depending on your branch, you might need to take these additional steps.
- For protected branches (e.g.
master), go to Settings → Repository → Protected Branches and permit the Staticman bot to push against that branch. - For unprotected branch (GitHub's default), there are no additional measures needed no measures needed.
To prevent spam, please enable reCAPTCHA. As of right now, you should specifically use reCAPTCHA v2 Checkbox.
- Register a new site for reCAPTCHA.
- Select reCAPTCHA v2 then "I'm not a robot" Checkbox.
- Add your
baseurlto Domains. If you would like to test locally, addlocalhost. - Copy your Site Key and paste it into both the
config.tomlandstaticman.yml. - Encrypt your Secret Key by hitting the Staticman API at
https://<your-api>/v3/encrypt/<your-site-secret>. An example using the default endpoint would behttps://<your-api>.herokuapp.com/v3/encrypt/exampleSecretKey. - Copy your newly encrypted secret key and paste it into both the
config.tomlandstaticman.yml.
To prevent excess branches (from comment pull requests) from piling up, please go to your project, then Settings → Webhooks.
- Set Payload URL to the endpoint set in your
config.toml, sayhttps://<your-api>.herokuapp.com. - Add
/v1/webookto the end of the Payload URL. For example,https://<your-api>.herokuapp.com/v1/webhook. - Set Content type to application/json.
- Select Let me select individual events. and then select Pull Requests.
- Ensure Active is checked.
For further reference, check the Staticman documentation for webhooks.
Note: This is unnecessary with GitLab and Framagit as there is a checkbox for deleting the source branch next to the Merge button in each pull request.
This theme and the Wiki are released under the Creative Commons Attribution 3.0 License. "Future Imperfect" is a theme by HTML5 UP licensed under the same terms. Please read the license for more information.