-
Notifications
You must be signed in to change notification settings - Fork 8
Getting started with AutoAcme
-
Prerequisites
- Windows Server 2012 or newer
- Install URL Rewrite module for IIS
- Install Application Request Routing module for IIS
- Install Centralized SSL Certificate support to IIS
-
Configuration
- Configure Centralized certificate store
- Configure web site for handling of ACME challenges
- Configure rewriting rule for handling of ACME challenges
- Configure AutoACME using the
autoacme initcfgcommand
-
HTTPS setup
- Request and receive certificate from Let's Encrypt
- Configure IIS to use the certificate
- Maintenance
The application is designed for Windows Server 2012 and IIS 8.0 and newer. Install the following IIS components:
You may use Microsoft Web Platform Installer to install them at once.
The initial configuration is quite complex, but you would need to do it only once.
- Create folder where you want to store your PFX files (ie.
C:\CertStore\PFX). - Create (local or domain) user account who would have rights to manage contents of the above folder (ie.
CentCertUser). - Assign NTFS read, write and delete (or full control) rights to the folder for the user.
- Install Centralized SSL Certificate
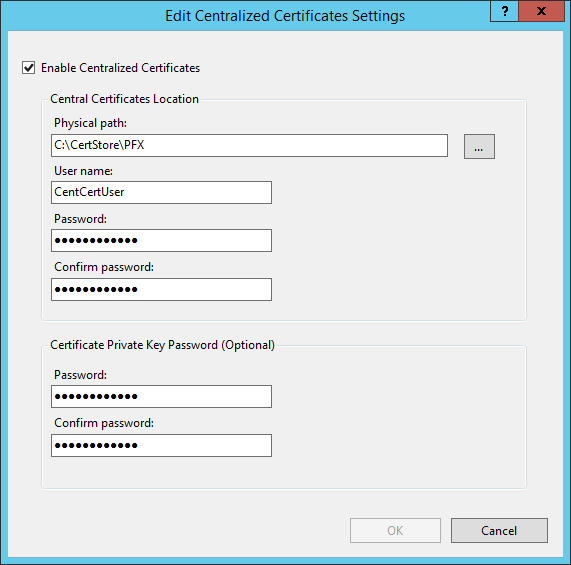
- Run IIS Manager and on server level select the Centralized certificates icon.
- Click Edit Feature Setting in right sidebar.
- Check Enable Centralized certificates.
- Point Physical path to
C:\CertStore\PFX. - Setup User name and Password for the
CentCertUser. - Setup the
Certificate Private Key Passwordfor encryption of PFX files. You'll need this password later when configuring AutoACME.
- Click OK.

We need some web site, to which we would route the ACME challenge verification requests later. The web site does not need to be accessible from the Internet, just from the web server itself.
We can use the preinstalled Default Web Site for this:
- Create folder
C:\InetPub\wwwroot\AutoACME - Assign NTFS read, write and delete (or full control) rights to that folder for the
CentCertUseruser.
Now we need to configure all requests for http://*/.well-known/acme-challenge/* (on all web sites) to http://localhost/AutoACME/*. We can do it using the URL Rewrite and Application Request Routing modules of IIS.
- In IIS Manager on server level select the Application Request Routing Cache icon.
- Click Server Proxy Settings in right sidebar
- Check Enable Proxy.
- Click Apply in right sidebar.
- In IIS Manager on server level select the URL Rewrite icon.
- Click Add Rule(s) in right sidebar
- Select Blank rule in the Inbound rules section and click OK.
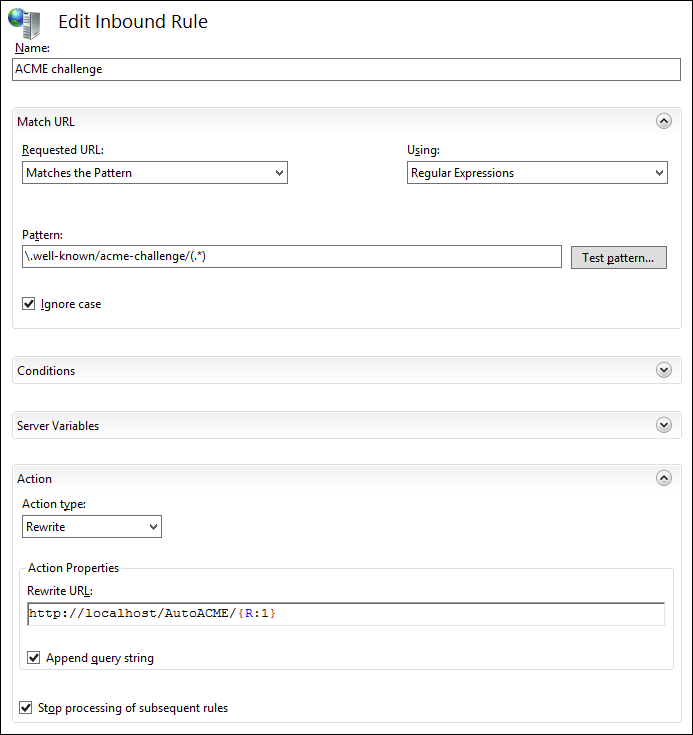
- Enter the following values:
- Name:
ACME challenge - Pattern:
\.well-known/acme-challenge/(.*) - Action type:
Rewrite - Rewrite URL:
http://localhost/autoACME/{R:1} - Check Stop processing of subsequent rules
- Name:
- Then click Apply.

Although the above rules do their best, they are not completely foolproof and do not work fully with absolutely all configurations. There are two areas where your app should cooperate, or at least don't get in the way.
Authentication and authorization should be configured so it will allow anonymous access to /.well-known/acme-challenge/ (or even better to entire ~/.well-known folder).
URL rewriting too early is also a problem. If you do your URL rewriting right, it should just work. But if you do it for example in BeginRequest event, you have to add the same exception as above.
Now you need to create the AutoACME configuration file, which is called autoacme.json by default.
- Extract the distribution ZIP archive to
C:\CertStore\AutoACME. - Run the text-based configuration wizard with
autoacme initcfgcommand. - If you followed this guide exactly, including the folder names, you can leave all values on defaults, except your e-mail address and PFX password (set during configuration of CCS).
See Configuration file reference for more information about what you can set in the configuration file.
ACME requires for the file to be sent without Content-Type HTTP header or with text/json one (even though the content is not in JSON format). To achieve this, initcfg command will create web.config file in configured folder (ie. C:\InetPub\wwwroot\AutoACME\web.config) with the following contents:
<configuration>
  <system.webServer>
    <staticContent>
      <!--
        ACME server requires that the verification file is served either without
        Content-Type header or with "text/json". This setting ensures that.
      -->
      <remove fileExtension="." />
      <mimeMap fileExtension="." mimeType="text/json" />
    </staticContent>
  </system.webServer>
</configuration>Congratulations, your setup has been completed. Now you can start to use the AutoACME utility.
Run the following command to request certificate for www.example.com (assuming that it points to your server):
autoacme addhost www.example.com
If everything is correctly configured, after the command finishes, there should be file C:\CertStore\PFX\www.example.com.pfx which should contain your newly issued certificate and its private key.
Please note known bug: The IIS Manager GUI would show error icons in list of PFX files in Centralized Certificate Store management. This is known issue affecting only the management UI, not functionality!
To use the keys in PFX file via Centralized Certificates Support:
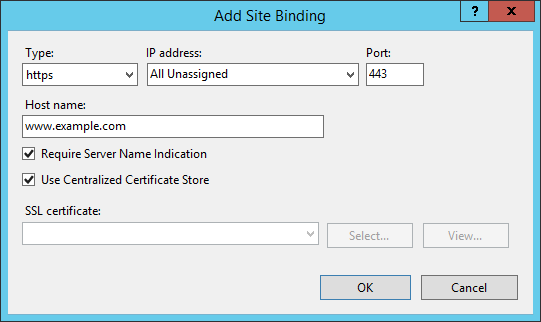
- In IIS Manager, go to the bindings of the web site and add new HTTPS binding
- Check Use Centralized Certificate Store
- Most likely (unless you have plenty of IP addresses) you would like to use SNI (Server Name Indication) as well, by entering the host name and checking Require Server Name Indication

Now you should be able to visit working https://www.example.com/.
Let's Encrypt CA issues certificates valid for 90 days and you are supposed to renew them automatically (and thus re-verify the site control). If they are not renewed for long time (ie. because you lost control of the site), they should be purged.
To renew certificates nearing expiration, run the following command:
autoacme renew
By default, certificates are renewed when they have 30 days or less of validity remaining. You can change this value in configuration file.
To purge certificates after expiration, run the following command:
autoacme purge
By default, certificates are purged when they are 30 days or more after expiration. You can change this value in configuration file.
To do both maintenance operations at once, run the following command:
autoacme maintenance
To ensure smooth and uninterrupted operations, run the autoacme maintenance command via task scheduler once per day. Remember to use user account with enough permissions, ie. the CentCertUser account from this tutorial.