-
Notifications
You must be signed in to change notification settings - Fork 200
Software ~ Advanced ~ Bidirectional telemetry
Bortek edited this page Nov 24, 2018
·
7 revisions
- Set
TELEMETRY_UPLINK=mavlink, TELEMETRY_TRANSMISSION=wbc, TELEMETRY_UPLINK=mavlink, RC=mavlinkin wifibroadcast-1.txt - Connect Tower App, QGroundControl or Missionplanner etc. via USB-Tethering or Hotspot
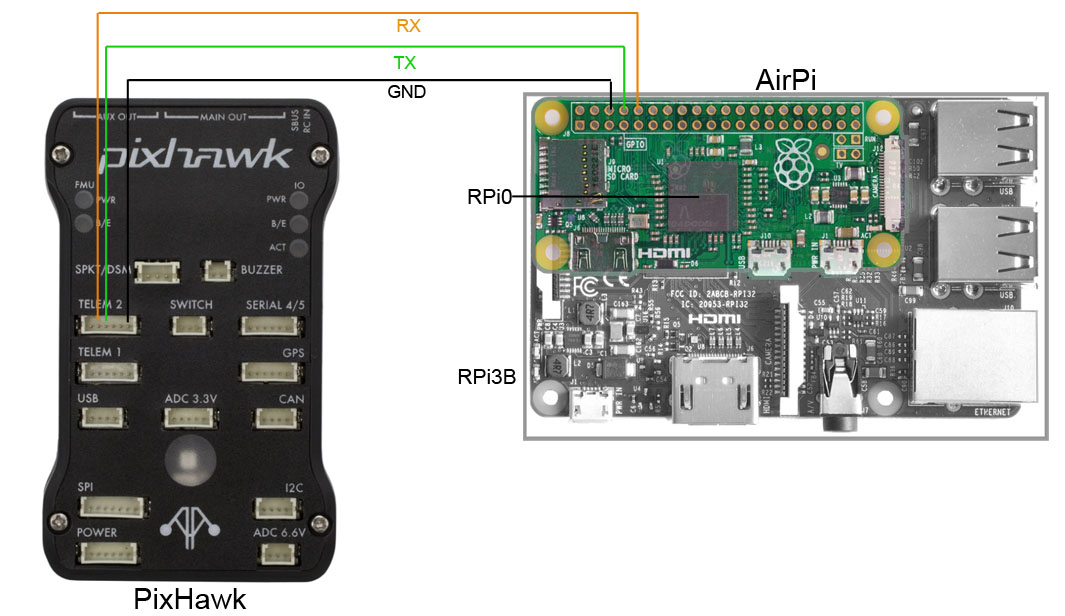
- Connect the serial port RX pin of your flight controler to the serial port TX pin on the AirPi and the serial port TX pin of your flight controller to the serial port RX pin on the AirPi. The Pi uses 3.3V logic level on the serial ports, make sure your flight control also uses 3.3V. Flight controllers which need 5V logic may not be able to detect the 3.3V signal level (See https://pinout.xyz/ for Raspberry pinout).
Wiring diagram for bi-directional telemetry: on pixhawk side.

General
Hardware Setup
- Proper Wiring
- Power Supply (BECs)
- Supported Pi models
- Supported Cameras
- Supported WiFi Adapters
- Supported Displays
- Antennas
- DIY builds
Software Setup
- Basic configuration options
- Advanced Options
RC Control
- General
- RC with Ardupilot (MAVlink)
- RC with iNav
- DIY builds
Ground Stations
- Mission Planner (Windows)
- QGroundControl (Windows / Linux / Mac / Android /iOS)
- APM Planner (Windows / Mac / Linux)
- Tower (Android)
- FPV_VR (Android)
- GStreamer (Windows / Mac / Linux)
- Fishing FanCam (iOS)
Expert Settings
- OSD MAVLink message types
- Transmit power settings
- SSH shell
- Raspivid camera settings
- Optimizing-Power-Consumption
Extensions / AddOns
- HDMI-in cards
- WebCams
- Video Switcher
- Thermal (FLIR, Seek)
- 360° cameras
Community-HUB
Developer's Corner
- Room for Improvement
- Mounting Images
- Reducing Images size
- WinSCP (copying files)