Expenses Bot Workshop demonstrates how you can use the Bot Framework with LUIS (Language Understanding)[1] to understand the intent of the user, which falls back to QnAMaker[2] (knowledge base consisting of a pair of questions and answers) when LUIS does not understand the intent. The workshop is trained using one intent "NewExpense", where the user can upload a receipt and extract the Merchant Name and Price with the help of Azure Computer Vision (OCR) API[3].
[1] https://www.luis.ai
[2] https://www.qnamaker.ai
[3] https://azure.microsoft.com/en-gb/services/cognitive-services/computer-vision/
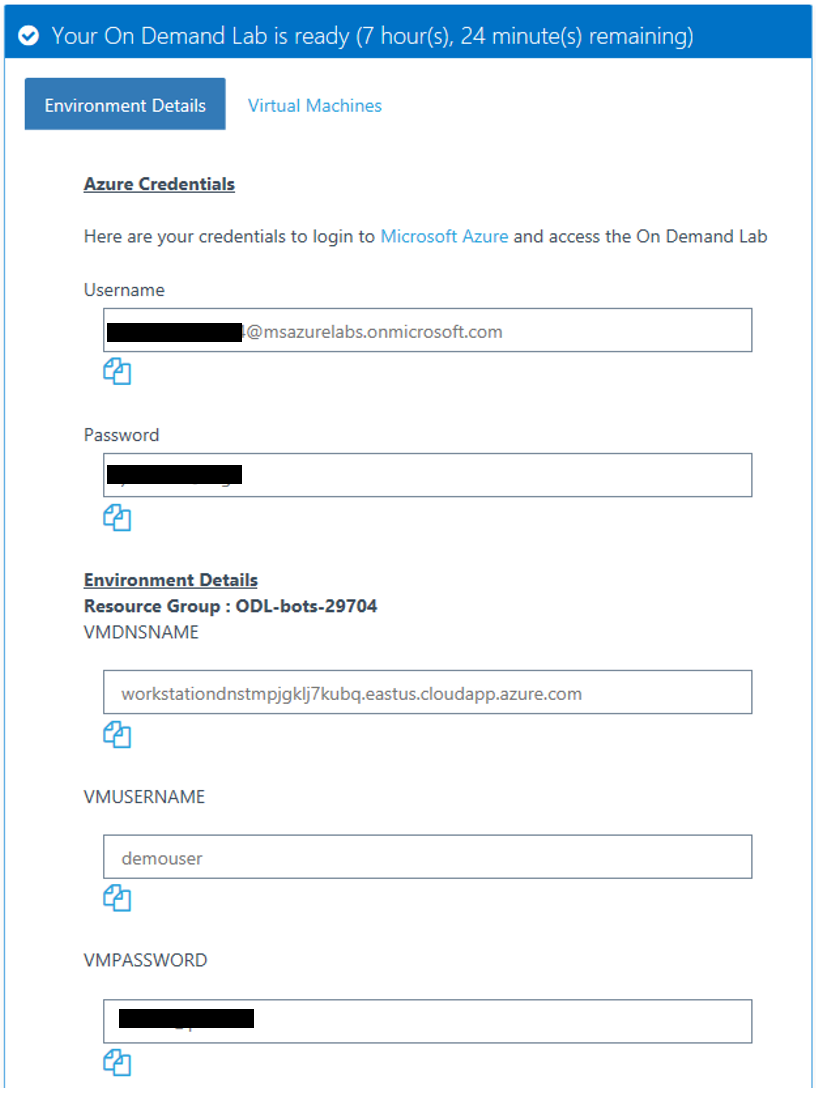
Please use this link "http://bit.ly/2L8c26N" to set up your lab environment and get your Demo Lab Credentials you will use throughout the workshop (tip: note these down on a piece of paper or sticky notes on your PC).
This guide will help you step by step to perform the tasks that are necessary to implement your Chatbot.
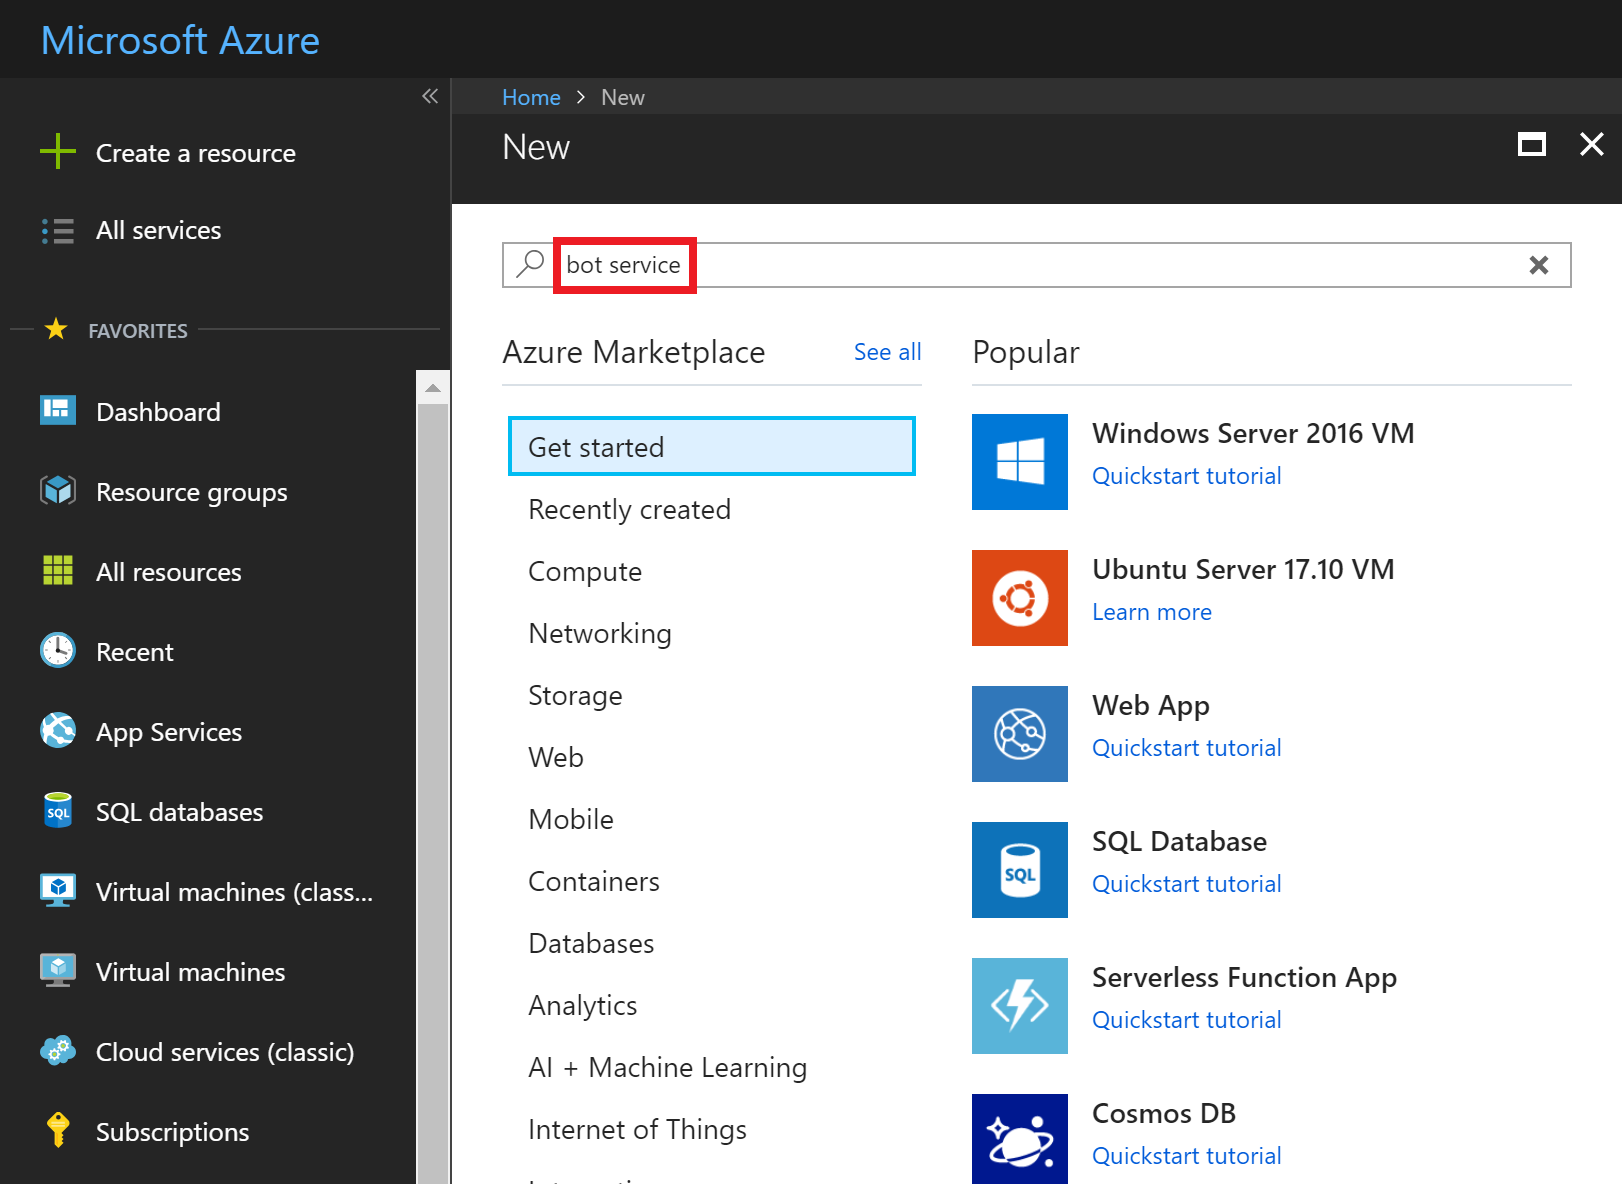
Start the Lab by clicking on "Launch Lab" and open an InPrivate browser to ensure Azure prompts you to login instead of using your cached employee credentials (More info on how to perform this: https://support.microsoft.com/en-us/help/4026200/windows-browse-inprivate-in-microsoft-edge). Navigate to the website https://portal.azure.com and log in with your Azure Demo Lab credentials. On the start screen, in the left upper corner, you find the button “Create a resource” (as shown in the screenshot below).
After clicking on that icon, enter in the search field: “bot service” and select the resource “Web App Bot”.
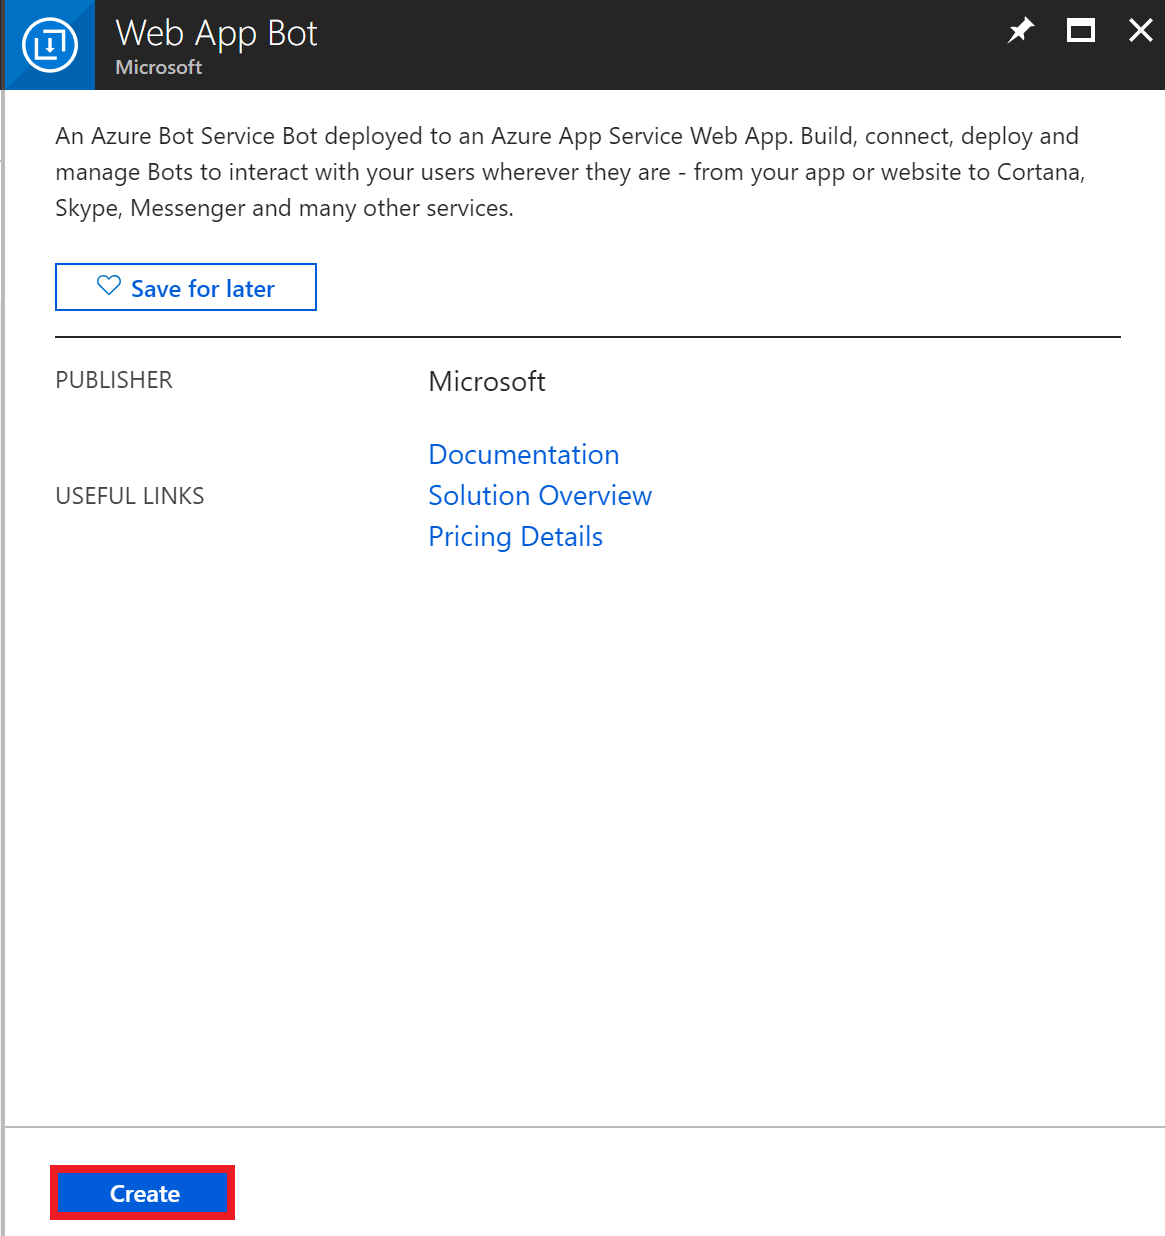
The bot wizard window will pop up and to continue, press “Create”
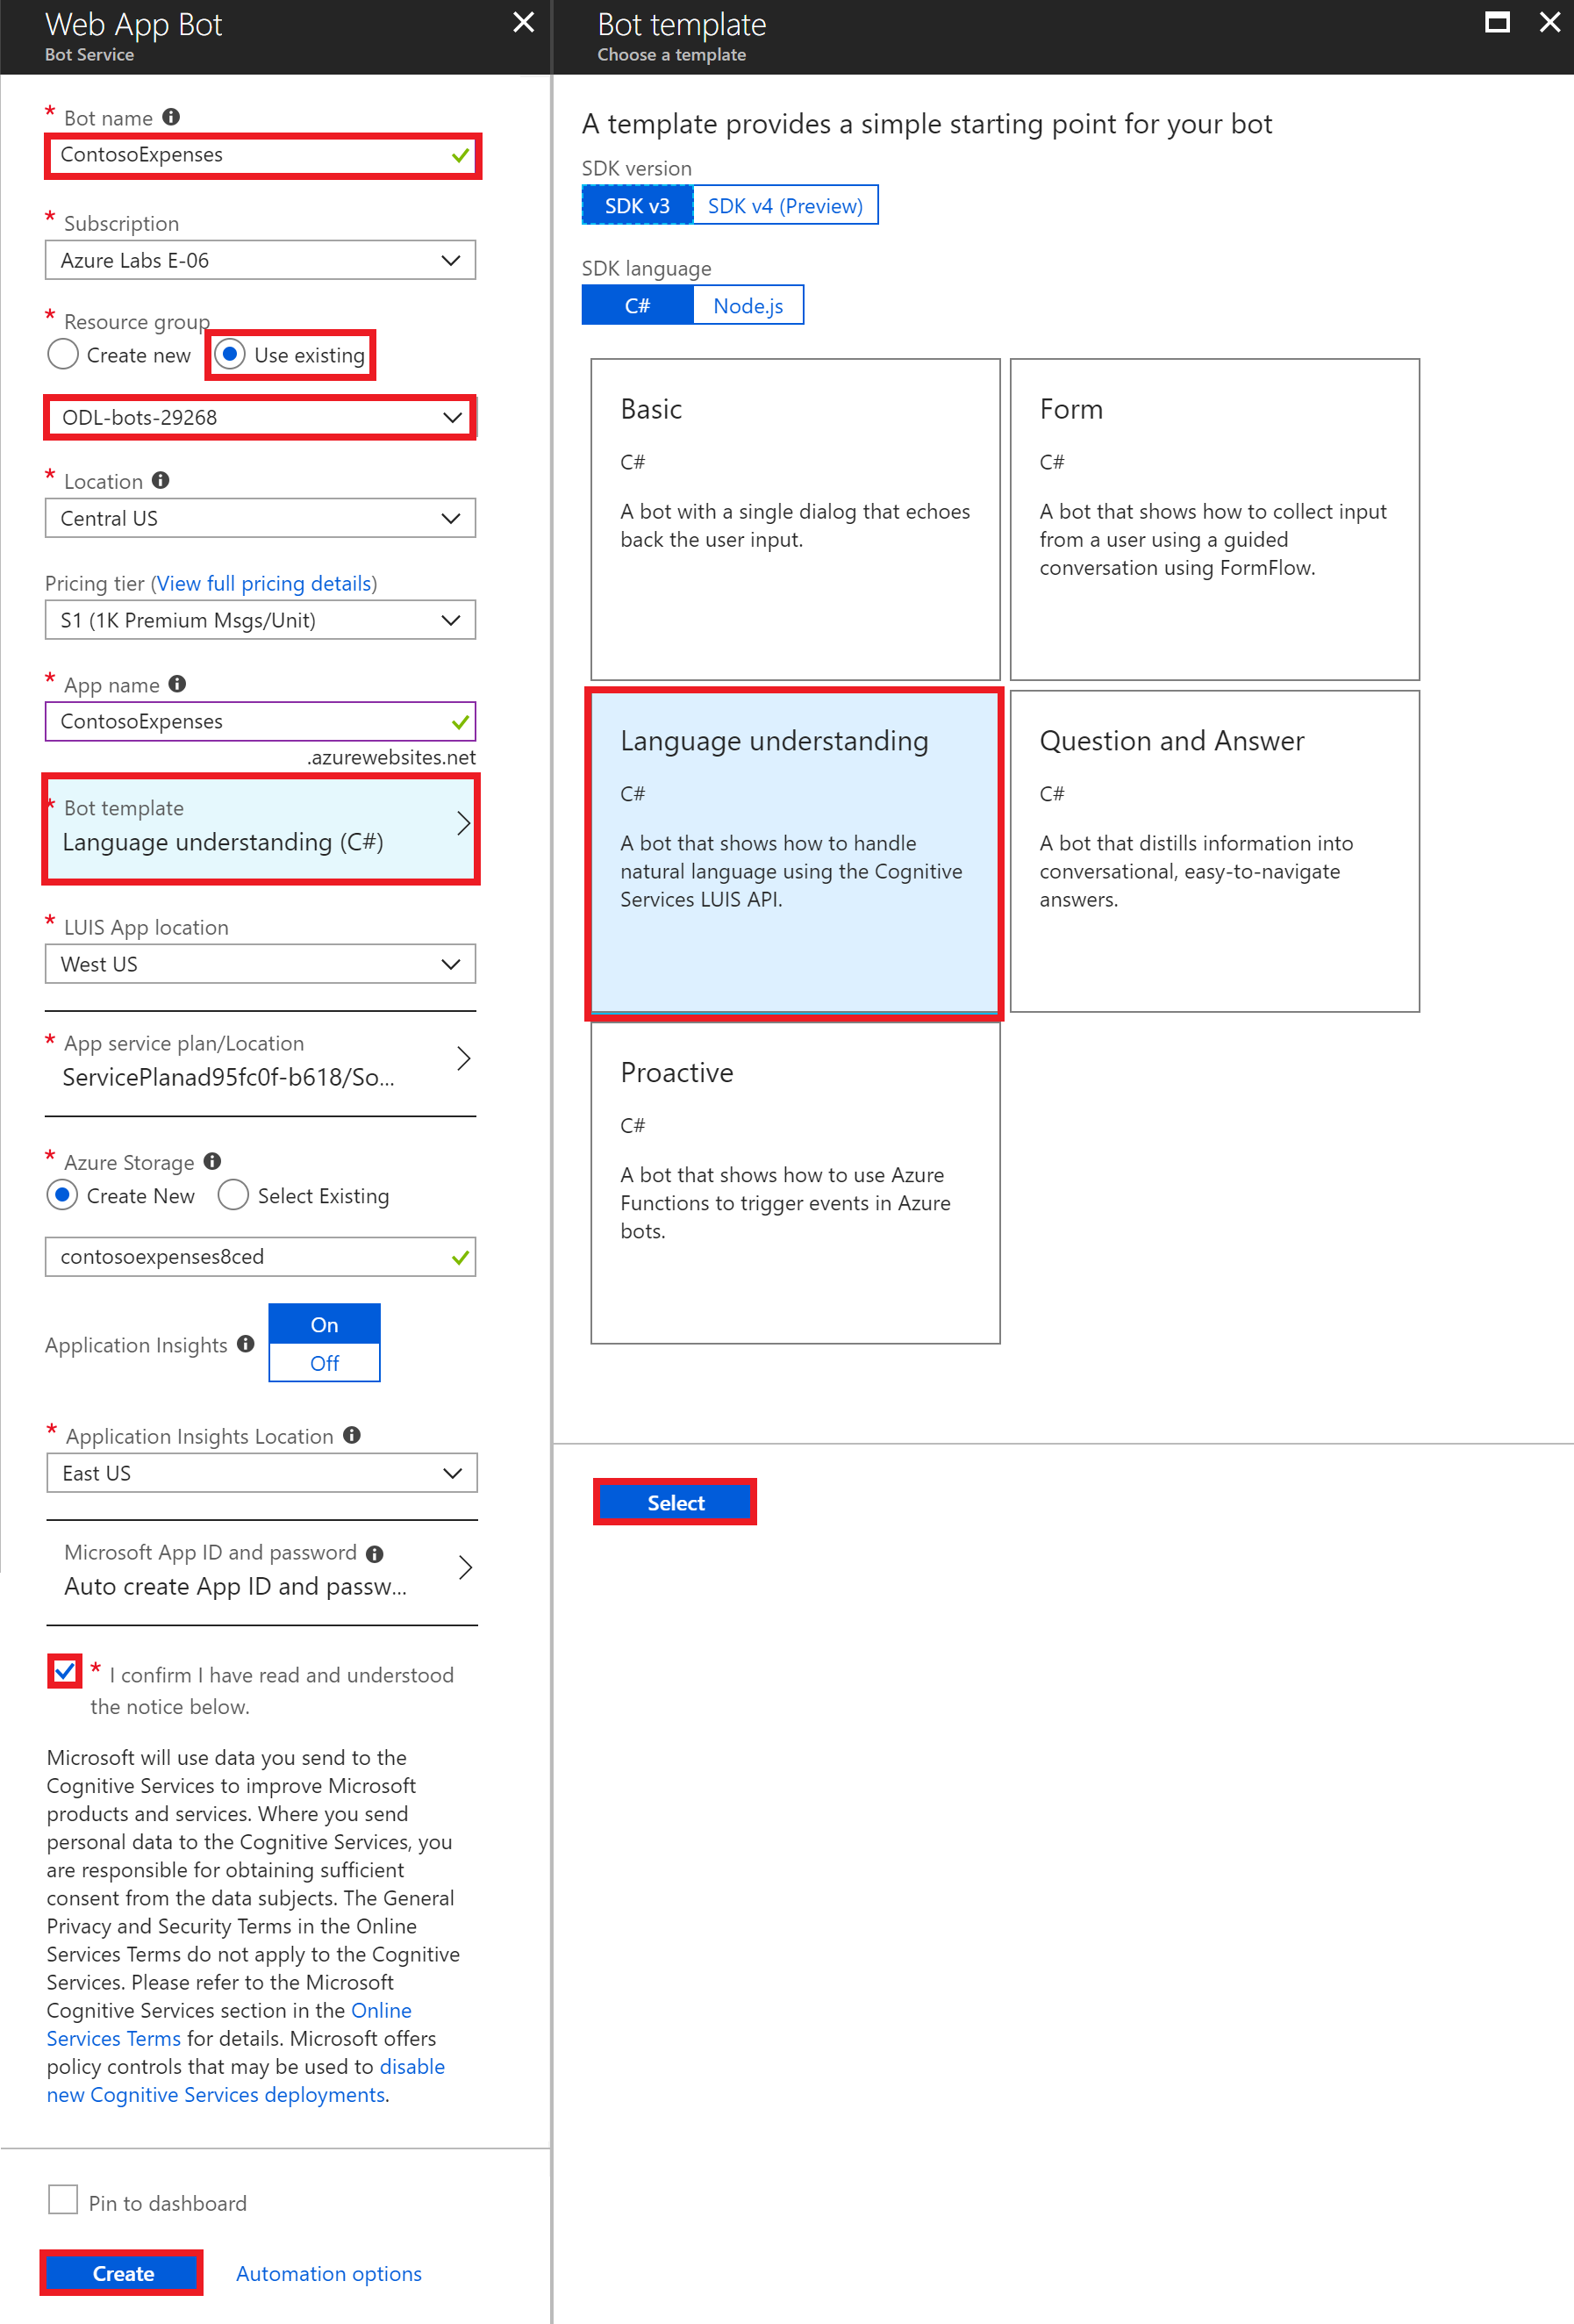
In the next step, the wizard will give you fields you need to fill out with some information:
- Bot name: Enter a unique bot name. For example “ContosoExpenses + ‘your alias’”
- Note: The name must be globally unique, therefore add your alias.
- Resource Group: Use existing resource group and select the resource group that will be proposed in the drop-down bar
- Location: select Central US
- Pricing Tier: S1
- App Name: This should automatically be populated based on the Bot name you entered already: “ContosoExpenses-‘youralias’”
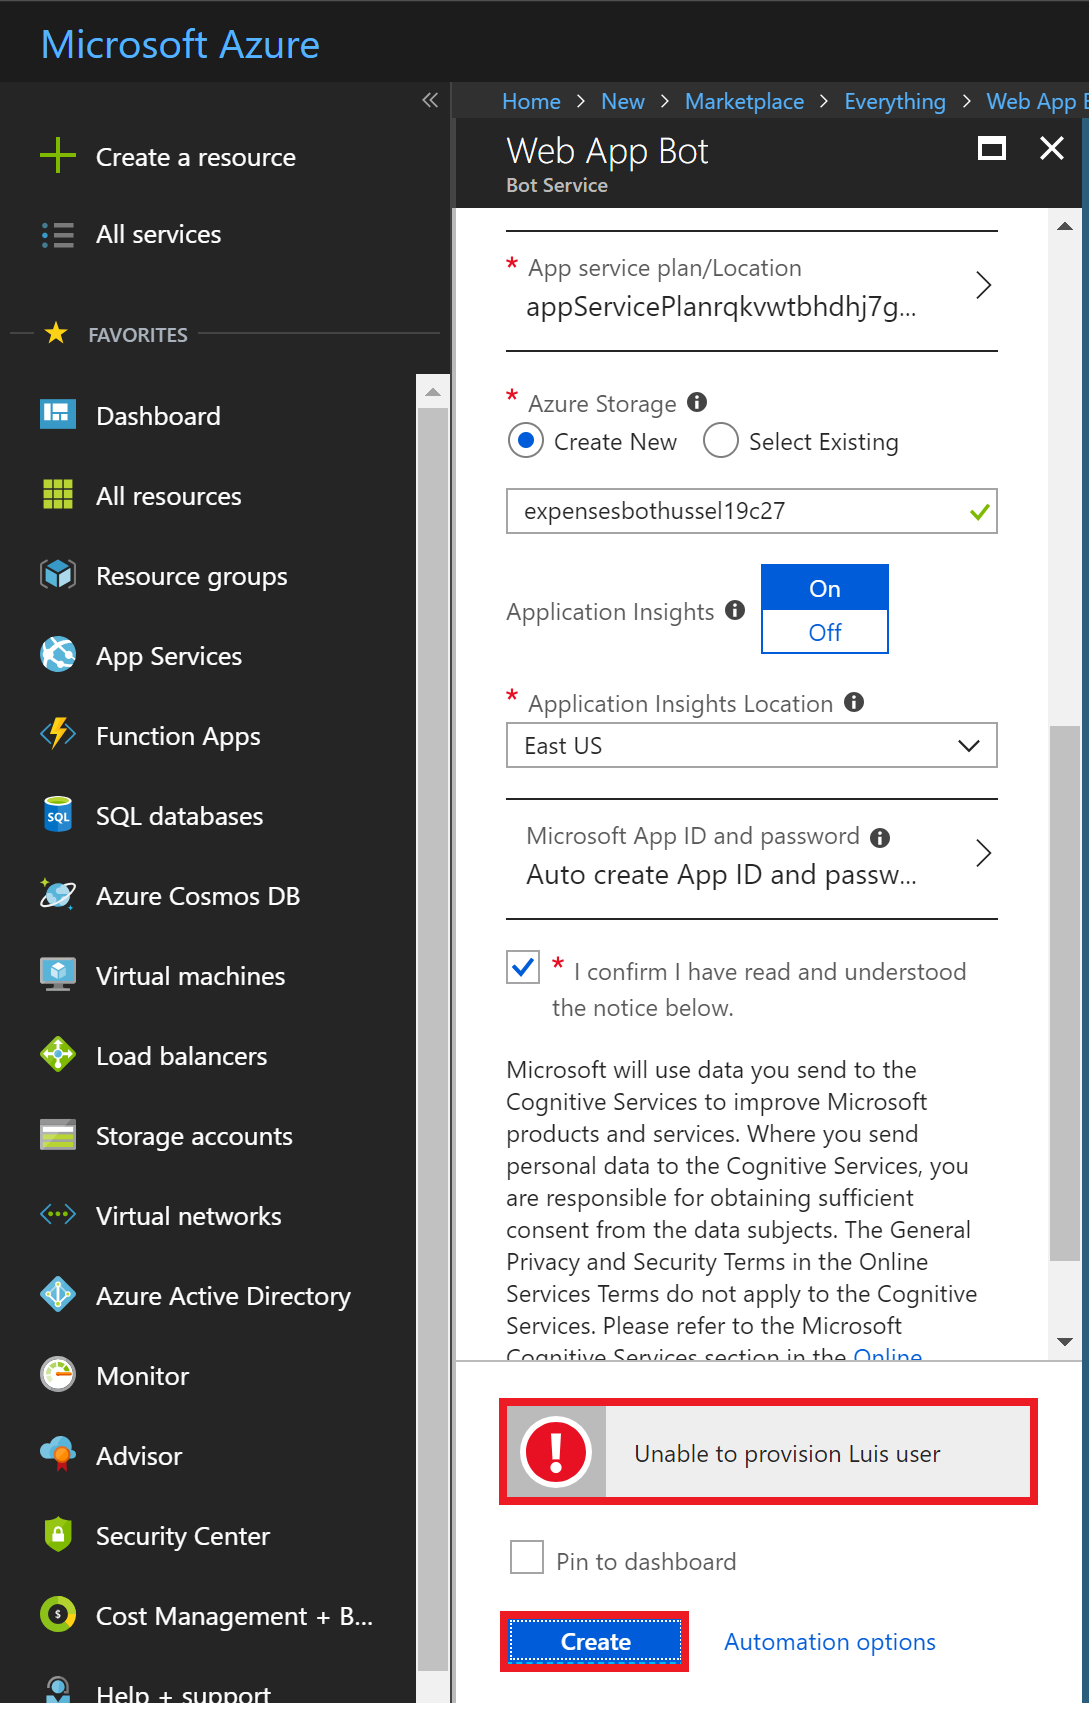
- Click on the Bot template which will open the selection of available templates. Use the “Language understanding” template and make sure to have selected the SDKv3 and C# modules at the top. Finally, click Select before clicking Create, otherwise the bot template will not be selected.
- LUIS App location: West US (default)
- Leave App service plan/Location as is
- Create a New Azure Storage leaving the name as it is automatically entered
- Application Insights Location: default (East US)
- Leave Microsoft App ID and password as is
- Check the box “I confirm I have read….”
Then, click on “Create” for starting the deployment process of your bot service. A notification on the top bar, as the screenshot shows, will inform you about the progress:
- Note: If you receive a error stating "Unable to provision LUIS user" or "ajaxExtended call failed", ignore it and click on "Create" again, which should deploy without any issues.
After the resource is deployed, you will get a green checkmark. Click on: “Go to resource”:
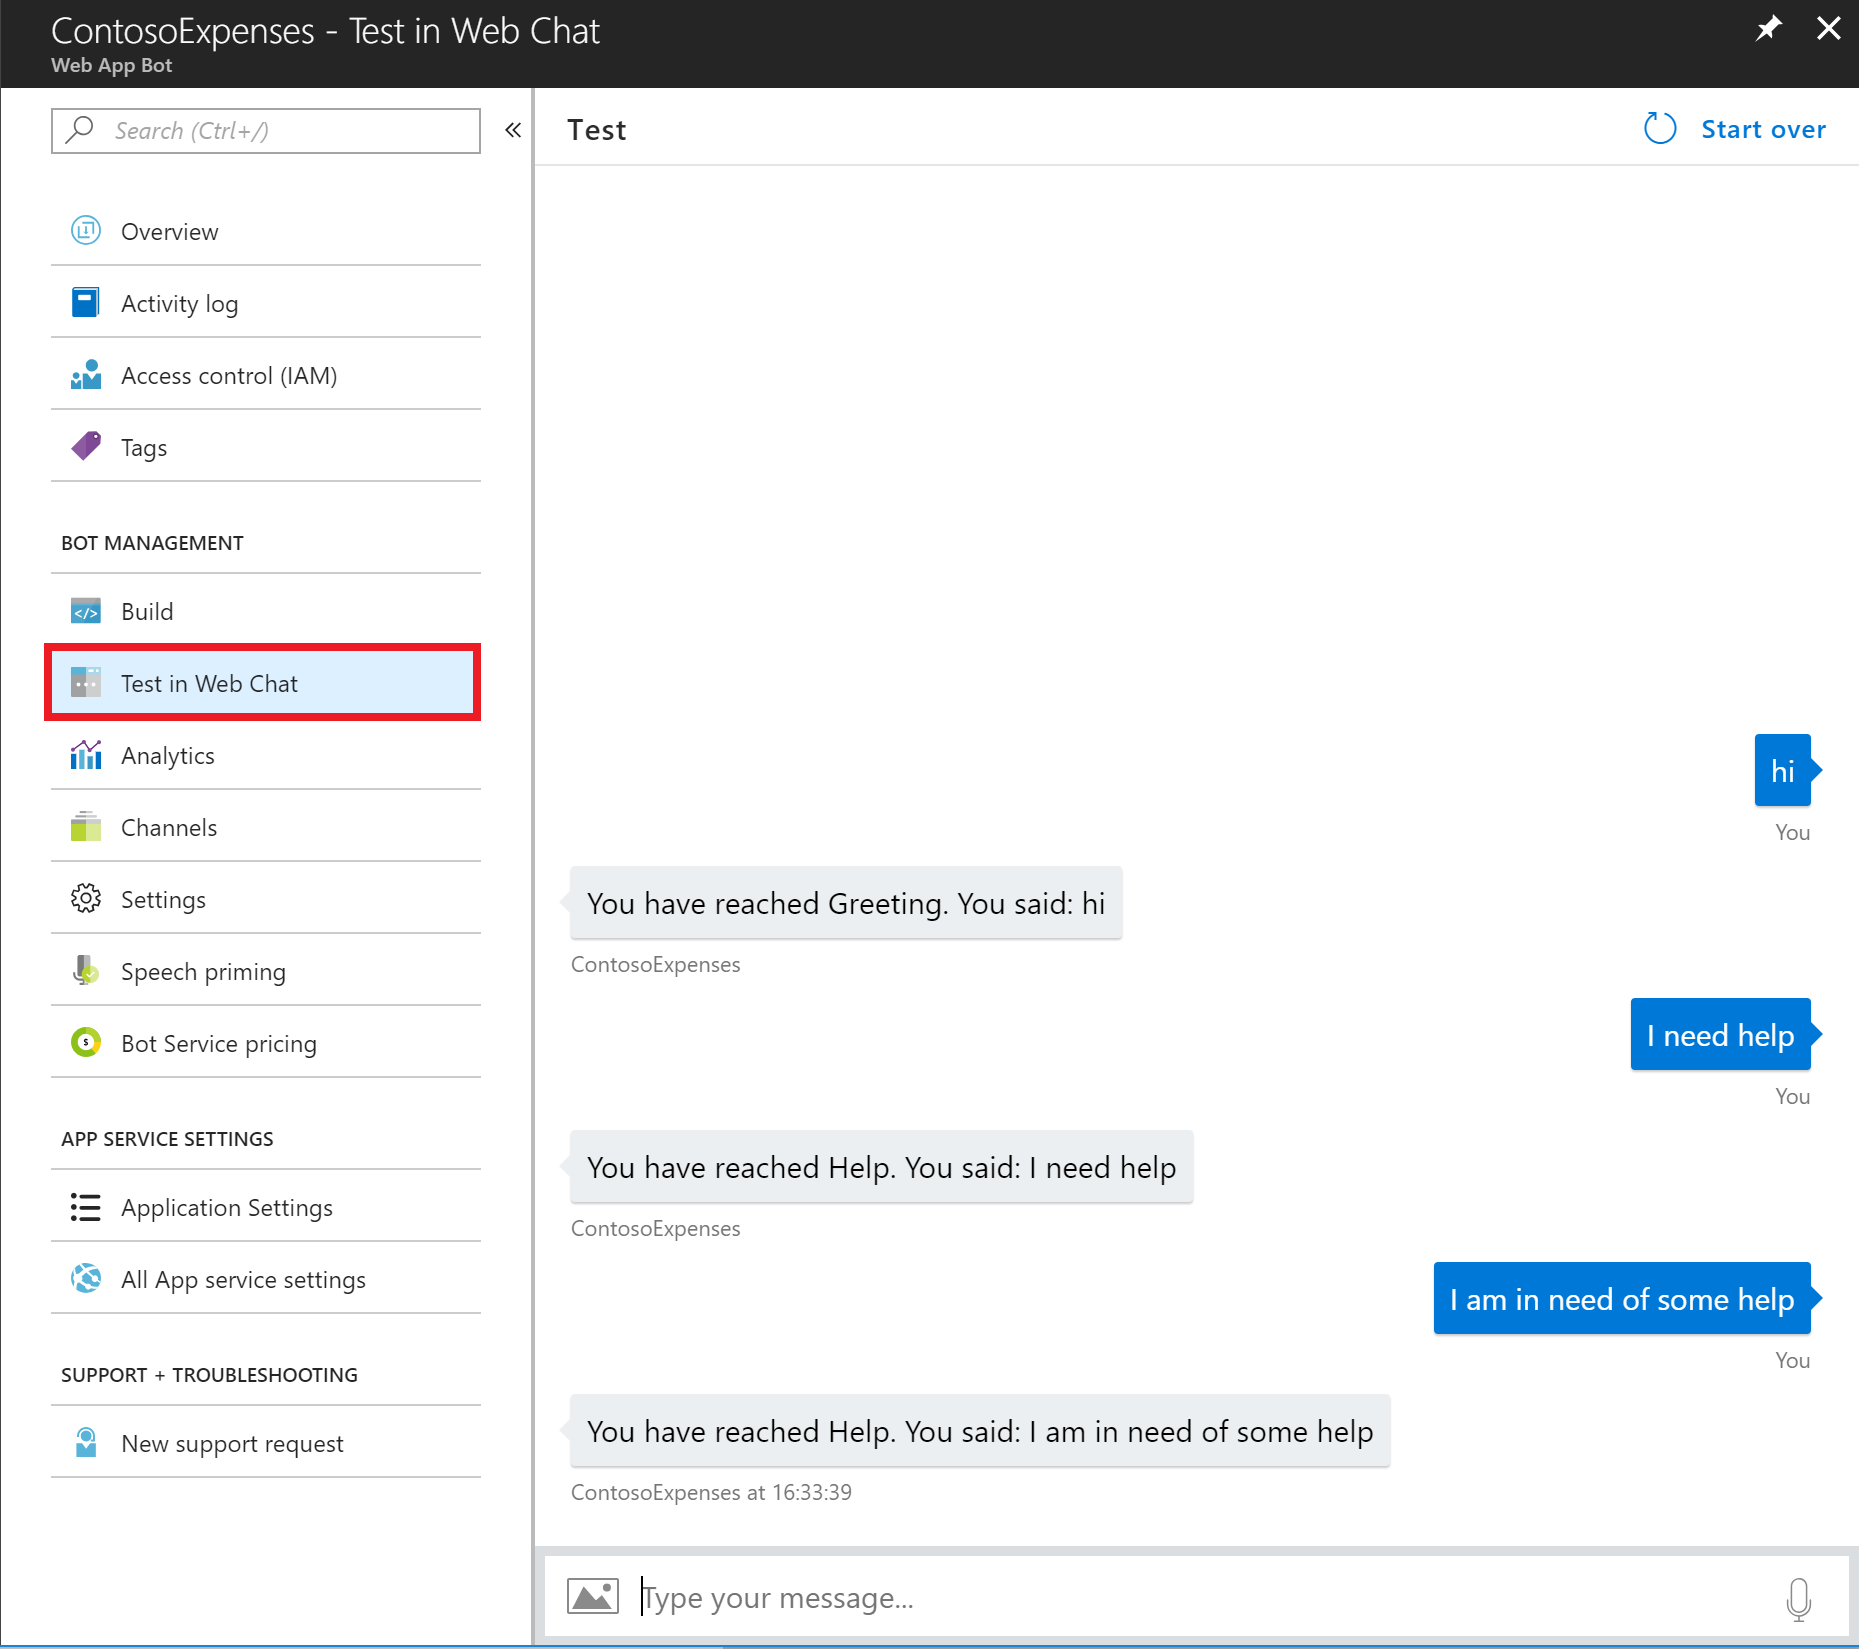
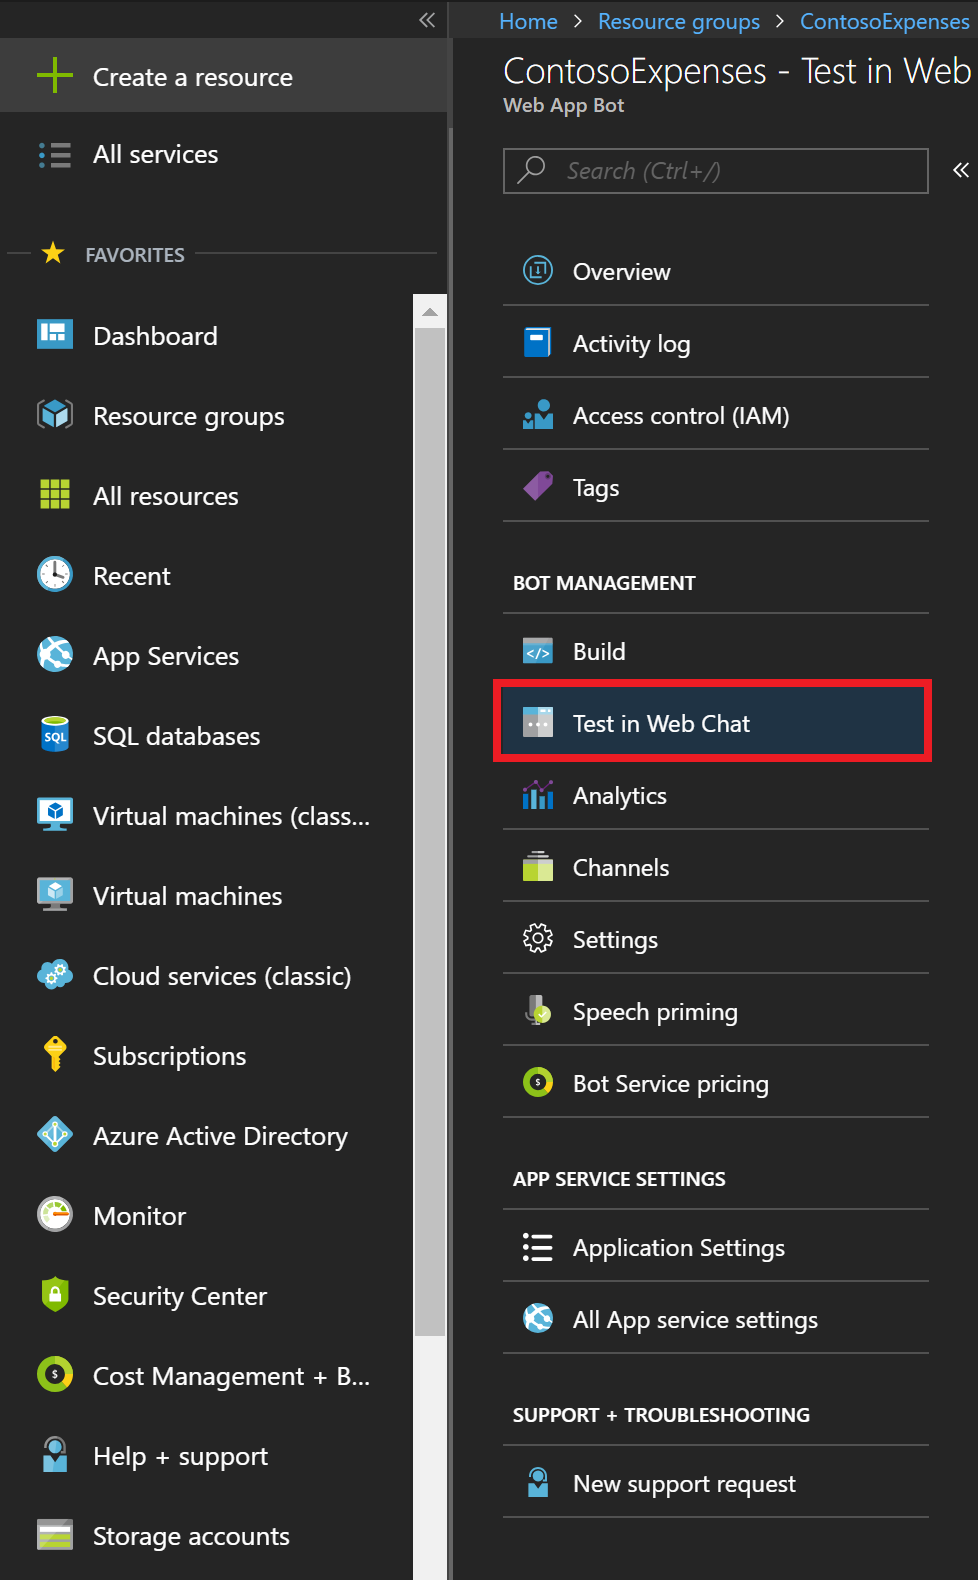
In your resource on the left panel, scroll to “Test in Web Chat” to test if your bot is running and type “Hello”. The bot will respond with “You have reached Greeting. You said: Hello”. This confirms that the bot has received your message (utterance), passed it to LUIS and has identified the utterance as being relevant to the pre-populated "Greeting" intent. Similarly, the utterance "I am in need of some help" was mapped to the pre-populated "Help" intent. At a later stage, you will create your own intent and train it with your own utterances to help LUIS understand when to map it accordingly.
App Service Editor is an online web-editor where you can view, modify and build your code. In the left pane, under Development Tools, click on All App service settings to open the App Service Editor (Preview).
Next, click on the “Go” button to start the editor. A new tap will open.
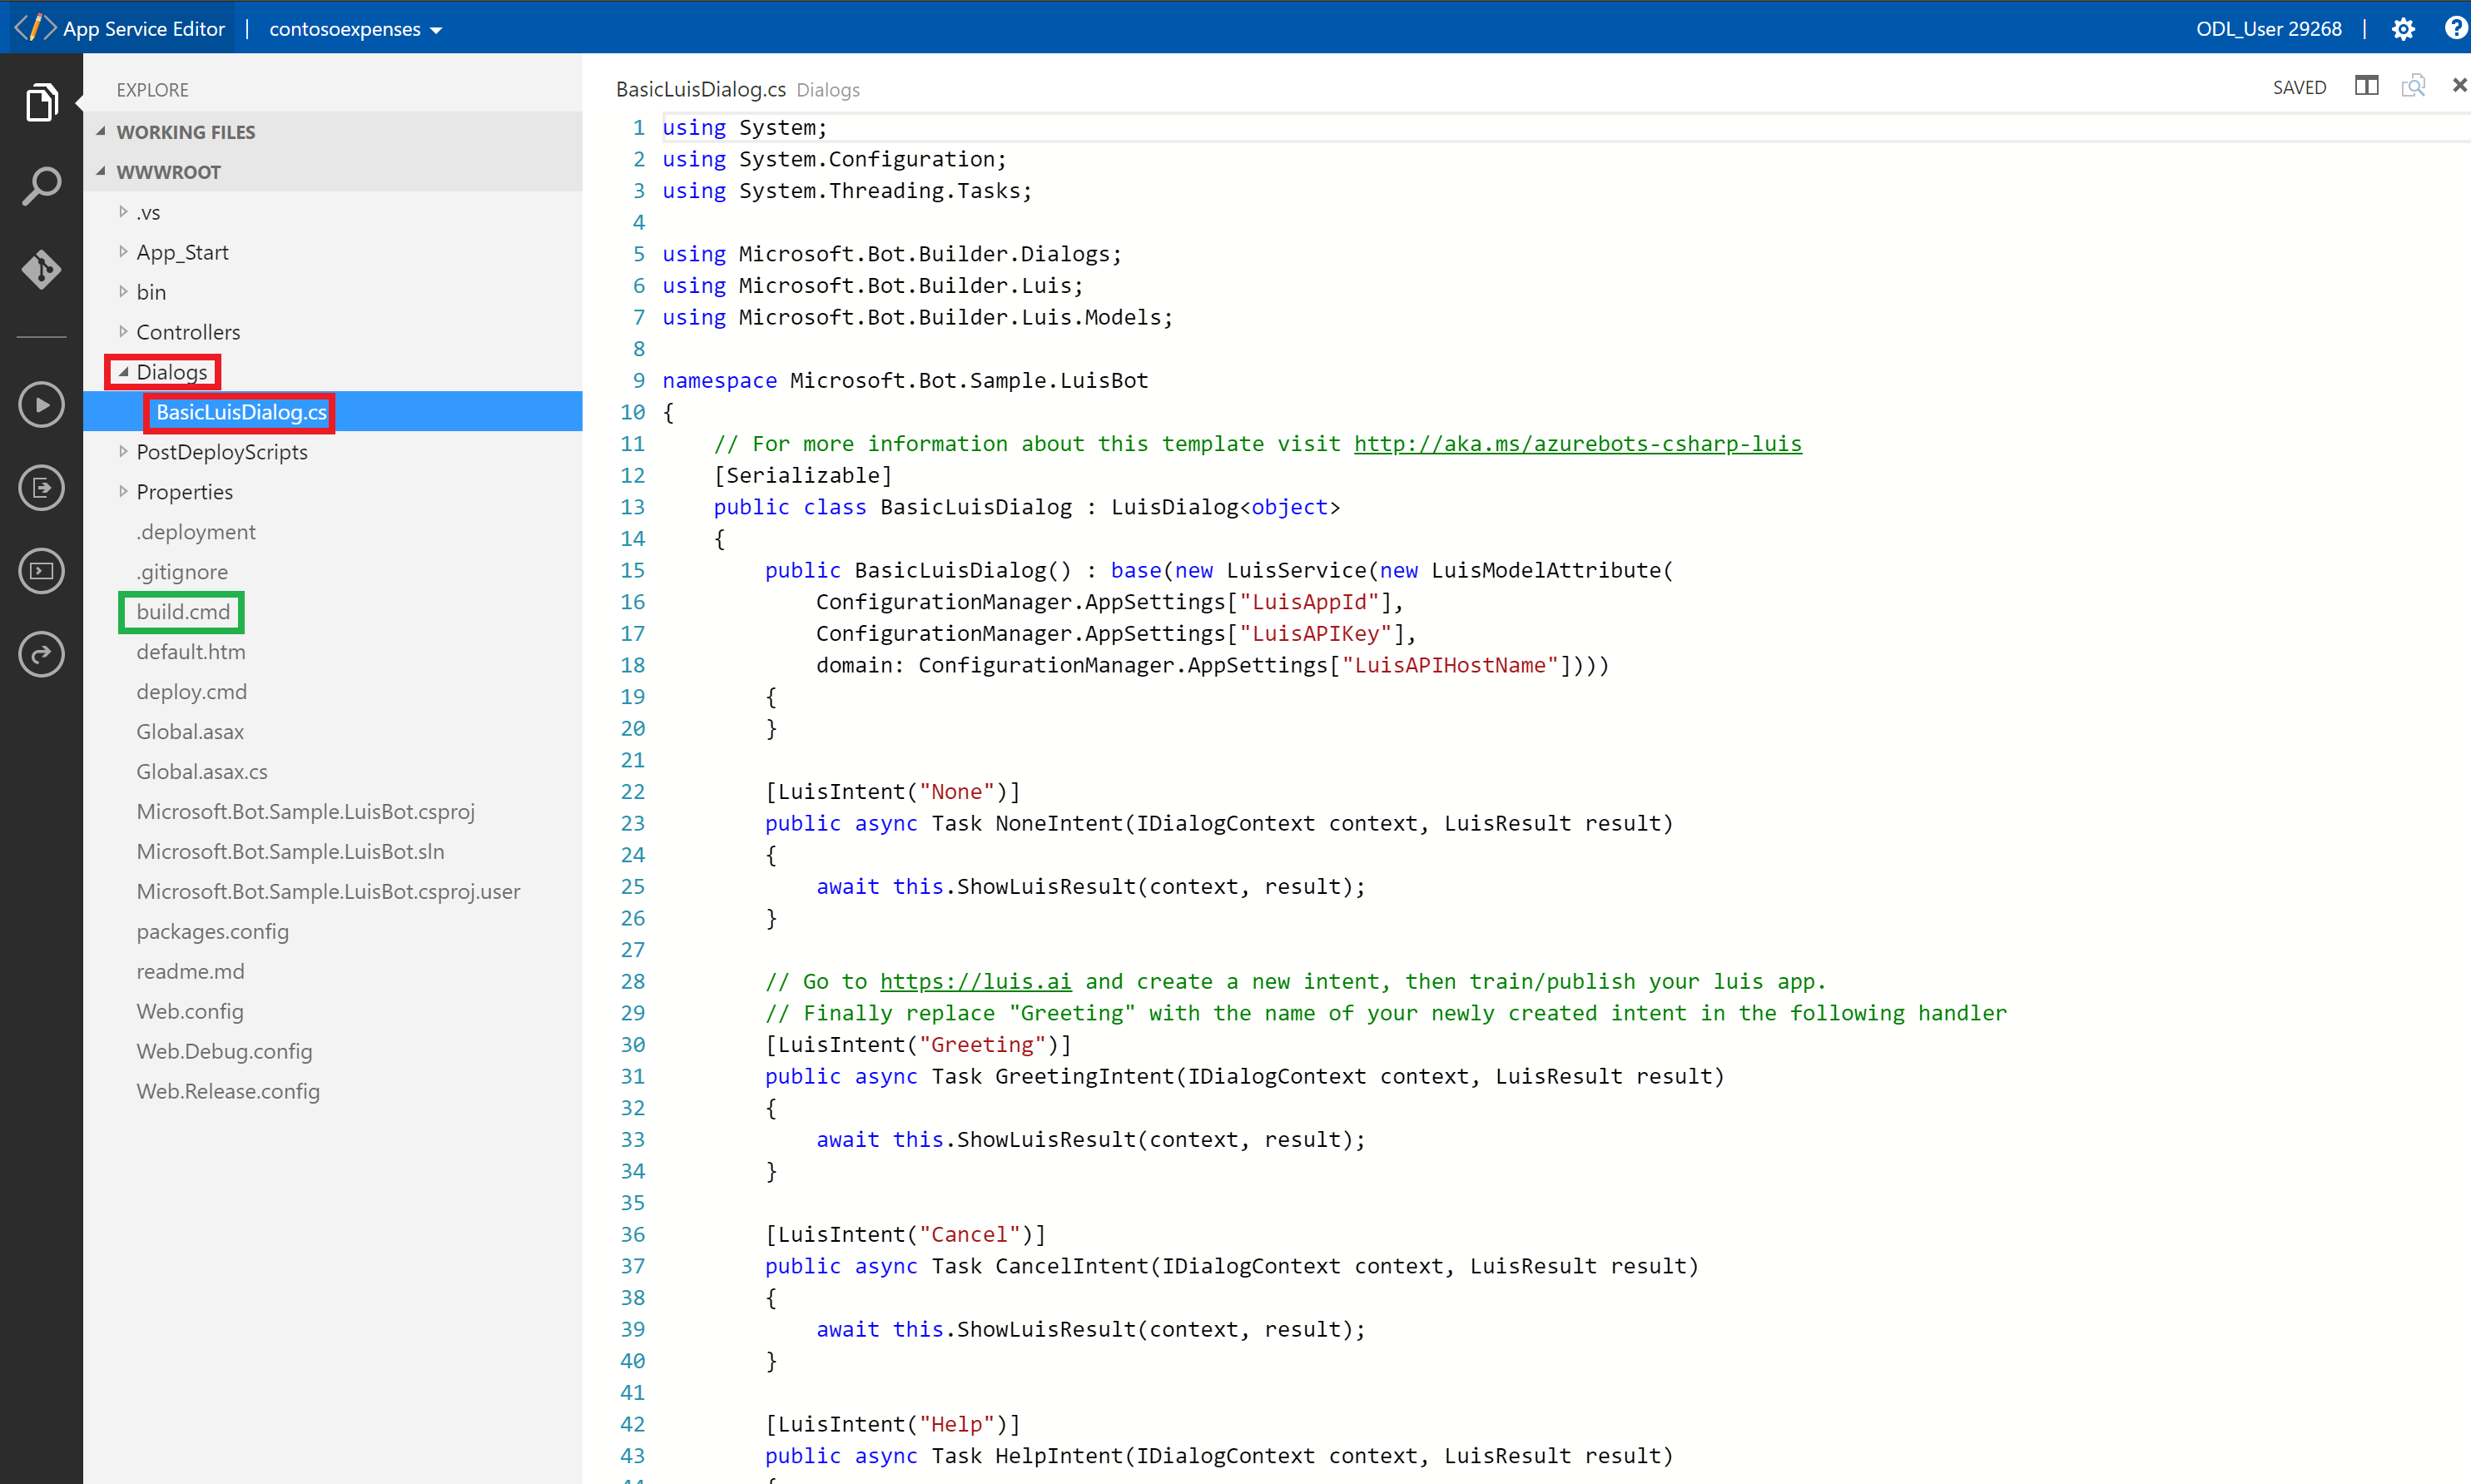
The Editor will open the LUIS C# template that you selected when creating the bot service. This shows all your source code files for your newly created bot. On the left pane, look for “Dialogs” and open the BasicLuisDialog.cs tab. You will see the default code with the LUIS intents “None”, “Greeting”, “Cancel” and “Help”. Each one points to “this.ShowLuisResult” which will output the intent along with the utterance said. When performing a change to the source code, it is important to right-click on the tab “build.cmd” on the left pane and run it to compile and transform it to executable code. If not, your changes will not be reflected in the chatbot conversation.
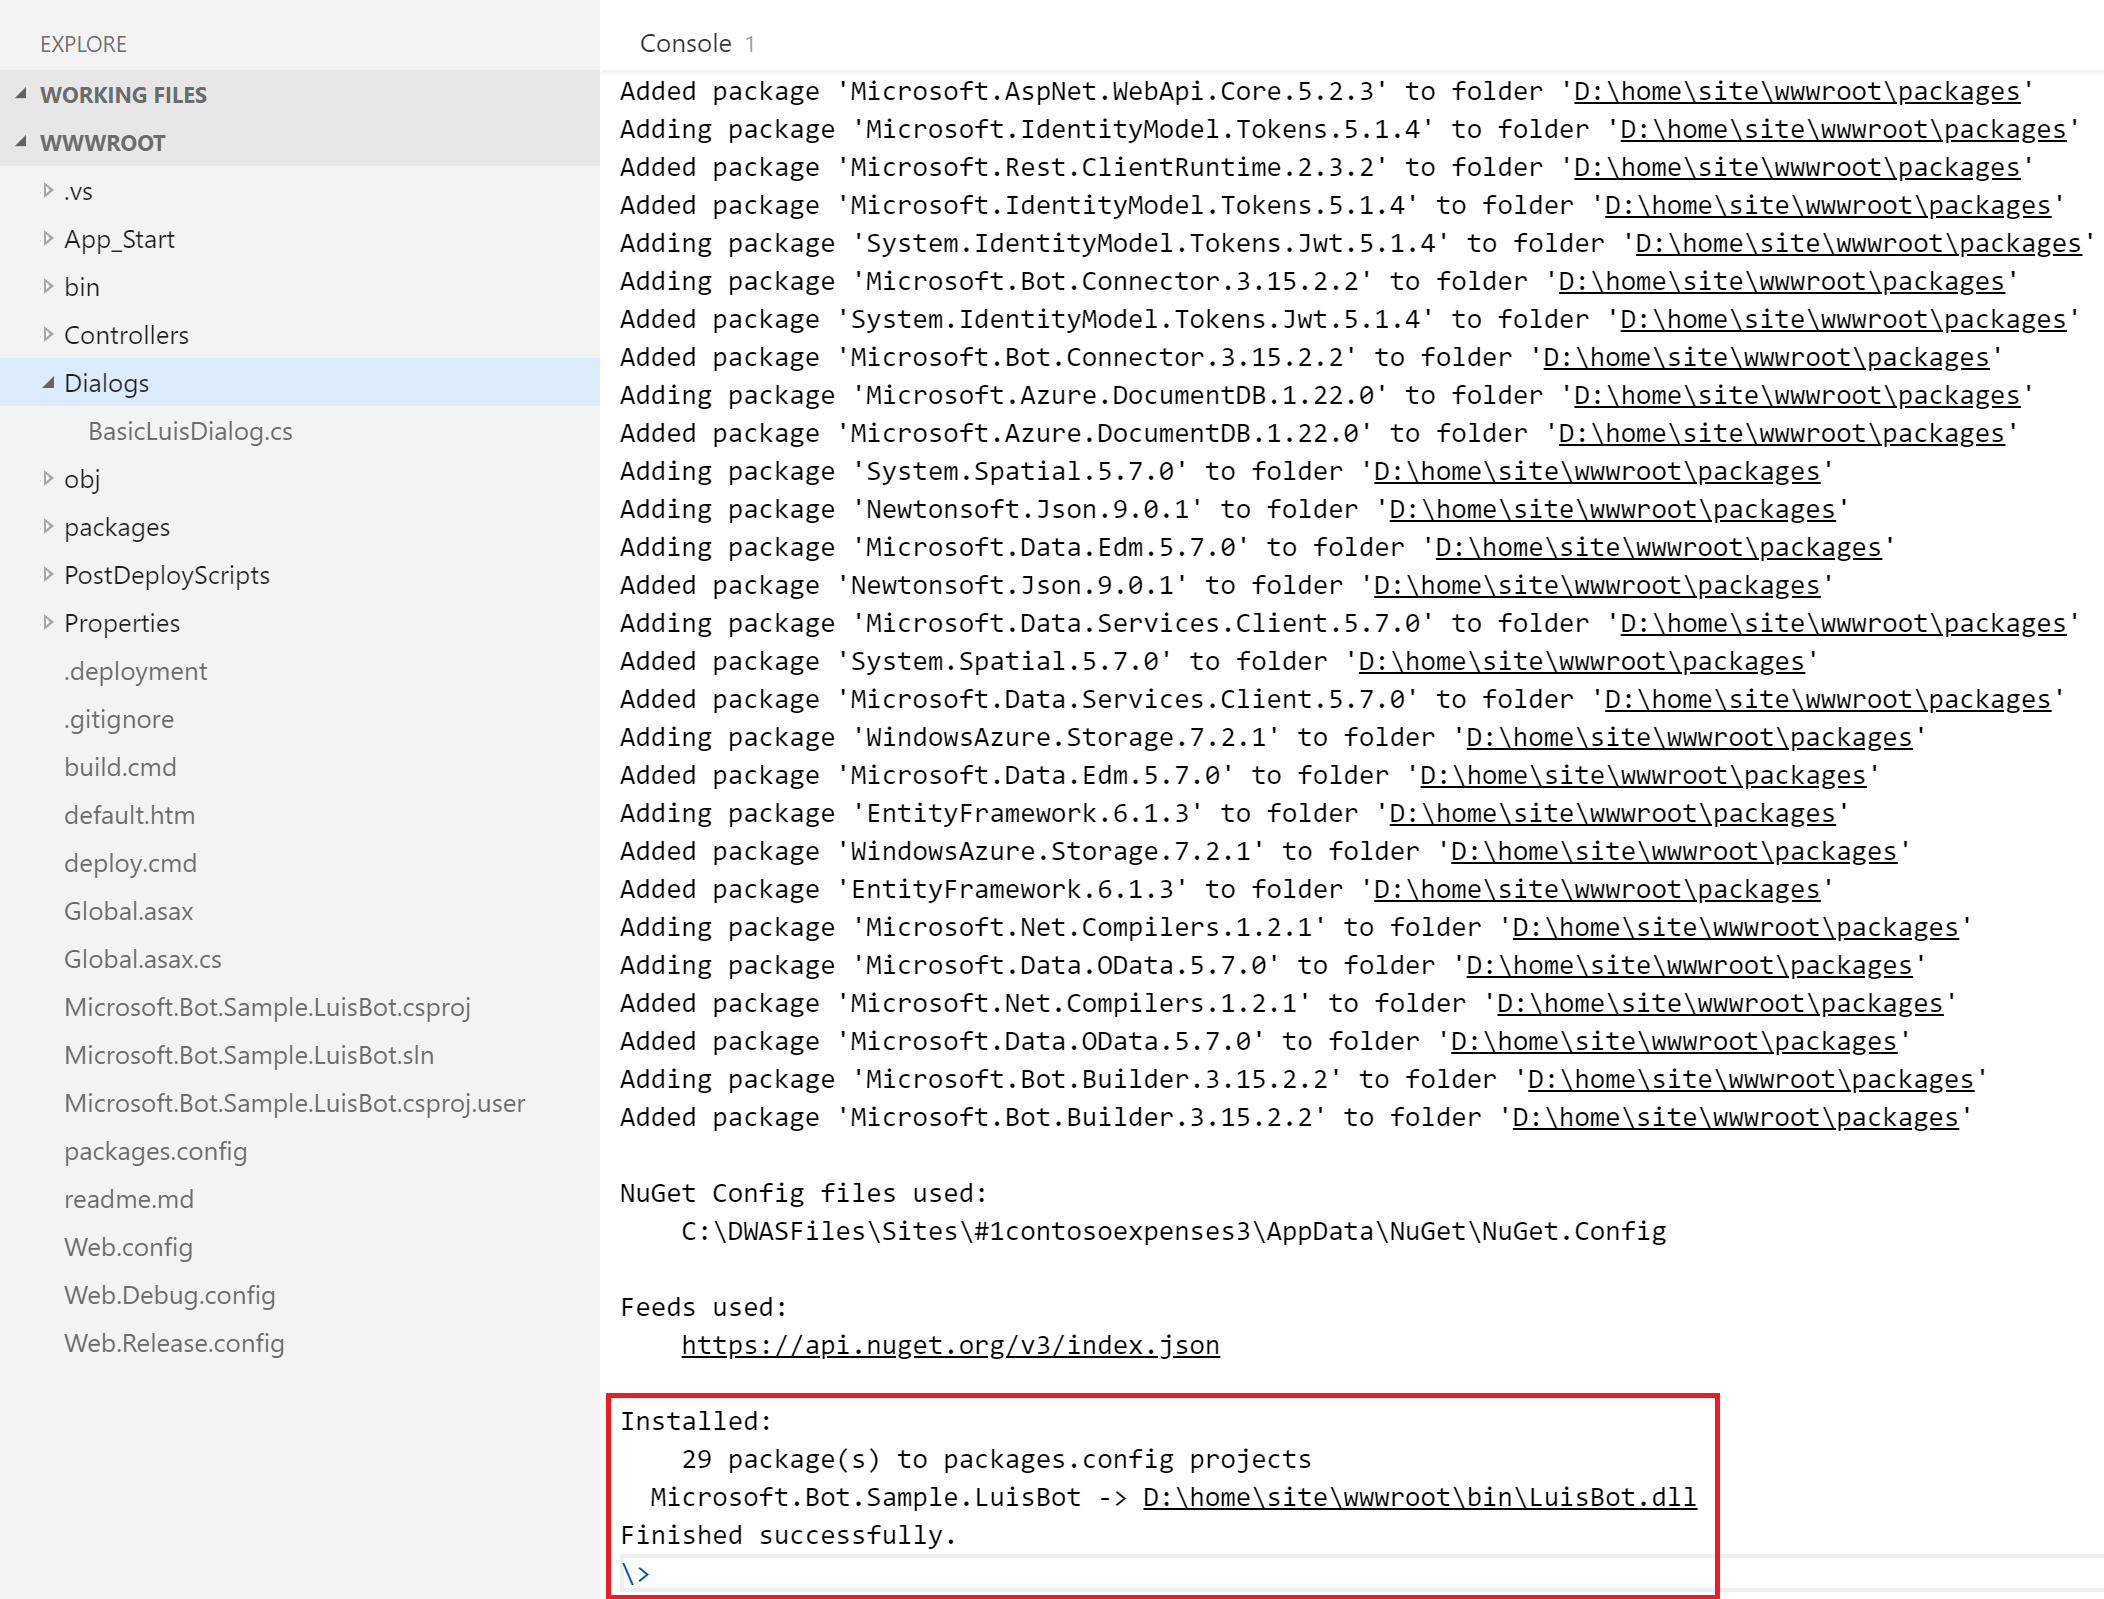
Now that you have explored the code, right-click on “build.cmd” under Properties and click “Run from console”. You should receive the following message, stating a successful run:
To explore the preconfigured default intents and utterances, switch to the LUIS dashboard. (NOTE: Leave the tab you just used open, you will need it later):
-
Open a new web browser tab and navigate to https://www.luis.ai
-
Click on Sign In and log in with your Azure Demo Lab credentials (same as for the Azure Portal in the first step)
-
Click “My Apps” and find your bot service “ContosoExpenses-“youralias”:
-
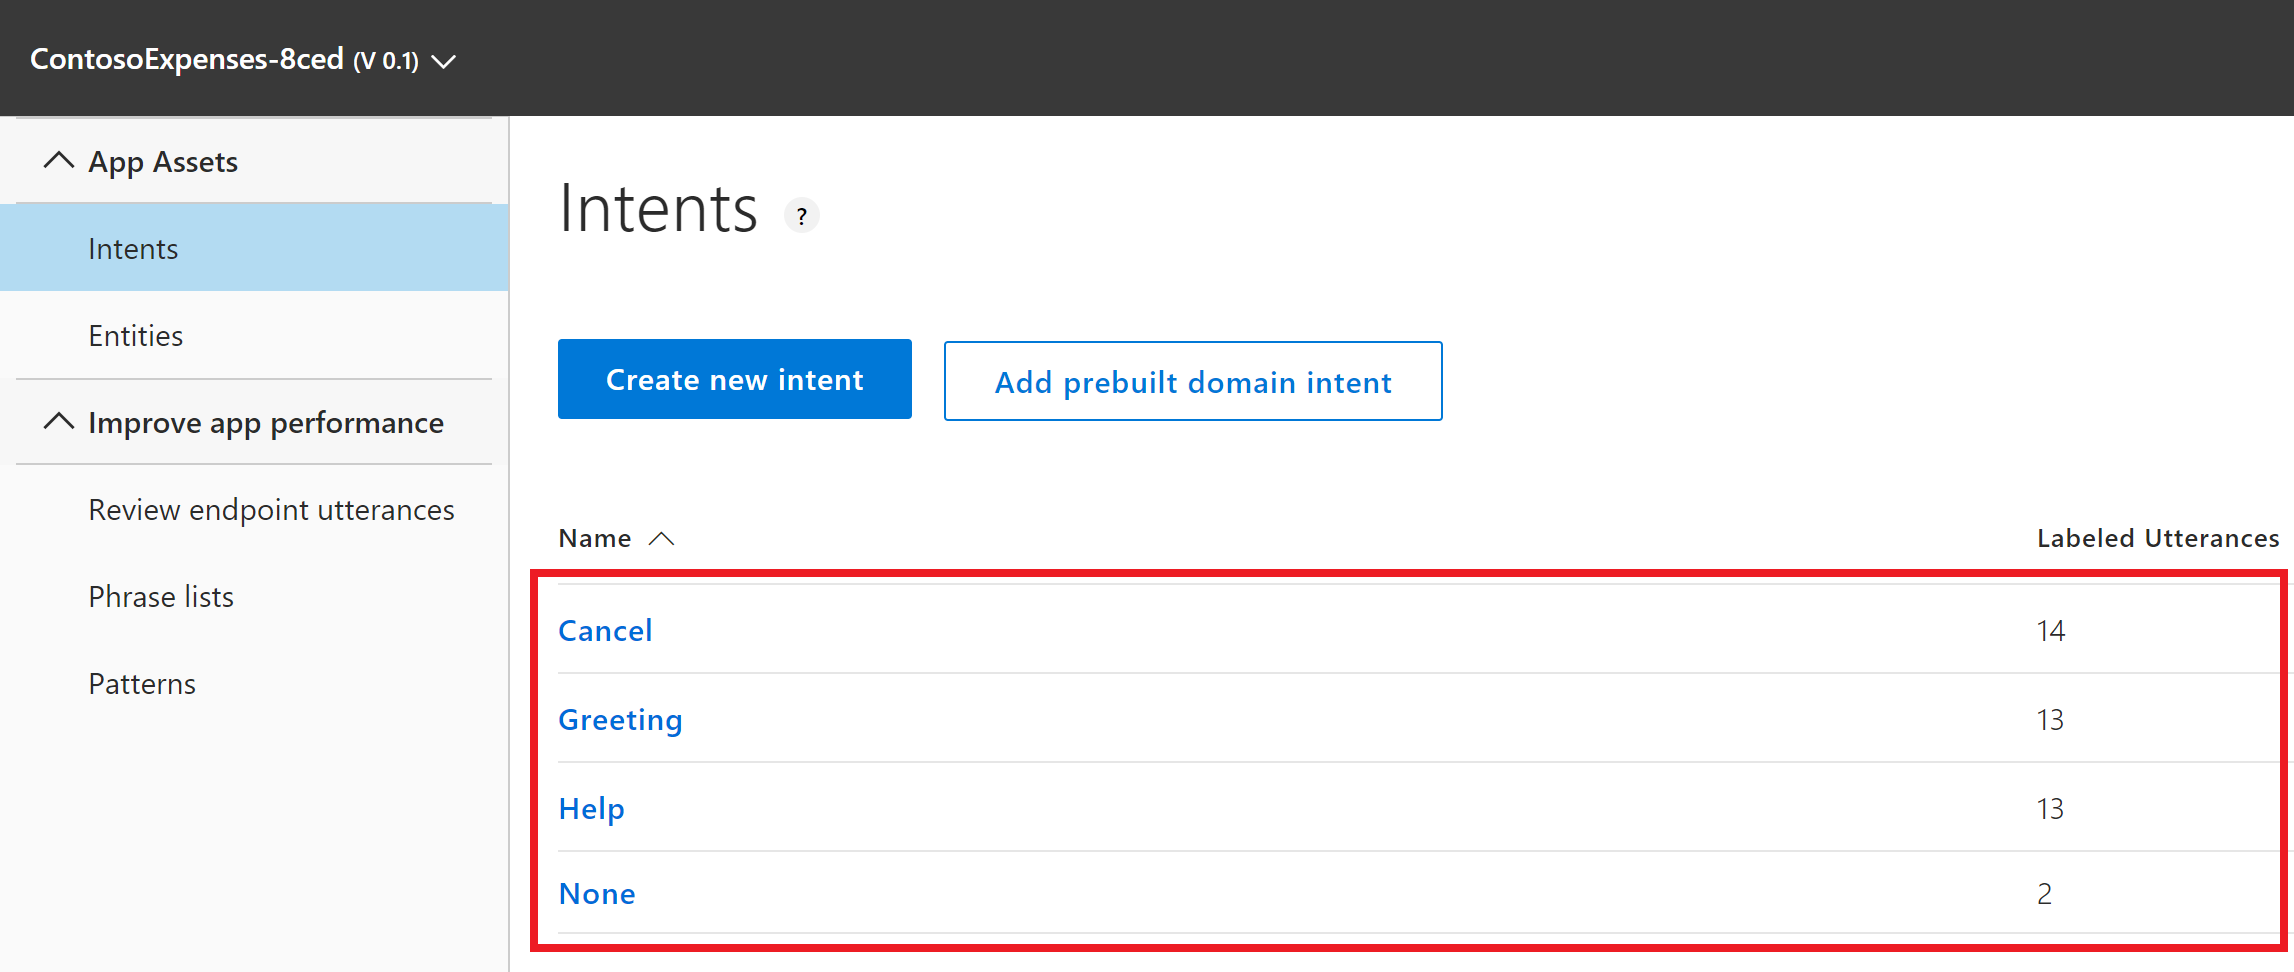
You should now see all the preconfigured intents, which matches the intents stated in the App Service Editor under the “BasicLuisDialog.cs” tab. Feel free to click on the intents and view the utterances associated with them. The utterances are sample sentences/questions that train LUIS to understand how to map sentences (utterances) to a specific intent.
-
In the next step we will create a new intent: click on “Create a new intent”
-
Name it “NewExpense”
- Note: It is important to spell it correctly (case-sensitive), otherwise the code you will copy later may not work.
-
Add the two example sentences (utterances) to help LUIS understand the user intent to add a “NewExpense”:
- “create an expense”
- “add a new expense”
-
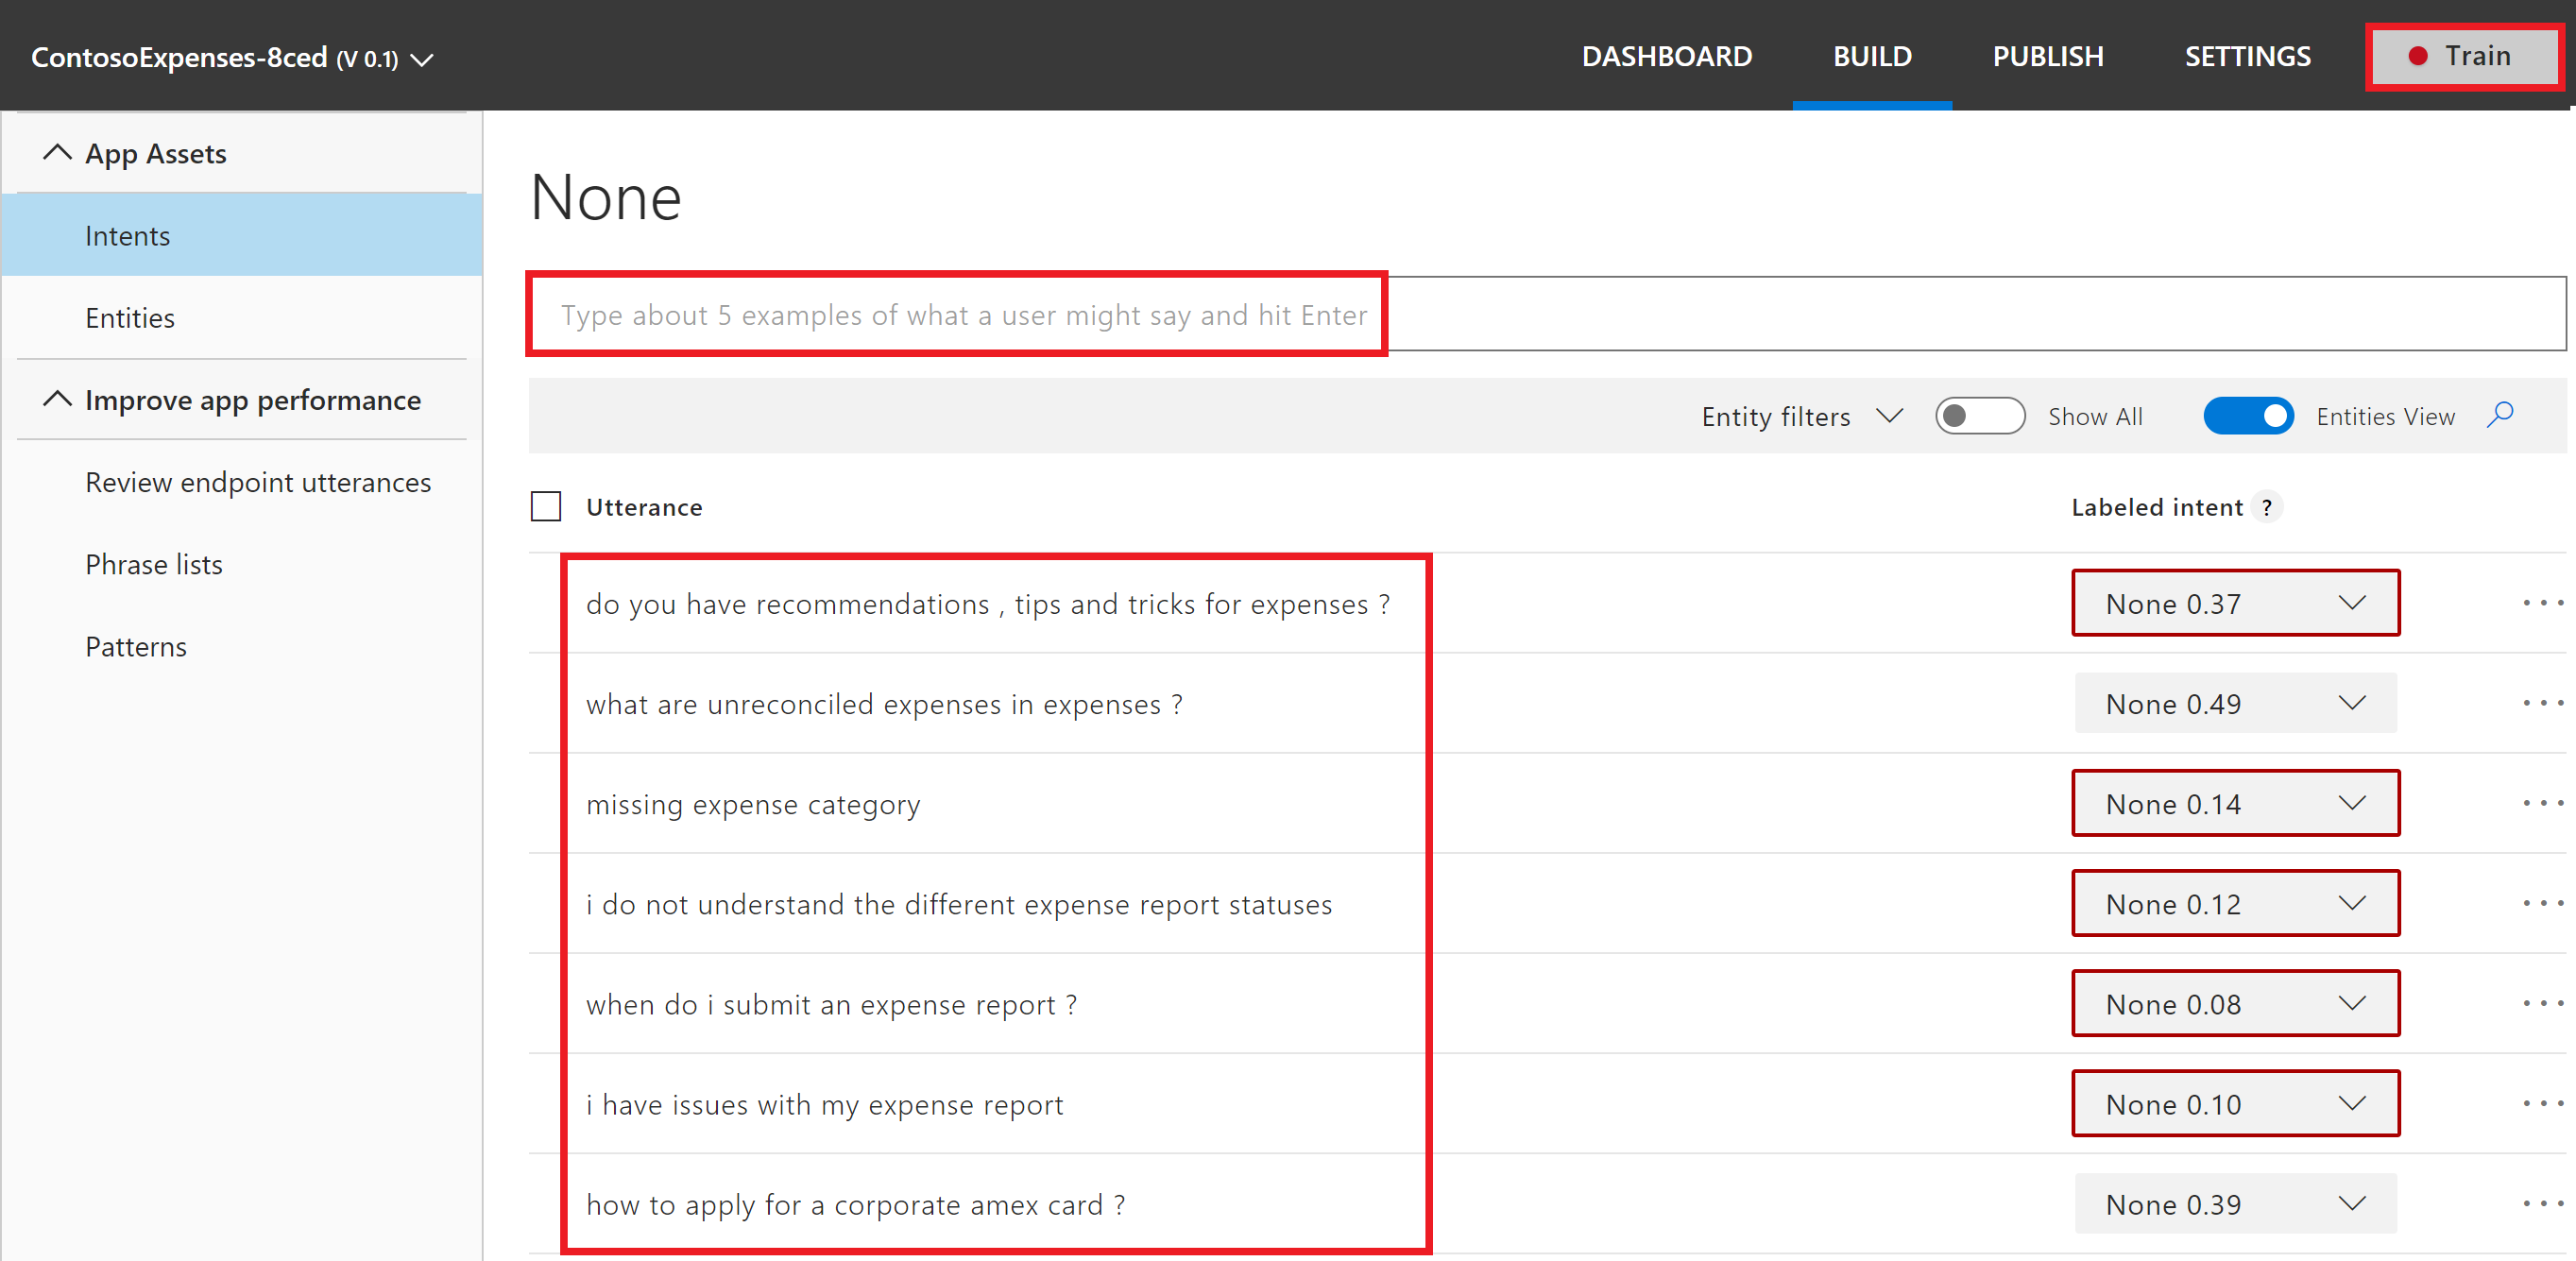
We will now train the “None” intent to help LUIS better identify which user questions/sentences it cannot understand. Click on intents in the left pane and navigate to the “None” intent.
-
Add the following 7 utterances to the “None” intent:
- “how to apply for a corporate amex card?”
- “i have issues with my expense report”
- “when do i submit an expense report?”
- “i do not understand the different expense report statuses”
- “missing expense category”
- “what are unreconciled expenses in expenses?”
- “do you have recommendations, tips and tricks for expenses?”
-
Click on “Train” (right upper corner) to train your LUIS based on the utterances you have provided
You will receive a notification when the training is successfully performed. You will now configure your bot in order to reflect the new “NewExpense” intent that you just trained.
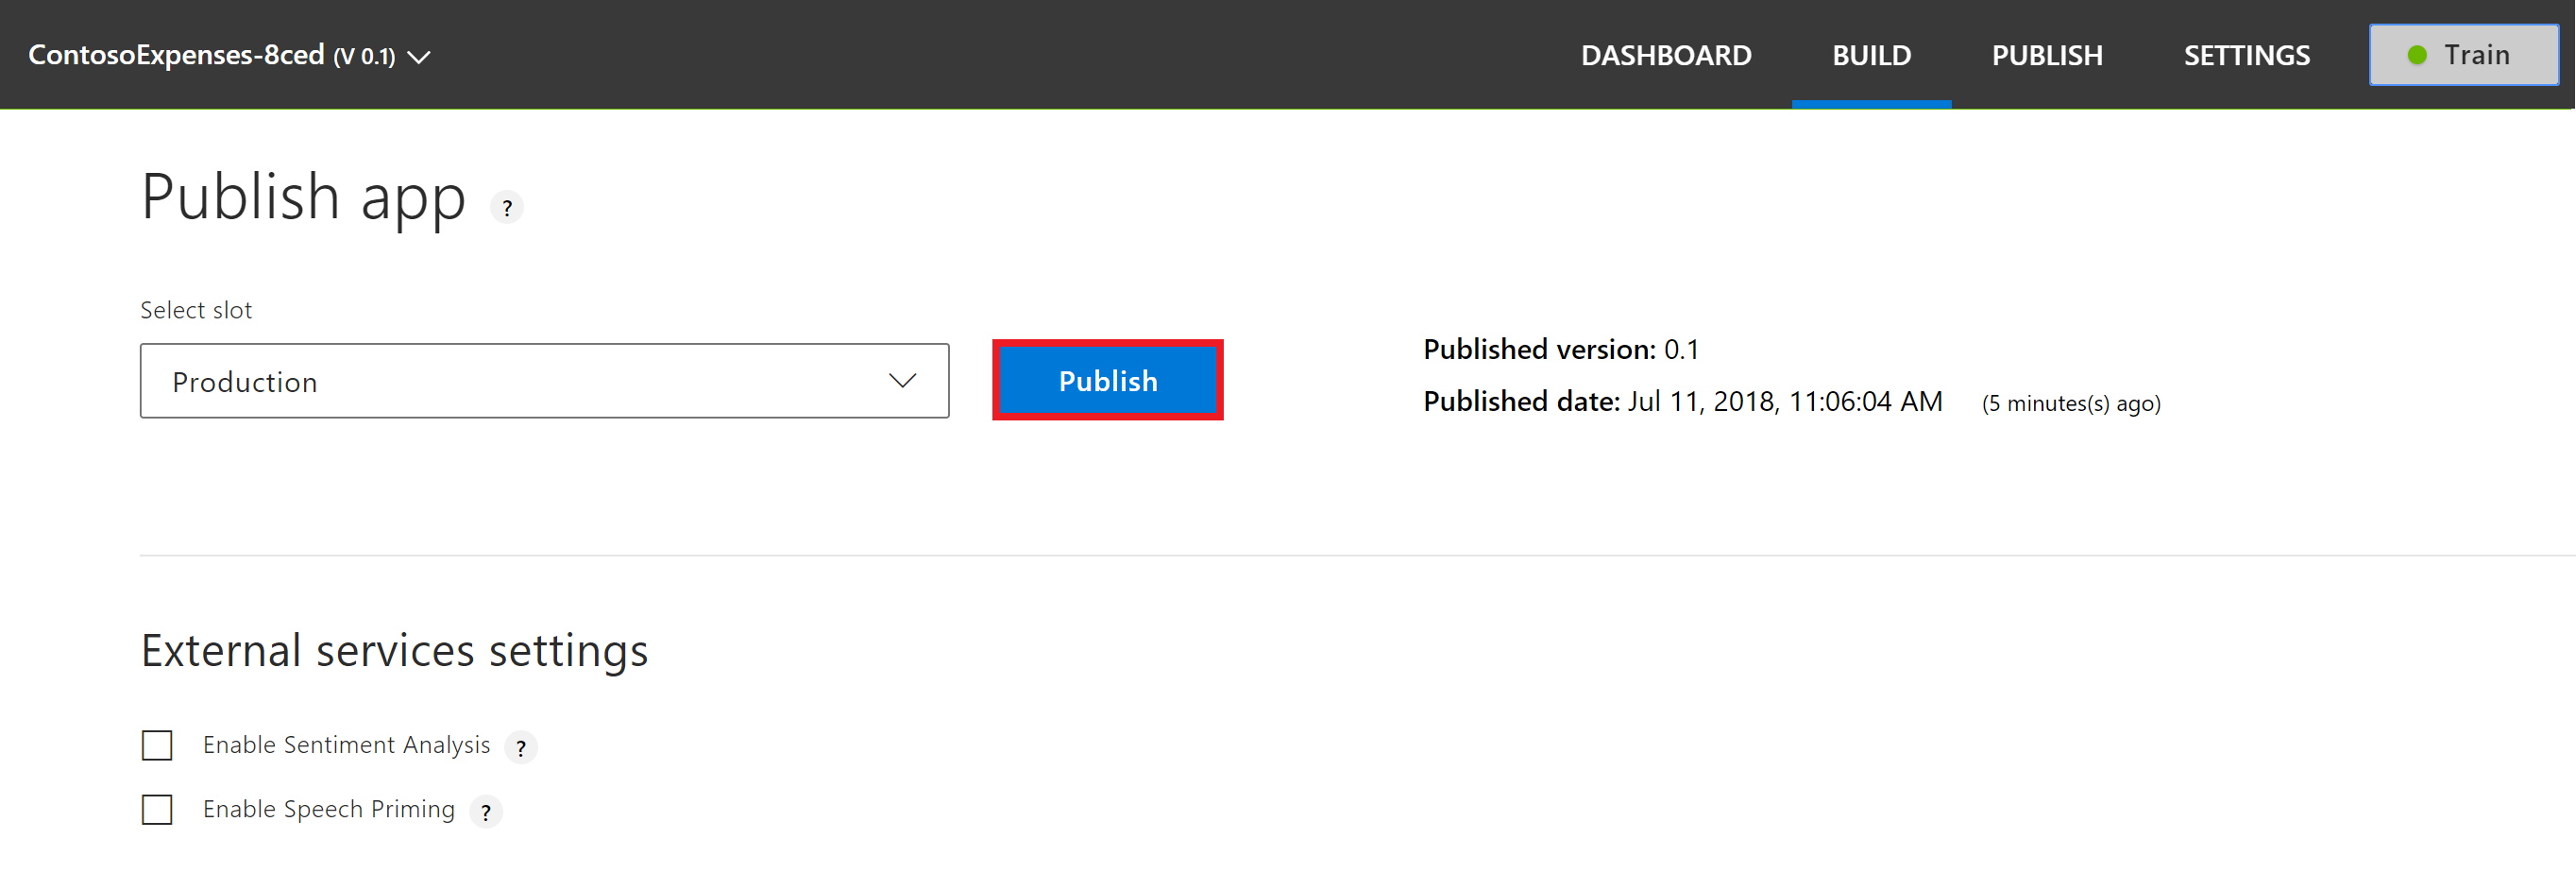
Now that you have trained LUIS based on the utterances, you will need to publish it in order for the changes to be reflective when you call LUIS from the bot.
-
Click on Publish, and once the Publish page finishes loading, click on the "Publish" button.
-
Navigate to the previous tab you were in (Azure Portal), with the “App Service Editor” opened. Copy the code that uses one of the Azure Cognitive Services called Computer Vision API into the “BasicLuisDialog.cs” tab. This will allow you to read characters off an image:
-
Delete all the code statements that start with “using” listed at the beginning lines (1-7) and replace with the following:
using System;
using System.Configuration;
using System.Threading.Tasks;
using Microsoft.Bot.Builder.Dialogs;
using Microsoft.Bot.Builder.Luis;
using Microsoft.Bot.Builder.Luis.Models;

using Microsoft.Bot.Connector;
using System.Net.Http;
using System.IO;
using System.Net;
using System.Text;
using Newtonsoft.Json;
using System.Collections.Generic;
using System.Linq;
using System.Threading;
It should now look like this:
-
Within the code, find the following statement:
public class BasicLuisDialog : LuisDialog<object>
    {
And insert directly in the next line underneath:
List<String> ocrList;
List<decimal> foundNumList;
decimal userSelectedPrice;
string userSelectedMerchantName;
string urlOfUploadedImg;
-
Stay in the same code and look for this statement:
private async Task ShowLuisResult(IDialogContext context, LuisResult result)
{
    await context.PostAsync($"You have reached {result.Intents[0].Intent}. You said: {result.Query}");
    context.Wait(MessageReceived);
}
And insert underneath it:
[LuisIntent("NewExpense")]
        public async Task NewExpenseIntent(IDialogContext context, LuisResult result)
        {

            // Ask the user to uploads an attachment
            PromptDialog.Attachment(
                   context: context,
                   resume: ResumeAfterExpenseUpload,
                   prompt: "I see you are trying to add an expense. Please upload a picture of your expense and I will try to perform character recognition (OCR) on it.",
                   retry: "Sorry, I didn't understand that. Please try again."
               );


        }

        private async Task ResumeAfterExpenseUpload(IDialogContext context, IAwaitable<IEnumerable<Attachment>> result)
        {
            var attachment = await result as IEnumerable<Attachment>;
            var attachmentList = attachment.GetEnumerator();
            if (attachmentList.MoveNext())
            {
                string tempStorage = Path.GetTempPath() + attachmentList.Current.Name;
                urlOfUploadedImg = attachmentList.Current.ContentUrl;

                // Create a request using a URL that can receive a post.
                WebRequest request = WebRequest.Create("https://eastus.api.cognitive.microsoft.com/vision/v2.0/recognizeText?mode=Printed");
                // Set the Method property of the request to POST.
                request.Method = "POST";
                string postData = "{\"url\":\""+urlOfUploadedImg+"\"}";
                byte[] byteArray = Encoding.UTF8.GetBytes(postData);
                // Set the ContentType property of the WebRequest.
                request.ContentType = "application/json";
                request.Headers.Add("Ocp-Apim-Subscription-Key", "8bf6f2a617814eebbdd4d31061a51e7b");
                // Set the ContentLength property of the WebRequest.
                request.ContentLength = byteArray.Length;
                // Get the request stream.
                Stream dataStream = request.GetRequestStream();
                // Write the data to the request stream.
                dataStream.Write(byteArray, 0, byteArray.Length);
                // Close the Stream object.
                dataStream.Close();
                // Get the response.
                WebResponse response = request.GetResponse();
                // Display the status.
                //Console.WriteLine(((HttpWebResponse)response).StatusDescription);
                // Get the stream containing content returned by the server.
                dataStream = response.GetResponseStream();
                string header;
                bool foundOCRResult = false;
                StreamReader reader = new StreamReader(dataStream);
                dynamic jsonObject;
                string responseFromServer = "";
                header = response.Headers["Operation-Location"];
                while (!foundOCRResult) {
                    await Task.Delay(3000);
                    request = WebRequest.Create(header);
                    request.Headers.Add("Ocp-Apim-Subscription-Key", "8bf6f2a617814eebbdd4d31061a51e7b");
                    response = request.GetResponse();
                    dataStream = response.GetResponseStream();
                    // Open the stream using a StreamReader for easy access.
                    reader = new StreamReader(dataStream);
                    // Read the content.
                    // Get the request stream.


                    // Close the Stream object.

                    responseFromServer = reader.ReadToEnd();
                    dataStream.Close();
                    jsonObject = JsonConvert.DeserializeObject(responseFromServer);
                    string status = jsonObject.status;
                    if (status == "Failed")
                    {

                        await context.PostAsync("OCR failed response when attempting to use Operation-Location header to obtain results.");
                        return;
                    }else if (status == "Succeeded")
                    {

                        foundOCRResult = true;
                    }
                }

                reader.Close();
                response.Headers.Keys.Get(1);
                WebHeaderCollection headers = response.Headers;

                dataStream.Close();
                response.Close();

                //response.Headers;

                jsonObject = JsonConvert.DeserializeObject(responseFromServer);

                ocrList = new List<String>();
                foundNumList = new List<decimal>();


                foreach (dynamic line in jsonObject.recognitionResult.lines)
                {
                    string lineStr = line.text.ToString();

                    //Console.WriteLine(lineStr);
                    ocrList.Add(lineStr);


                }

                ocrList.Reverse();

                int j = 1; // counter for how many times it found a number (execution will stop when it has found three numbers)
                int k = 1; // counter for how many iterations it performed to find at least three numbers
                decimal foundNum;
                char[] foundChars;
                bool breakLoop = false;

                for (int i = 0; i < ocrList.Count - 1 && !breakLoop; i++)
                {


                    if (ocrList[i].ToLower().Contains("total") || ocrList[i].ToLower().Contains("amount") && ocrList[i].ToLower().Contains("total"))
                    {
                        while (j < 3 && ocrList.Count > i + k)
                        {
                            int searchIndex = i - k;
                            if (searchIndex < 0)
                            {
                                breakLoop = true;
                                break;

                            }
                            foundChars = ocrList[searchIndex].Where(Char.IsDigit).ToArray();
                            string foundStr = "";
                            if (foundChars.Count() != 0)
                            {
                                foreach (char c in foundChars)
                                {
                                    foundStr = foundStr + c;
                                }

                                foundStr = foundStr.Insert(foundStr.Count() - 2, ".");

                                if (decimal.TryParse(foundStr, out foundNum))
                                {
                                    foundNumList.Add(foundNum);
                                    j++;
                                }
                            }
                            k++;

                        }
                        j = 1;
                        k = 1;

                    }


                }

                userSelectedMerchantName = ocrList[ocrList.Count - 1];
               await context.PostAsync("Based on OCR, I have detected " + userSelectedMerchantName + " to be the Merchant Name.");


                HeroCard card = new HeroCard { Text = "Is that correct? If not, please type in the merchant name.", Buttons = new List<CardAction> { new CardAction(ActionTypes.ImBack, title: "Yes", value: "Yes") } };
                var message = context.MakeMessage();
                message.Attachments.Add(card.ToAttachment());
                await context.PostAsync(message);

                context.Wait(ResumeAfterMerchantName);


            }
            else
            {
                await context.PostAsync("Sorry, no attachments found!");
                return;
            }


        }

private async Task ResumeAfterMerchantName(IDialogContext context, IAwaitable<object> result)
        {
            var activity = await result as Activity;

            if (activity.Text.ToLower().Contains("yes"))
            {


            }
            else
            {
                userSelectedMerchantName = activity.Text;
            }

            List<CardAction> listofCards = new List<CardAction>();
            listofCards.Add(new CardAction(ActionTypes.ImBack, title: "Yes", value: "Yes"));
            foreach (decimal foundNum in foundNumList)
            {

                listofCards.Add(new CardAction(ActionTypes.ImBack, title: foundNum.ToString(), value: foundNum.ToString()));
            }


            userSelectedPrice = foundNumList.FirstOrDefault();
            HeroCard card = new HeroCard { Title = "Numbers found on the expense", Text = "Is the total **" + userSelectedPrice + "**? If not, feel free to select from the other numbers I have found above, or just type it in!", Buttons = listofCards };

            var message = context.MakeMessage();
            message.Attachments.Add(card.ToAttachment());
            await context.PostAsync(message);

            context.Wait(ResumeAfterPrice);

        }

        private async Task ResumeAfterPrice(IDialogContext context, IAwaitable<object> result)
        {
            var activity = await result as Activity;

            if (activity.Text.ToLower().Contains("yes"))
            {
                await ResumeAfterReceipt(context, result);

            }
            else
            {

                decimal n;
                if(decimal.TryParse(activity.Text, out n))
                {
                    userSelectedPrice = n;
                    await ResumeAfterReceipt(context, result);
                }
                else
                {
                    await context.PostAsync("Sorry, but your input does not appear to be a number. Please try again.");
                    context.Wait(ResumeAfterPrice);
                }
            }


        }

        private async Task ResumeAfterReceipt(IDialogContext context, IAwaitable<object> result)
        {

            var thumbnailCard = new ThumbnailCard
            {
                // title of the card
                Title = "Your expense",
                //subtitle of the card
                Subtitle = "Company Name: **"+userSelectedMerchantName+"**",

                //Detail Text
                Text = "Total: " + userSelectedPrice,
                // smallThumbnailCard  Image
                Images = new List<CardImage> { new CardImage(urlOfUploadedImg) },
            };
            var message = context.MakeMessage();
            message.Attachments.Add(thumbnailCard.ToAttachment());
            await context.PostAsync(message);
            await context.PostAsync("Your expense has been saved! Is there anything else I can help you with?");
            context.Done("");
            //return thumbnailCard.ToAttachment();


        }
-
In order to reflect your new changes, right-click in the panel on the left on “build.cmd” which is found under “Properties” and click “Run from console”. You should receive the following success message:
-
Switch back to the Azure Portal you have still opened in another Tab or open a new one navigating to https://portal.azure.com
- On your left, click on “Resource Groups” and select the resource group that hosts your bot (you should only see one resource group). Click on your Web App Bot Service (“ContosoExpenses-‘youralias’”) and find on the panel that will open on your left “Test in Web Chat”
- Test the bot by starting a chat with the input “I would like to create an expense”. You should be prompted to upload an image. Click on the small image icon next to the message input field to upload a sample image provided at:- https://github.com/samaea/expensesbotworkshop/tree/master/receipts.
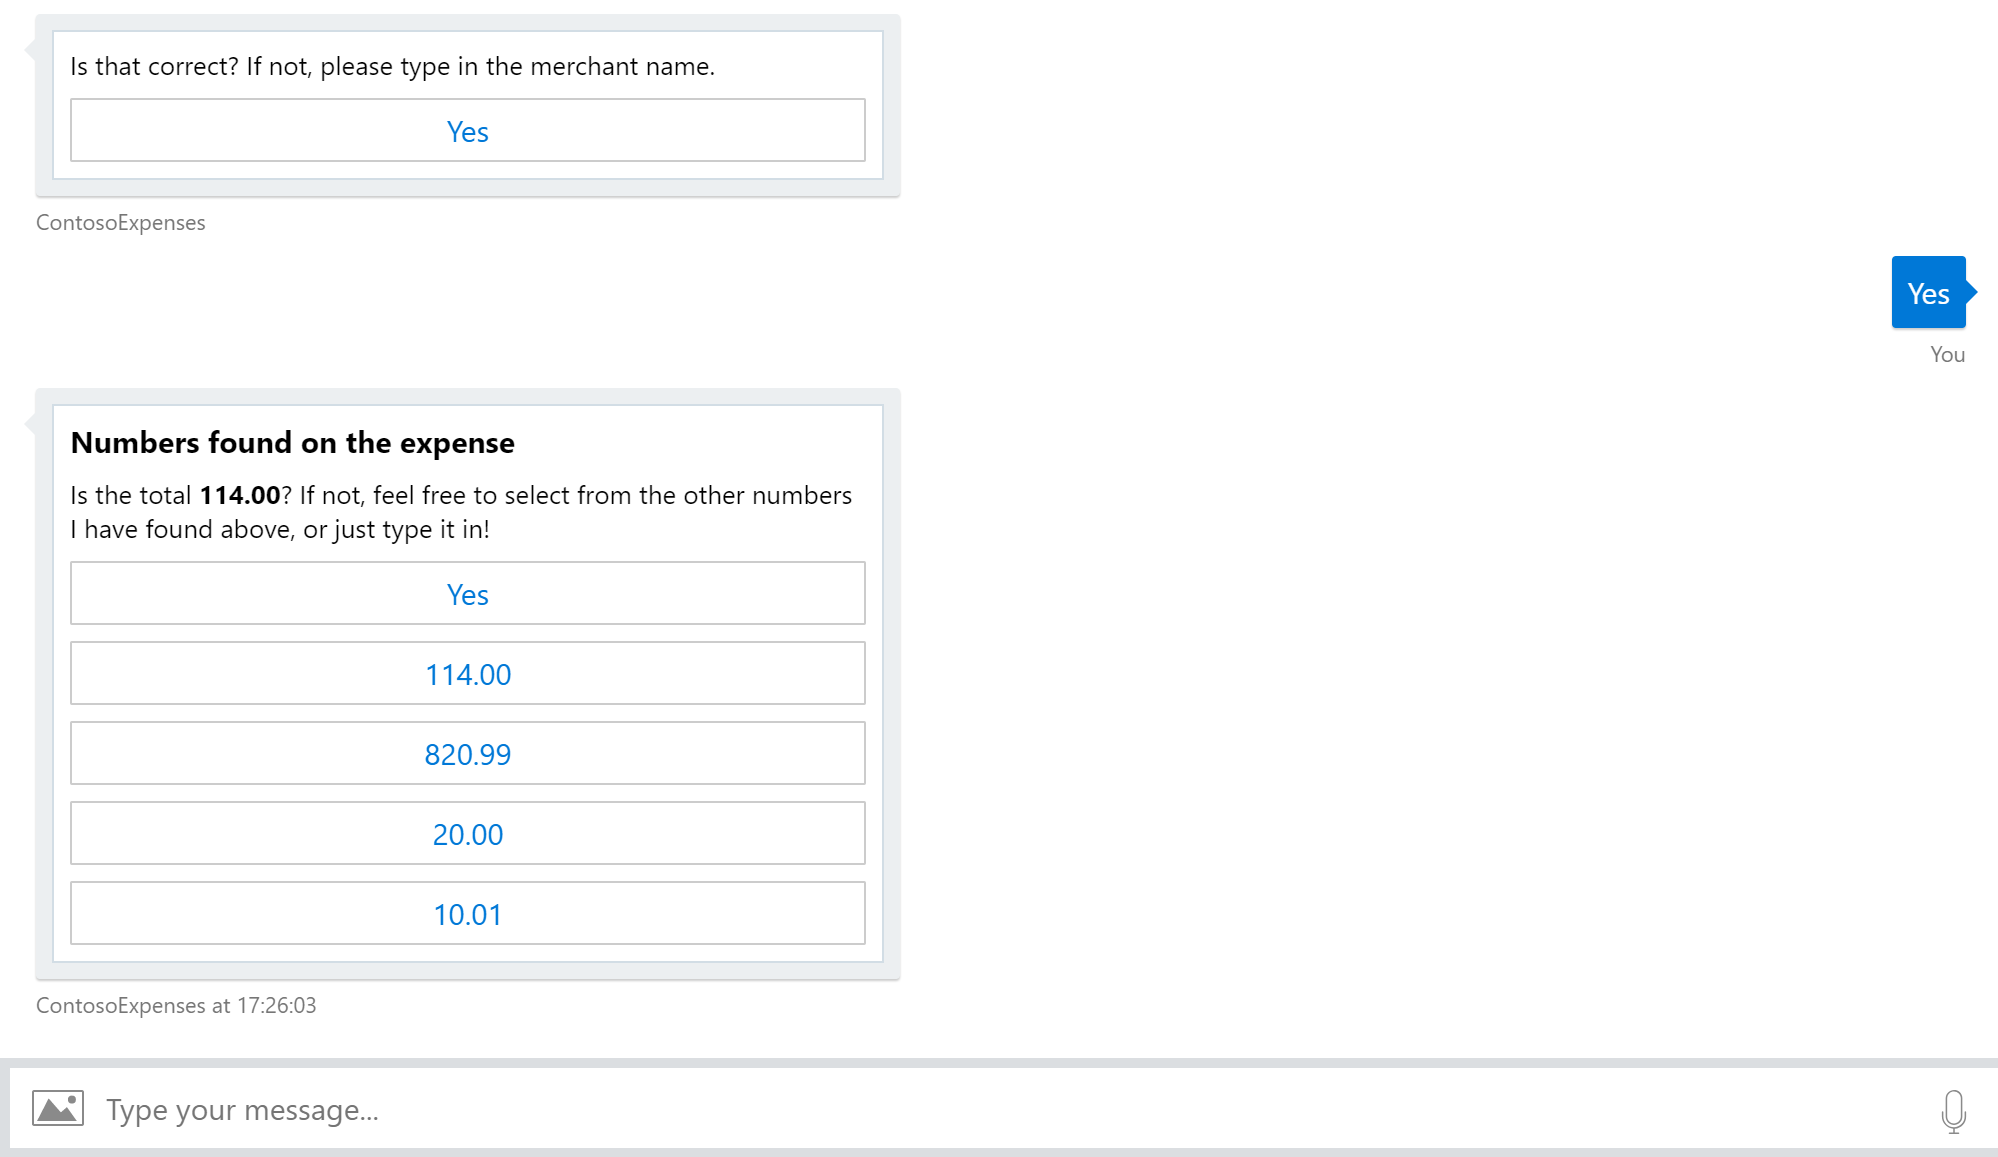
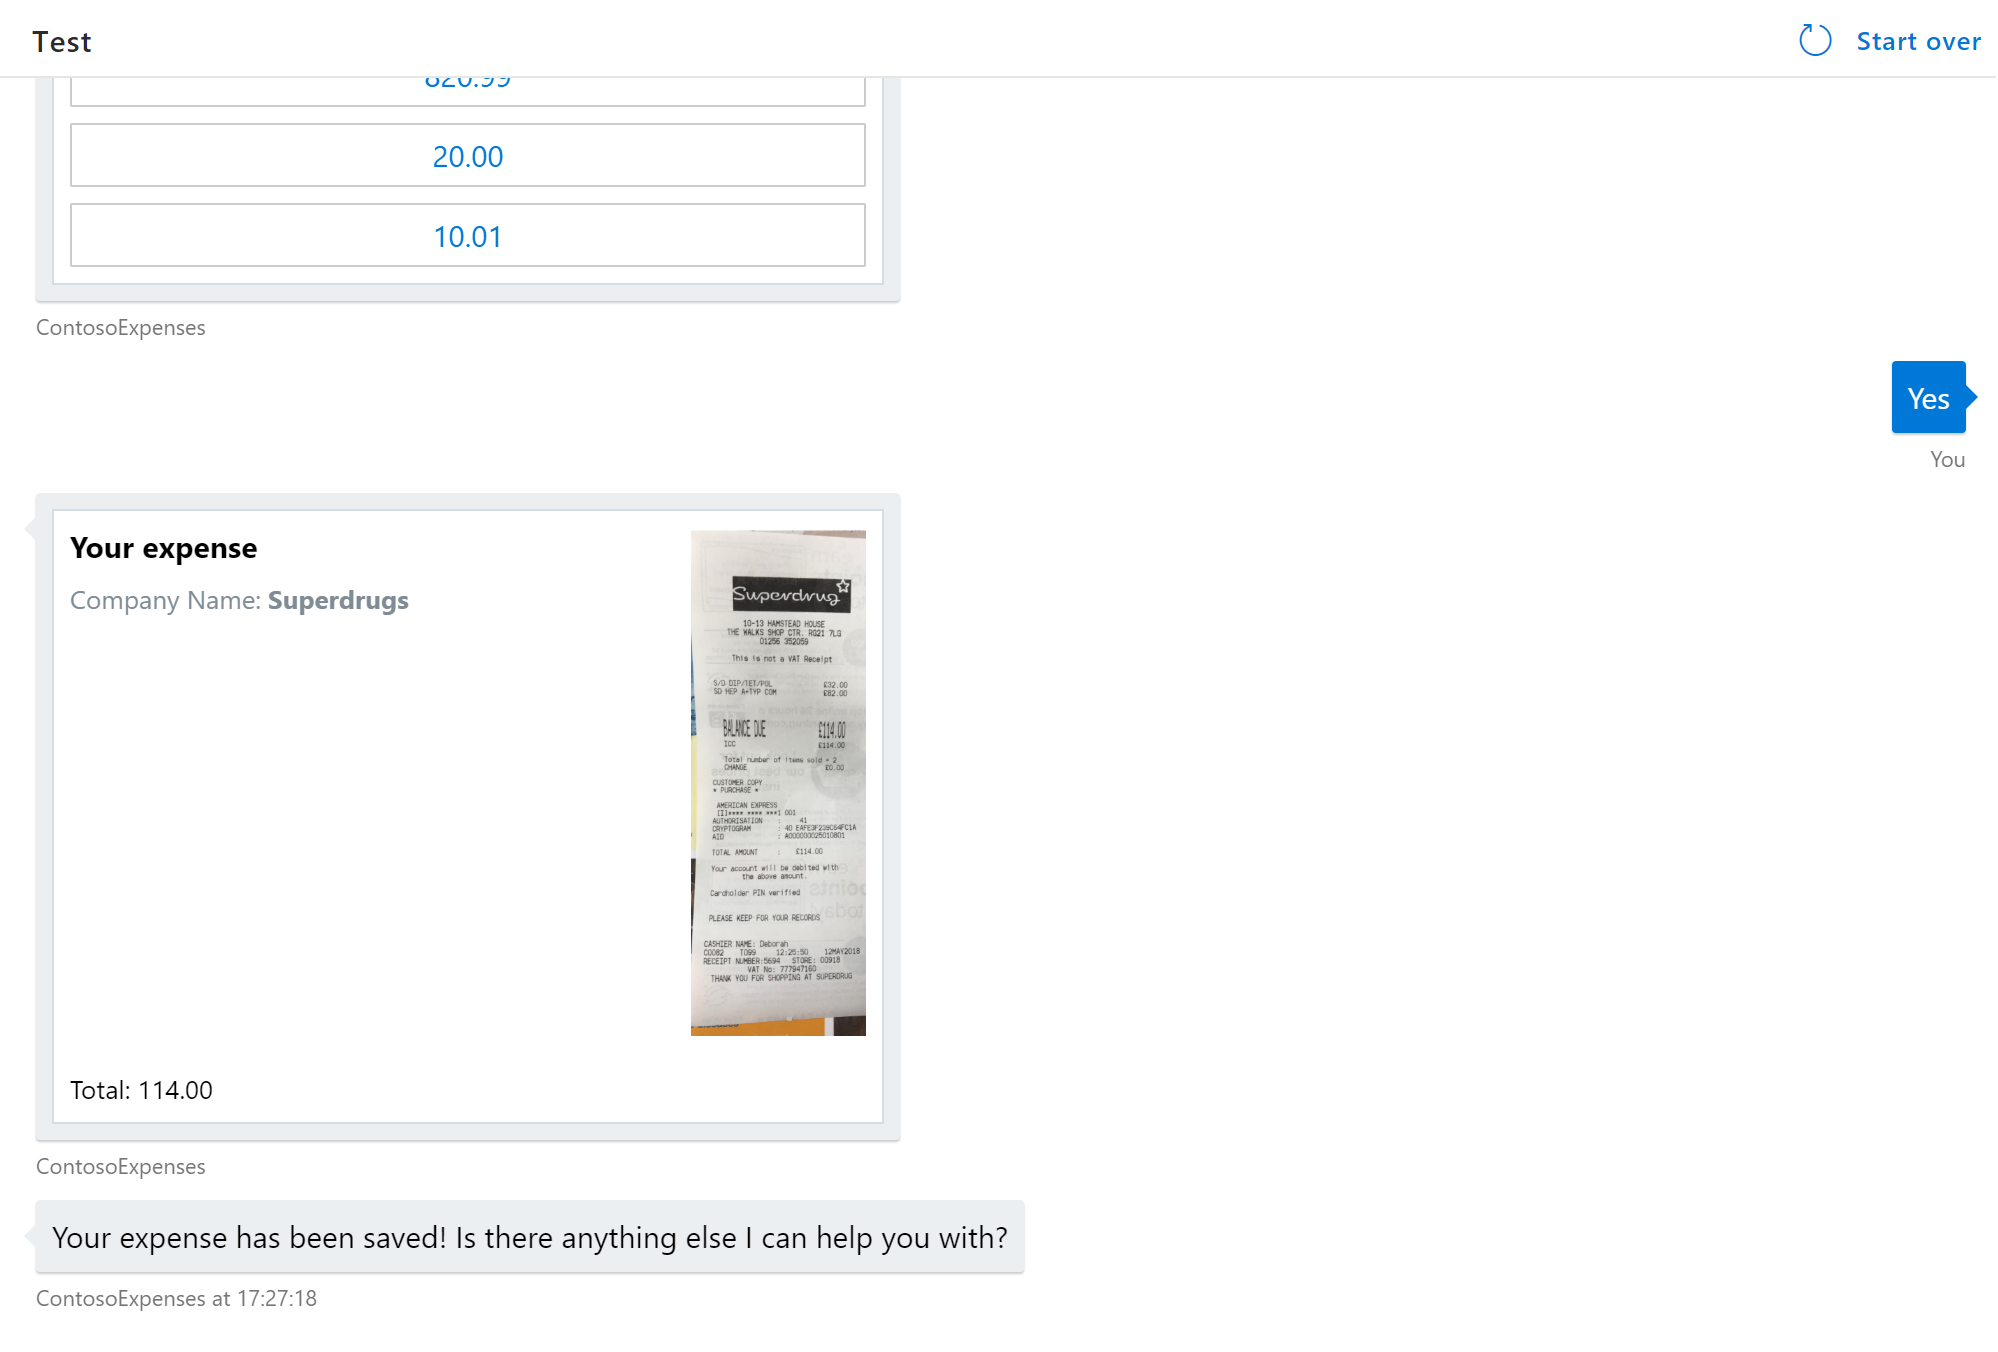
The bot will use optical character recognition to identify information of the receipt image. It will provide you with the numbers it found and ask you to confirm or change the total number of the purchase:
Feel free to test with the other sample receipts provided in the previous link.
Well done! You have now configured a bot capable of understanding users’ intents with the help of LUIS.
You will now configure your bot to handle user input it does not understand (for instance when LUIS maps an utterance (user sentence input) to the “None” intent). For this scenario, you will use another Cognitive Service called “QnA Maker”. QnA Maker allows customers to create a knowledge base (like a small database) consisting of pairs of questions and answers. This can be populated by simply providing a FAQ link or by uploading a file containing questions and answers. Once the knowledge base is built, your bot can query the QnA Maker whenever an utterance lands on the “None” intent.
- Go to your Azure Portal again and create a new resource. Search for QnA Maker and click on the service published by Microsoft.
-
Enter the following information:
- Give the QnA Maker an unique name “expensesqnamaker-‘youralias’”
- select the pricing tier S0
- Use the existing resource group you created for your bot service (find it in the drop-down bar)
- Select “B” for the search pricing tier
- Leave the rest of the settings as is and click “Create”
Wait for the QnA Maker service to be provisioned. You can check the status of the deployment by clicking on the Bell icon.
-
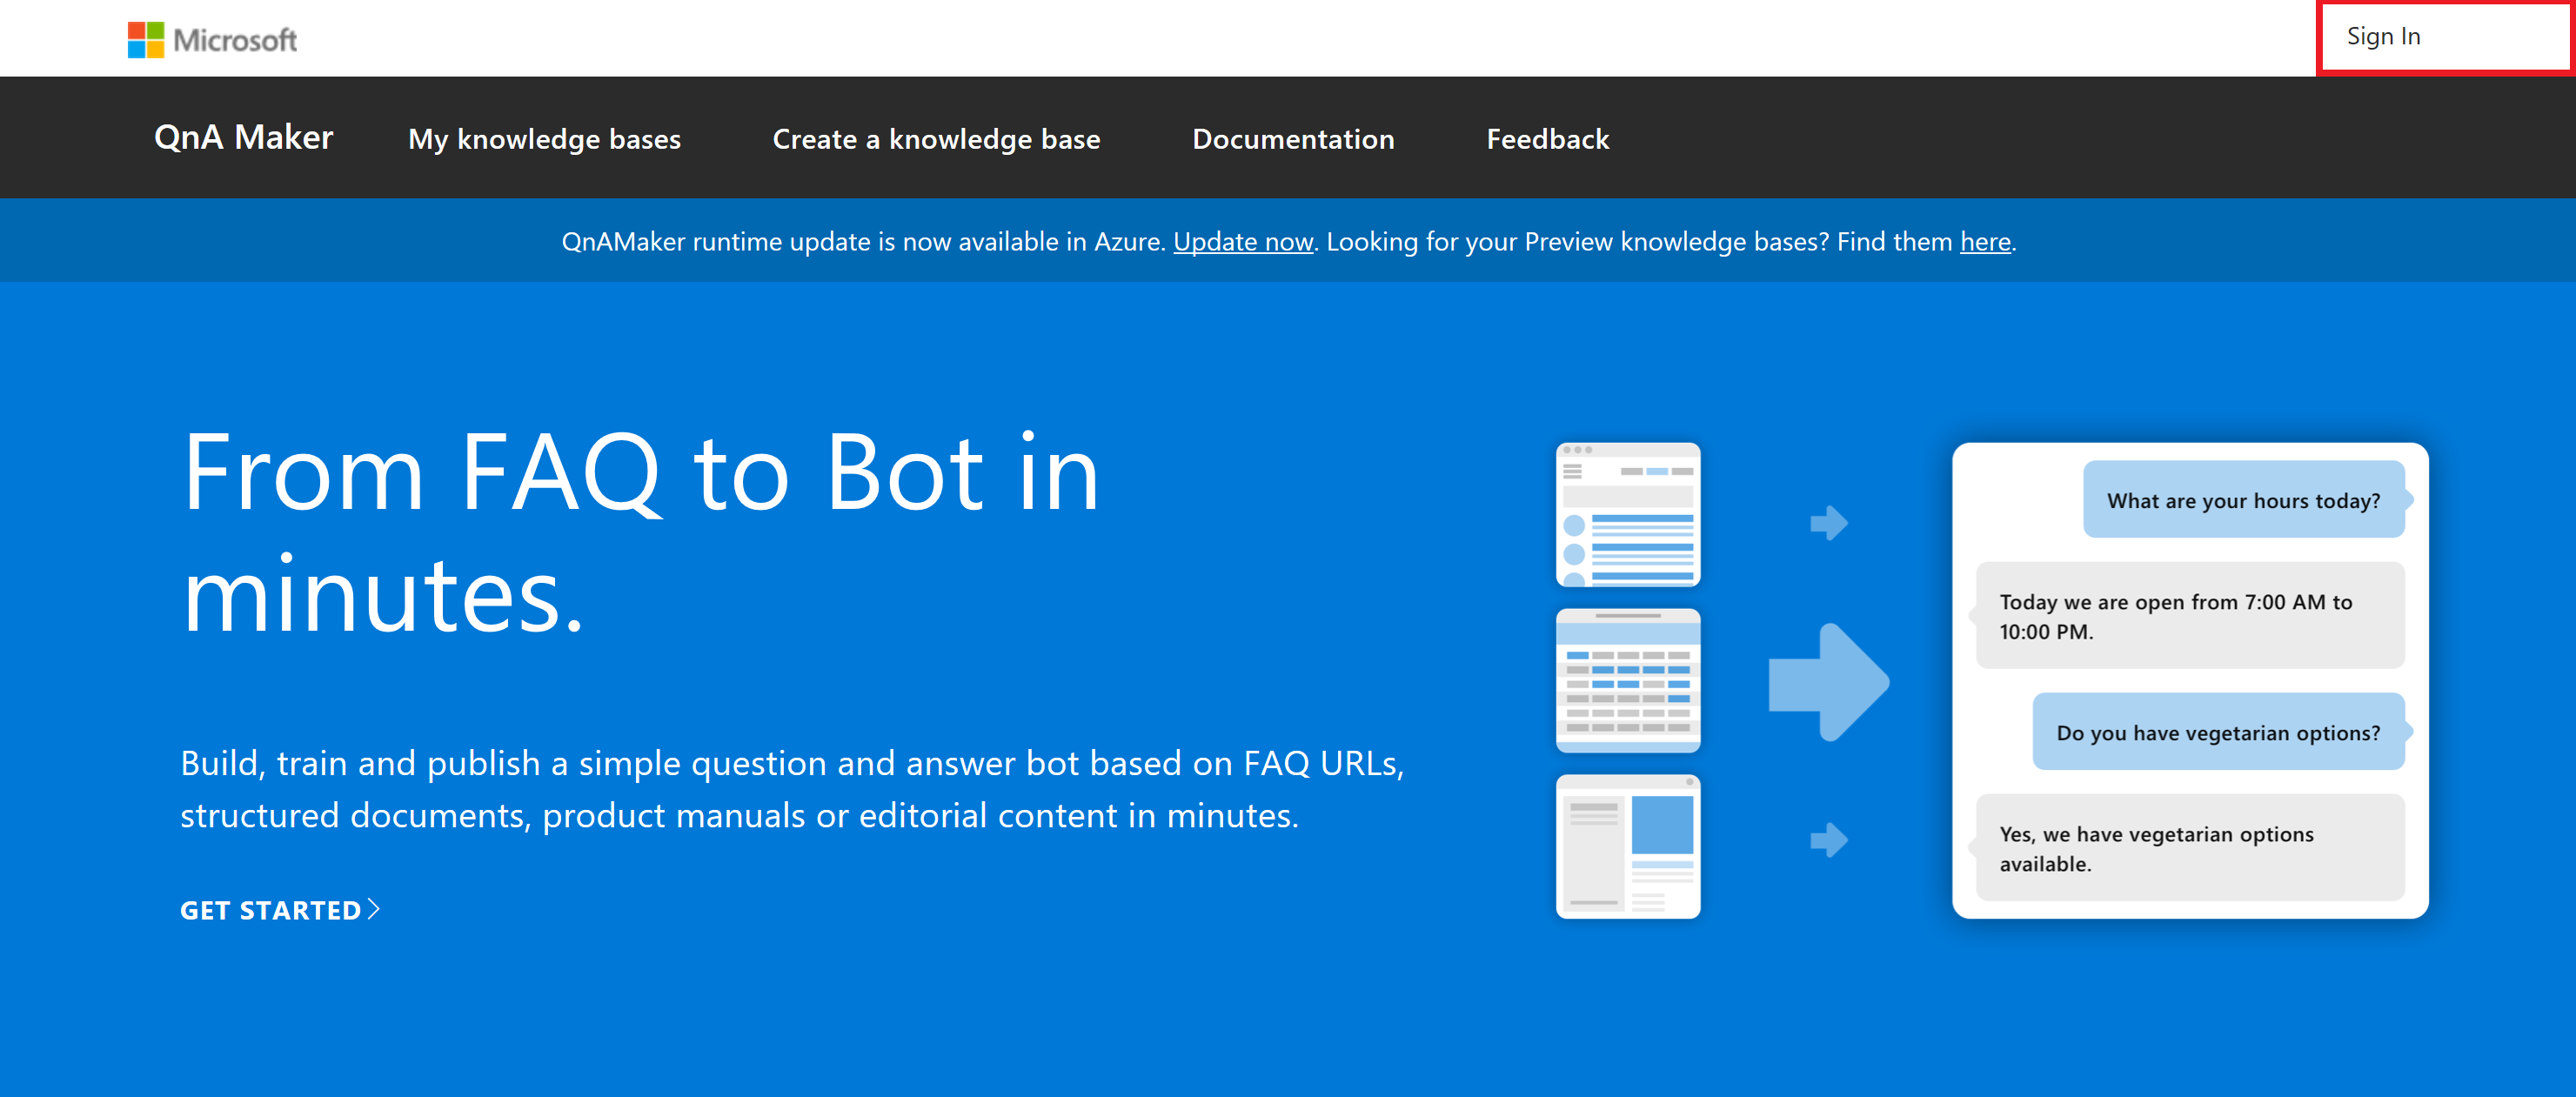
Now open another website tab and navigate to https://www.qnamaker.ai
- Click on “Sign In” and log in with your Azure Demo Lab credentials. On the top, find “Create a knowledge base”
Note: You do not need to click on “Create a QnA Maker service”, since you did this in the previous step
-
Select the Azure Active Directory and Azure subscription name you created the QnA Maker resource on the Azure Portal with (in the lab, you should only have one listed which will be the one you should select).
-
For Azure QnAService, select the one you just created in the previous steps “expensesqnamaker-‘youralias’”.
-
Give your knowledge base a name: “ExpensesKB”.
-
In this step, you can provide a FAQ Website link or use a file of question and answer pairs. In this lab, you will provide the FAQ document (ReadyExpensesFAQ.docx), which can be found here: https://aka.ms/msexpensesfaq. Please download it to your PC and upload it by clicking “+ file”.
-
Click on “Create your KB”.
You should now see your questions and answers that were present on the document you just uploaded. Click on Save and train. Once that is complete, click on Publish.
- Once your QnA Maker knowledge base is published, you will be provided with the QnA Maker knowledge base ID, hostname and API key. Please note these down as you will need them in the next step.
-
Now click on the tab that has the Azure portal opened. If you do not have it opened, feel free to open a new tab and navigate to https://portal.azure.com
-
Click on Resource Groups and open your resource group that hosts your bot (you should only have one resource group)
-
Click on your Web App Service
-
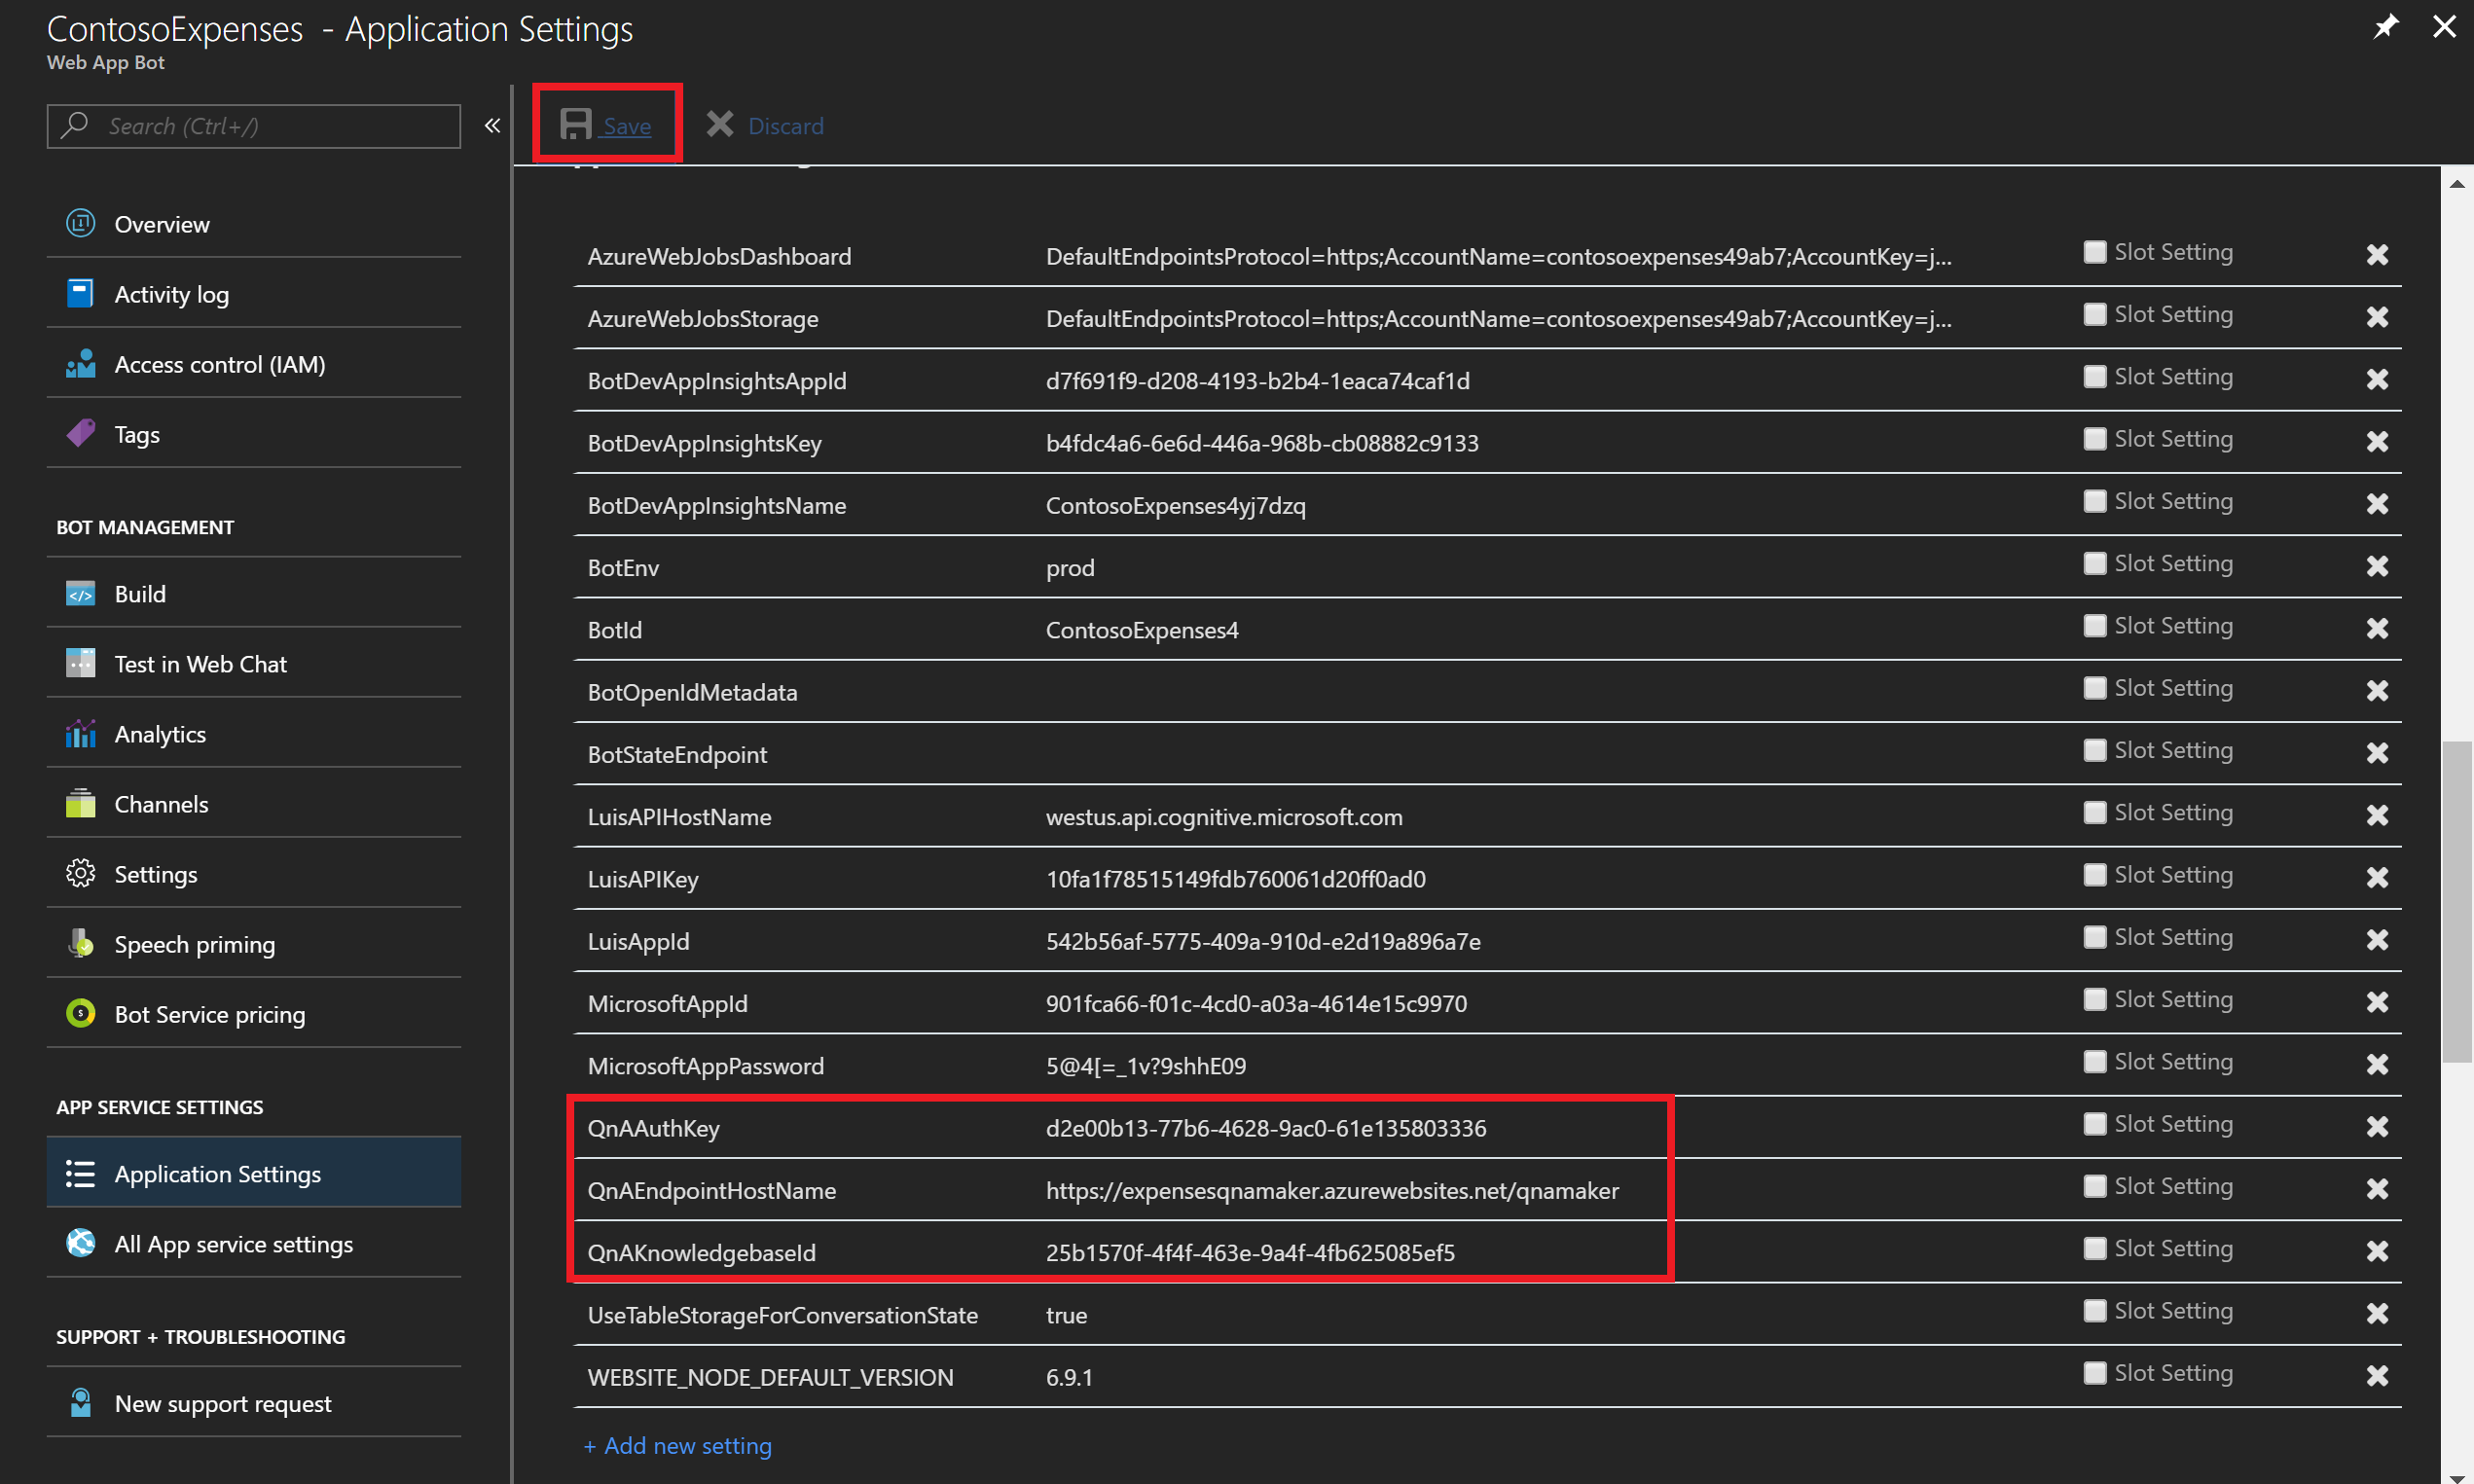
On the left panel, scroll down until you find the section “Application settings” and click on “Add new setting” (you will need to click on this each time you input a new name/value pair). This will show the two fields “Enter a name” and “Enter a value”.
In this section you will input the following name and value pairs coming from the parameters you noted on the qnamaker.ai website:
Name Value QnAKnowledgebaseId [The Knowledge base ID obtained from QnAMaker] QnAEndpointHostName [QnAMaker Hostname obtained from QnAMaker] QnAAuthKey [API Key obtained from QnAMaker] -
Click on the “Save” button. The result should look similar to the screenshot below
-
In the left pane, under App Service Settings, click on All App service settings to open the “App Service Editor (Preview)”.
-
Next, click on the “Go” button to start the editor. A new tap will open.
-
Open a new website tab and navigate to the following GitHub webpage: https://github.com/samaea/expensesbotworkshop/tree/master/supporting-files.
-
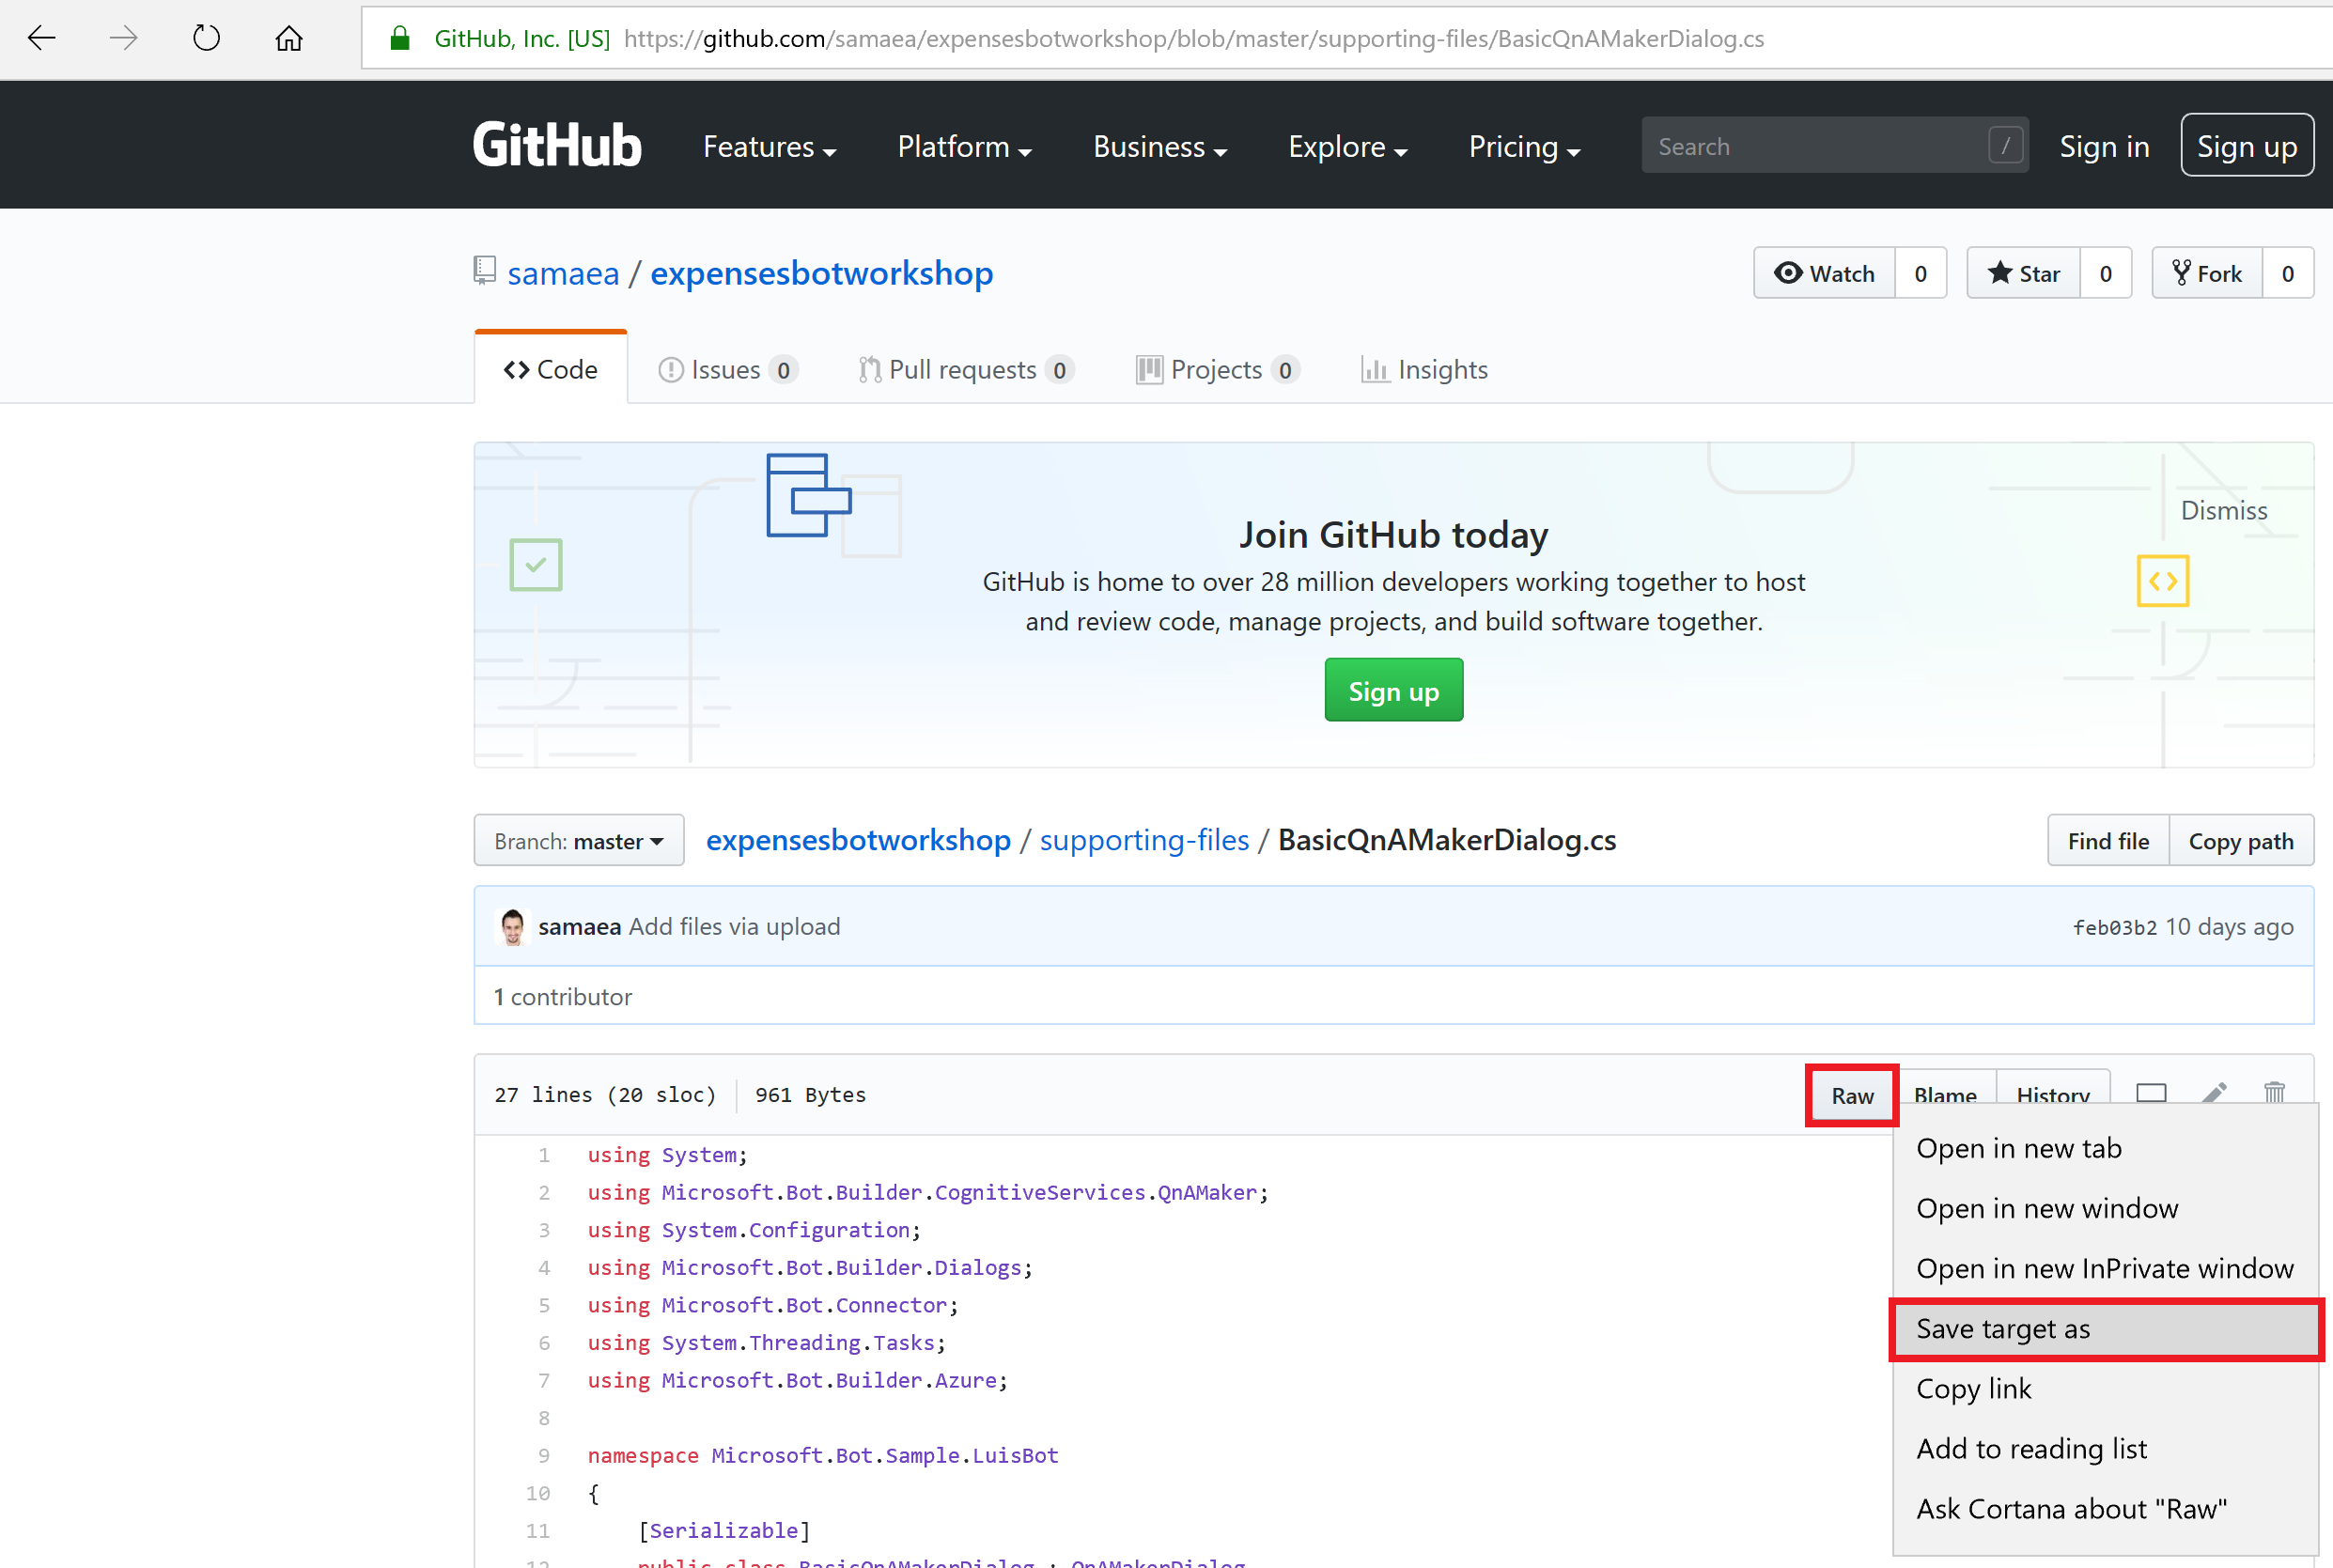
Click on the “BasicQnAMakerDialog.cs” file.
-
Right-click on the “Raw" button and save it on your local computer (e.g. the Desktop). This file is simply the default dialog file that comes with Bot Service when you select “Questions and Answers” being the bot template instead of the “Natural Language Understanding”, which you used in the beginning of the workshop to create LUIS.
-
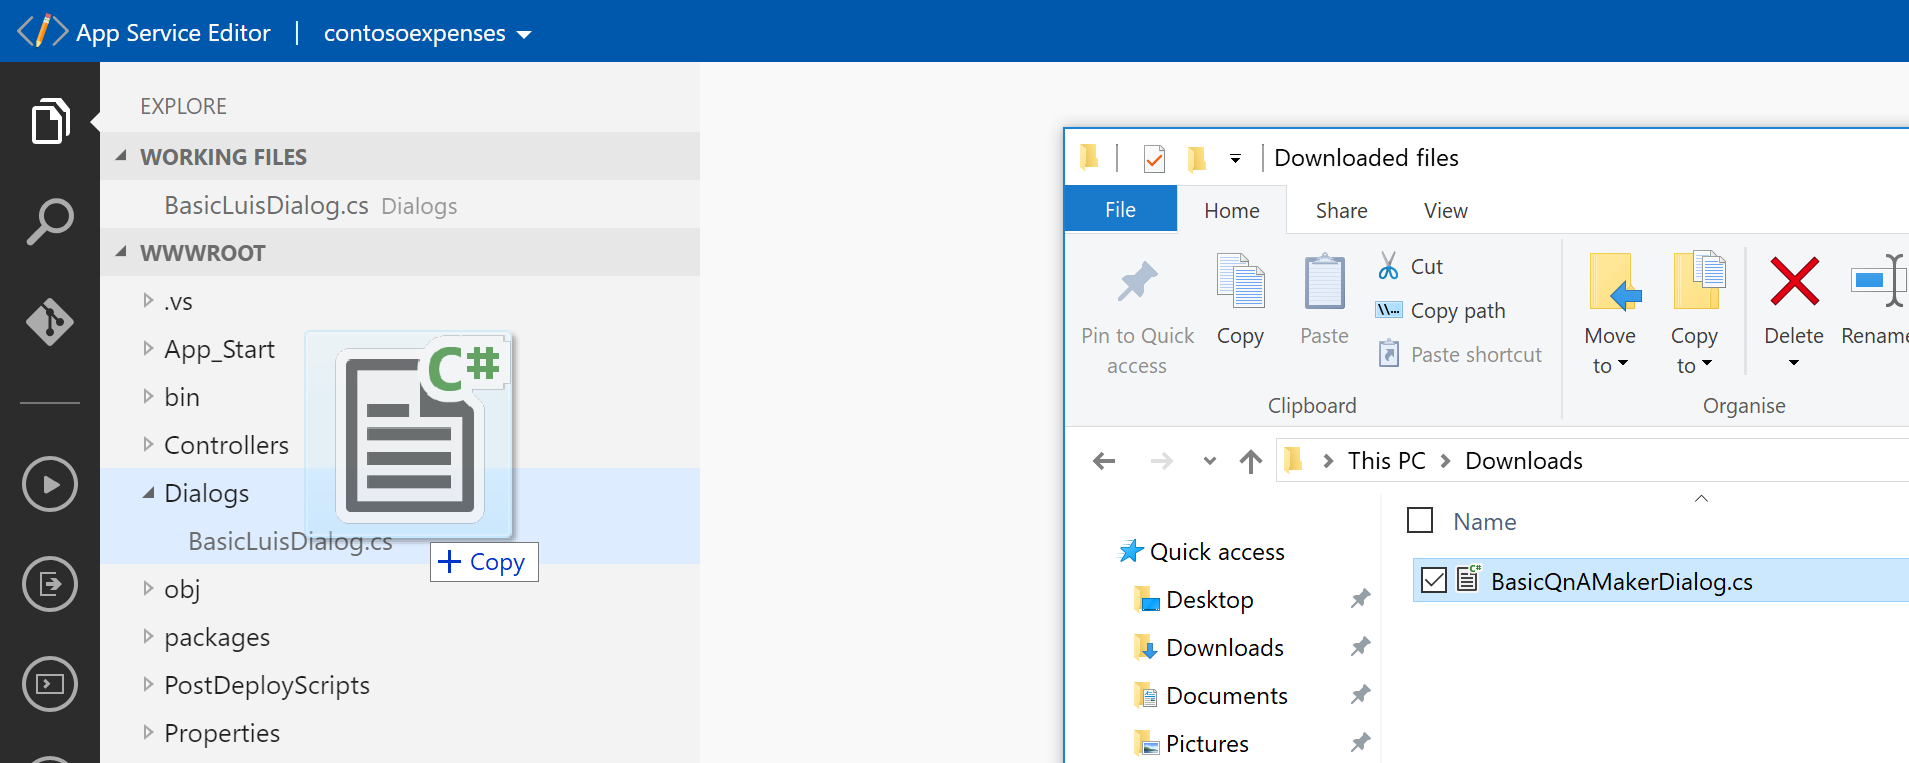
Upon completion of the download, navigate back to the tab of the “App Service Editor” and drag and drop the downloaded file under the “Dialogs” folder.
The result will be having a new file inserted under “Dialogs”:
-
-
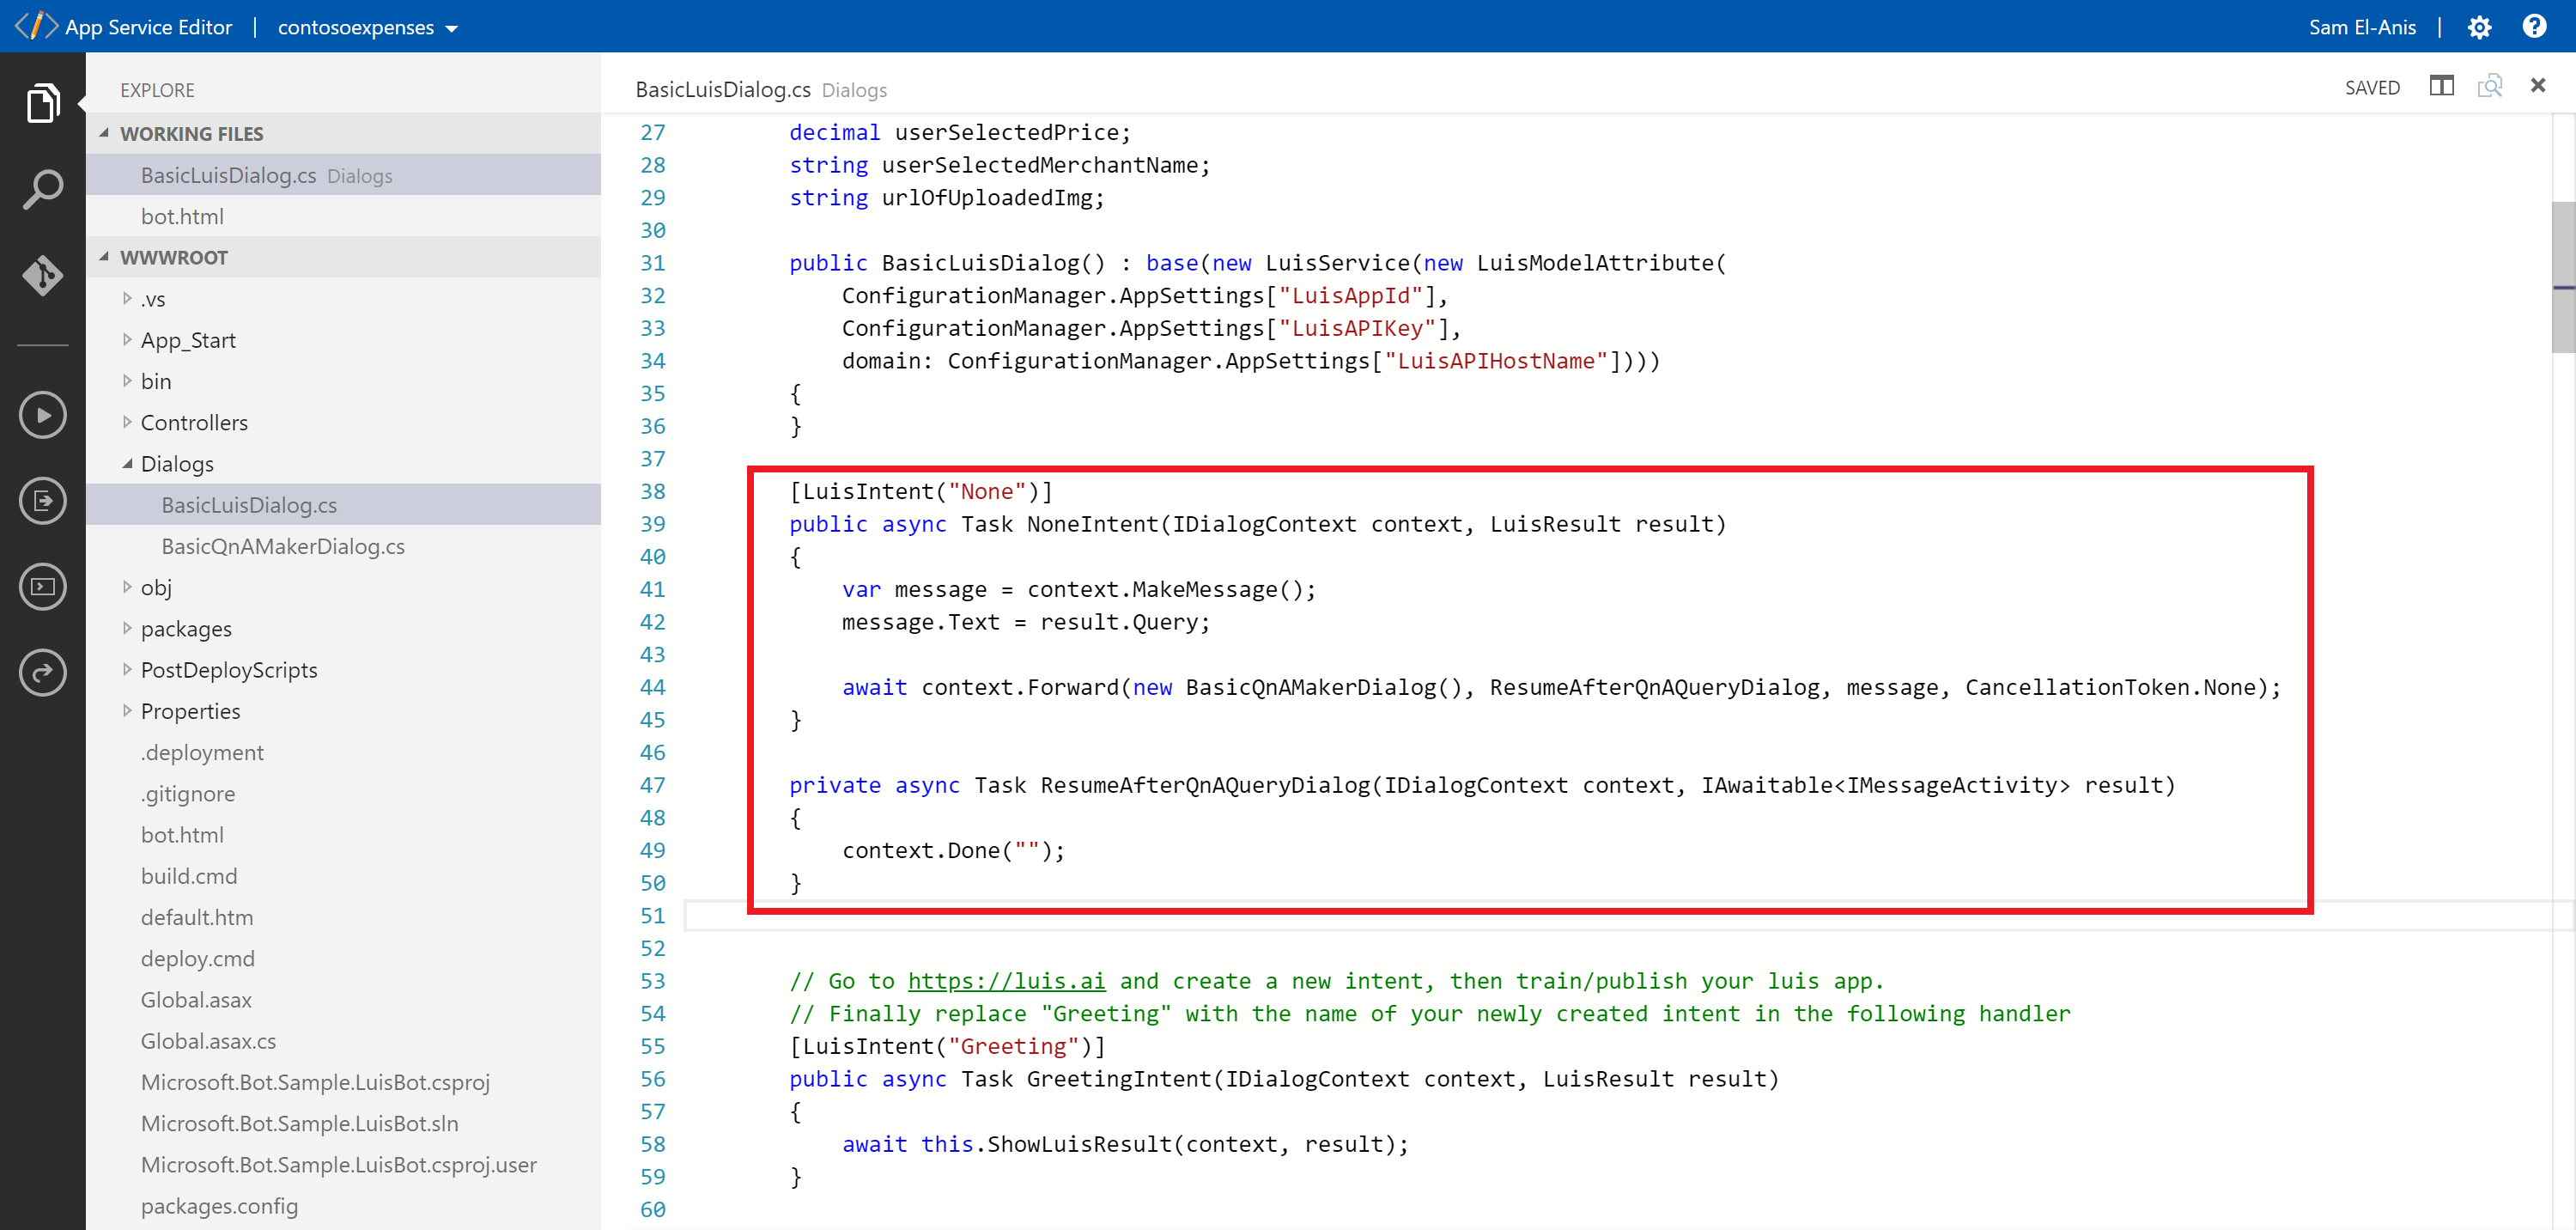
Now within the file "BasicLuisDialog.cs" in the Dialog Tab, find the following section:
[LuisIntent("None")]
 public async Task NoneIntent(IDialogContext context, LuisResult result)
 {
      await this.ShowLuisResult(context, result);
 }
And replace it with:
[LuisIntent("None")]
public async Task NoneIntent(IDialogContext context, LuisResult result)
{
      var message = context.MakeMessage();
      message.Text = result.Query;

      await context.Forward(new BasicQnAMakerDialog(), ResumeAfterQnAQueryDialog, message, CancellationToken.None);
 }
 private async Task ResumeAfterQnAQueryDialog(IDialogContext context, IAwaitable<IMessageActivity> result)
 {
      context.Done("");
 }
As you have now inserted QnA Maker into your solution, you will need to add additional packages (dependencies) that QnA Maker rely on and inform your build that the BasicQnAMakerDialog.cs exists within our project. You will do this by modifying the “Microsoft.Bot.Sample.Luis.csproj” and “packages.config” file.
-
Click on “Microsoft.Bot.Sample.Luis.csproj” and find:
<Reference Include="System.IdentityModel.Tokens.Jwt, Version=5.1.4.0, Culture=neutral, PublicKeyToken=31bf3856ad364e35, processorArchitecture=MSIL">
<HintPath>packages\System.IdentityModel.Tokens.Jwt.5.1.4\lib\net451\System.IdentityModel.Tokens.Jwt.dll</HintPath>
</Reference>
Add straight below the following code:
<Reference Include="Microsoft.Bot.Builder.CognitiveServices.QnAMaker, Version=1.1.7.0, Culture=neutral, PublicKeyToken=31bf3856ad364e35, processorArchitecture=MSIL">
<HintPath>packages\Microsoft.Bot.Builder.CognitiveServices.1.1.7\lib\net46\Microsoft.Bot.Builder.CognitiveServices.QnAMaker.dll</HintPath>
</Reference>
-
Find
<Compile Include="Dialogs\BasicLuisDialog.cs" />
And add below it:
<Compile Include="Dialogs\BasicQnAMakerDialog.cs" />
-
Now open the “packages.config” file on the left. You will now add the QnA Maker package, which is part of CognitiveServices package.
Find the following code line:
<package id="WindowsAzure.Storage" version="7.2.1" targetFramework="net46" />
And add straight below it:
<package id="Microsoft.Bot.Builder.CognitiveServices" version="1.1.7" targetFramework="net46" />
-
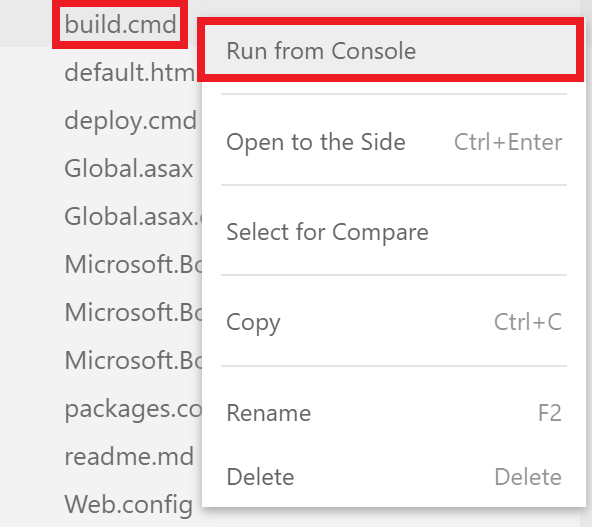
Now to reflect the changes you made, right-click on “build.cmd” on the left and click on “Run from console”
Assuming everything has been configured correctly, you will receive a similar successful finish message as shown below:
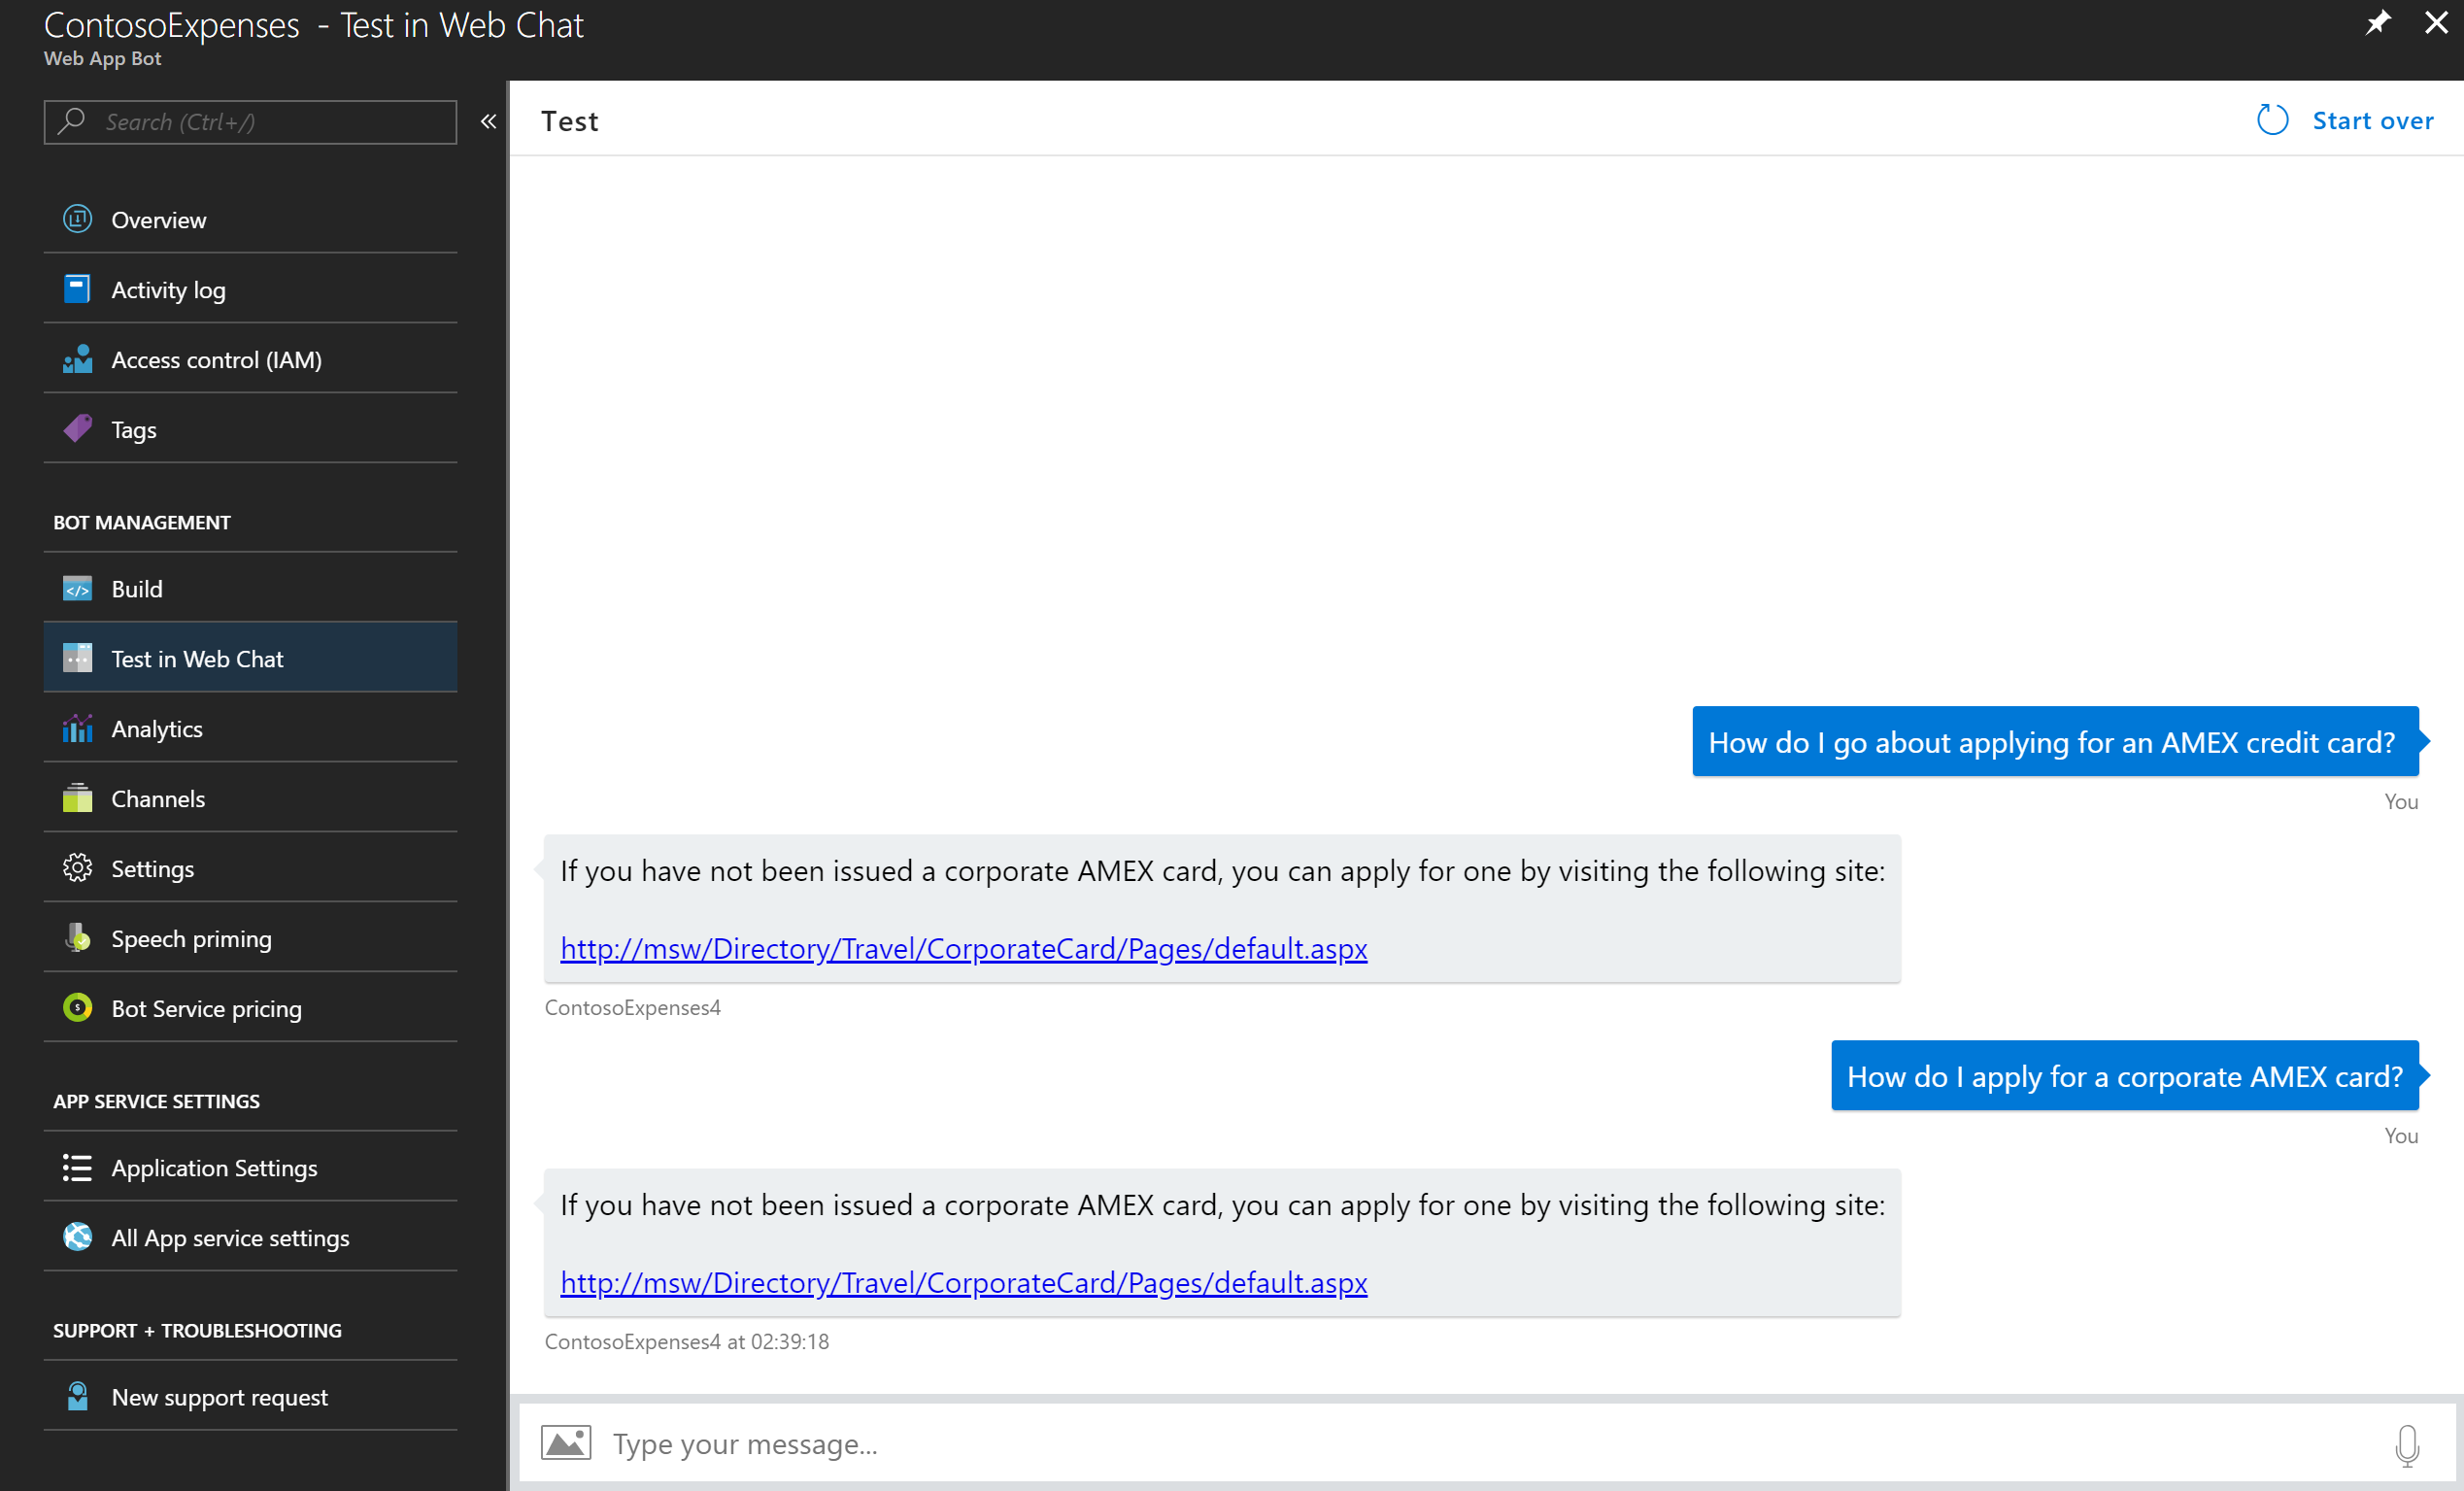
Now go back to your bot on the Azure Portal and test it again. This time you will ask it a question available on the ReadyExpensesFAQ.docx (the document you populated QnA Maker with) and you should receive an answer. You do not have to match the question word by word as QnA Maker uses optimized machine learning logic to match it with its corresponding answer.
-
Click on the tab that has the Azure portal opened. If you do not have it opened, feel free to open a new tab and navigate to https://portal.azure.com
-
Click on Resource Groups and find your resource group that hosts your bot (you should only have one resource group)
-
Click on your Bot Service and finally click on “Test in WebChat” on the left panel
-
Test the bot by starting a chat with “How do I go about applying for an AMEX credit card? ” (note that the original question within the QnA Maker knowledge base is: “How do I apply for a corporate AMEX card?”). You will receive an answer that points you to a link:
