Neutralinojs is a great framework for building cross-platform applications. What it lacks, however, is a native menubar. This project aims to partly cure the disease by creating a native looking menubar using JavaScript & CSS, which gets injected behind the scenes. Partly, because this just works on Windows and Linux. At the moment I don't know of an elegant way to transfer this concept to macOS.
- Native looking menubar for Windows & Linux
- Electron Menu inspired API
- Easily customizable by simply editing the appropriate Stylesheets
- Offers a light and a dark color theme for both platforms
- Uses custom HTML elements, so it won't clash with existing Stylesheets
- Lightweight (around 20kb minified)
Clone the repository locally first:
git clone https://github.com/scanline/neutralinojs-menubar
and install the dependencies afterwards:
cd neutralinojs-menubar
npm install
Please note: This is not a npm package. Node.js tooling is just used for bundling.
After successful installation run:
npm run build
and the final JavaScript bundle will be at dist/NeutralinoMenuBar.min.js
If you're working with JavaScript modules, you have the option to output an ECMAScript module of this library too.
Just run:
npm run buildESM
and instead of the UMD, you'll have an ESM bundle at dist/NeutralinoMenuBar.esm.min.js
First we need a neutralinojs project to work with of course. For simplicity let's take the almost empty starter template:
neu create myapp --template neutralinojs/neutralinojs-zero
If you've build neutralinojs-menubar from source, move dist/NeutralinoMenuBar.min.js to myapp/www or alternatively get it from releases.
Now open www/index.html in your favorite editor and locate the following line:
<script src="/neutralino.js"></script>right below add:
<script src="/NeutralinoMenuBar.min.js"></script>
<script src="/main.js"></script>
www/main.js does not exist yet, so create it.
That's it! If you build the project using
neu run
you won't see too much yet though. We did not create a menu yet!
As I mentioned earlier, neutralinojs-menubar's API is loosely based on Electron's Menu and MenuItem.
Open www/main.js in your editor and add:
Neutralino.init();
Neutralino.events.on("windowClose", () => {
	Neutralino.app.exit();
});
const { Menu, MenuItem } = NeutralinoMenuBar;
To actually create a menu we need to utilize Menu.buildFromTemplate(), which takes an array of MenuItem blueprints.
const menu = [{
	label: "Menu &A",
	submenu: [{
		label: "Menu Entry 1",
		type: "checkbox",
		checked: true,
		click: () => {
			console.log("Menu Entry 1 clicked");
		},
		accelerator: "F1"
	}, {
		label: "Menu Entry 2",
		submenu: [{
			label: "Option 1",
			click: () => {
				console.log("Option 1 clicked");
			}
		}, {
			label: "Option 2",
			click: () => {
				console.log("Option 2 clicked");
			}
		}],
		accelerator: "F2"
	}, {
		label: "Menu Entry 3",
		enabled: false,
		id: "myMenuItem",
		accelerator: "F3"
	}]
}, {
	label: "Menu &B",
	submenu: [{
		label: "Menu Entry 4",
		accelerator: "F4"
	}, {
		label: "Menu Entry 5",
		accelerator: "F5"
	}]
}];

const myMenu = Menu.buildFromTemplate(menu);
Menu.setApplicationMenu(myMenu);
Let's try it again! Enter:
neu run
and things will look a little different now.
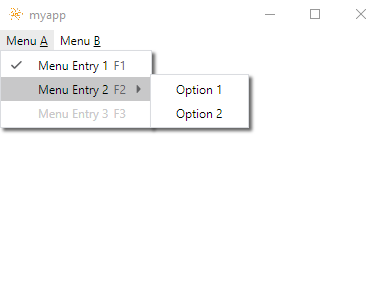
Windows:
Linux:
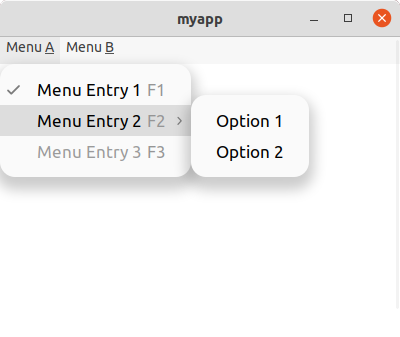
Great stuff - but we can do more. If you look closely at the screenshots, you'll notice that Menu Entry 3 is grayed-out. If we scroll-up a bit, we'll realize that we've done this on purpose, as it's enabled property is set to false. What if we change our minds later on? This MenuItem also has it's id property set. So all we have to do is query the menu for this particular MenuItem and set enabled to true.
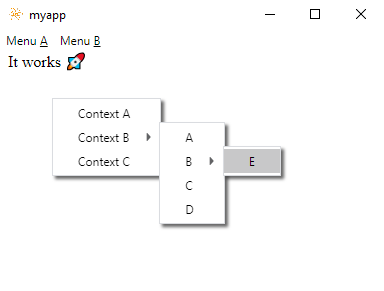
myMenu.getMenuItemById("myMenuItem").enabled = true;If you're familiar with Electron, you surely know there's more to the Menu API than just menu bars. In fact it's also used to create context menus. neutralinojs-menubar offers the same functionality and it's as easy as creating a menu bar!
Construct a context menu:
let contextMenu = Menu.buildFromTemplate([{
	label: "Context A"
}, {
	label: "Context B",
	submenu: [{
		label: "A"
	}, {
		label: "B",
		submenu: [{
			label: "E"
		}]
	}, {
		label: "C"
	}, {
		label: "D"
	}],
}, {
	label: "Context C"
}]);
and call the menu's popup() method, to ultimately open the context menu via a mouse right-click:
window.addEventListener("contextmenu", (evt) => {
	contextMenu.popup();
	evt.preventDefault();
}); 
Though the neutralinojs project's website does not offer a template for it (yet), it's client library can also be used inside a module environment. For this use-case, neutralinojs-menubar offers an ECMAScript module version too.
Start by cloning the zero template once more:
neu create myapp --template neutralinojs/neutralinojs-zero
cd myapp
Now download the ESM version of the client library:
npx --yes download-cli --out ./www https://unpkg.com/@neutralinojs/lib/dist/neutralino.mjs
and neutralinojs-menubar:
npx --yes download-cli --out ./www https://github.com/scanline/neutralinojs-menubar/releases/download/v1.1.0/NeutralinoMenuBar.esm.min.js
After succesful download, the www/index.html file needs some modifications. Find:
<script src="/neutralino.js"></script>and replace it by:
<script src="__neutralino_globals.js"></script>Right below add:
<script src="/main.js" type="module"></script>Again, www/main.js does not exist yet, so go ahead and create it. The only difference to the prior code is that we now need to import our modules first of course.
import * as Neutralino from './neutralino.mjs';
import { Menu, MenuItem } from "/NeutralinoMenuBar.esm.min.js";