✨ Updated January 2020: As we have introduced some new features, this tutorial and the code samples have been updated! All the changes from the previous version of this example, read the DIFF.md
By registering your app's capabilities as message actions, users can pick and choose messages to send to your app so you can do something useful with them. Store these messages in a virtual trapper keeper, feed them to your internal markov chain bot, or file away information about an important lead.
![]() This fictional Slack app, "ClipIt" allows users to "clip" a message posted on Slack by using the actions to export the message to JSON to be used in the external app/service, let's say, "ClipIt web app".
This fictional Slack app, "ClipIt" allows users to "clip" a message posted on Slack by using the actions to export the message to JSON to be used in the external app/service, let's say, "ClipIt web app".
If you are developing apps like memo / note-taking app, collaborative doc app, this sample use-case would be a nice addition to your Slack app.
Also, the message action would be great for:
- Bug / issue tracking app (e.g. "Create a ticket from the message")
- To-Do app (e.g. "Create a to-do")
- Project management app (e.g. "Attach to task")
- Social media (e.g. "Post it to [my social media] App")
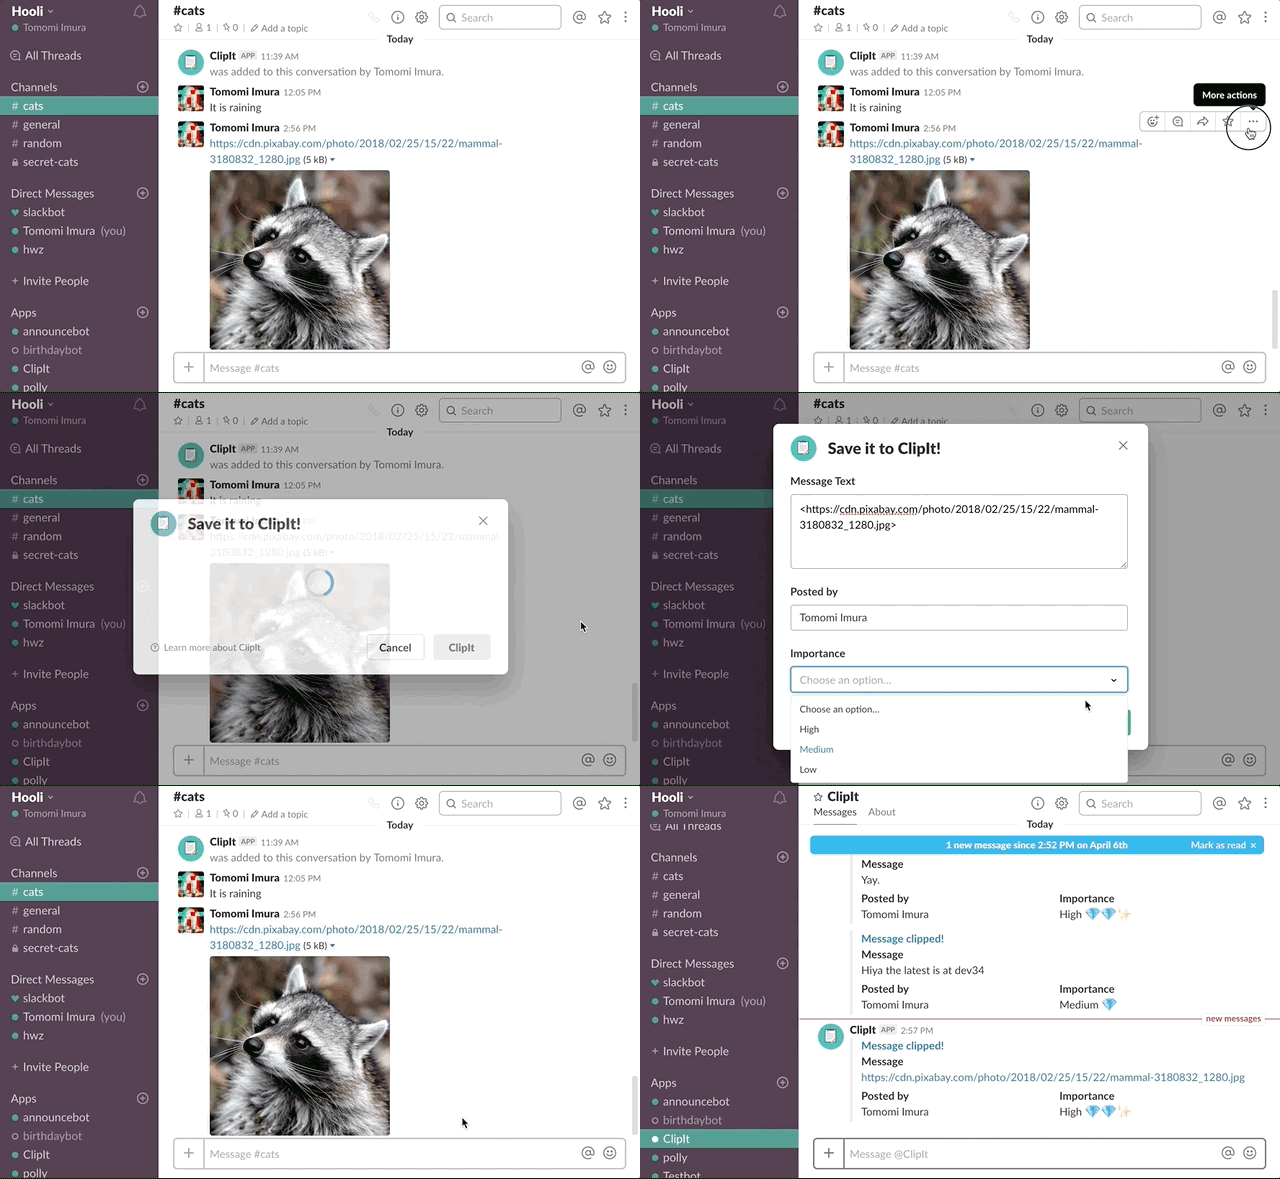
When a user hover a message then choose "Clip the message" from the action menu, a dialog pops open. The message text is pre-populated into the modal box, but the user can edit before submitting it too. Once a user finalize the form and submit, the app DMs the user with the confirmation.
- Create an app at https://api.slack.com/apps
- Navigate to the OAuth & Permissions page and add the following bot token scopes:
commands(required for Actions)chat:write(required to send messages as a bot user)im:write(required to open a DM channel between your bot and a user)
- Click 'Save Changes' and install the app
- Get the code
- Either clone this repo and run
npm install - Or visit https://glitch.com/~slack-action-and-modal-blueprint
- Either clone this repo and run
- Set the following environment variables to
.envwith your API credentials (see.env.sample):SLACK_ACCESS_TOKEN: Your app's bot token,xoxb-token (available on the Install App page, after you install the app to a workspace once.)SLACK_SIGNING_SECRET: Your app's Signing Secret (available on the Basic Information page)to a workspace)
- If you're running the app locally:
- Start the app (
npm start) - In another window, start ngrok on the same port as your webserver
- Start the app (
- Go back to the app settings and click on Interactive Components.
- Click "Enable Interactive Components" button:
- Request URL: Your ngrok or Glitch URL +
/actionsin the end (e.g.https://example.ngrok.io/actions) - Under Actions, click "Create New Action" button
- Action Name:
Clip the message - Description:
Save this message to ClipIt! app - Callback ID:
clipit
- Action Name:
- Request URL: Your ngrok or Glitch URL +
- Save


