Logitech Z906 Control Library
This 5.1 speaker system comes with a "1000 Watts Peak/500 Watts RMS" power for a rich THX Certified surround sound. With the ability to decode Dolby Digital and DTS encoded soundtracks.
The Logitech Z906 is who has six class D amplifiers included, but you cannot use them if you do not have the console connected.
This information is made to be able to control the unit without the need of the console, using any device with a programmable serial port, especially an arduino :)
Codenamed "Liszt".
The main component is a Renesas D2-71583 intelligent digital amplifier and sound processor.
The system requires external firmware to boot the DSP, the EN25F10A serial flash memory has been chosen.
This is the dump data.
The communication between the Digital Audio Processor and the console is done through TTL serial communication at 3.3V.
The following table illustrates the pinout.
| Pin | Description | Pin | Description |
|---|---|---|---|
| 3 | GND | 6 | GND |
| 11 | 3.3V @ 250mA | 12 | TX |
| 13 | RX | 15 | Console Enable |
D2-71583 NO is 5V tolerant. If you have Arduino UNO, MEGA, etc use a Logic Level Converter.
| Serial settings | |
|---|---|
| Baud rate | 57600 |
| Data | 8 bit |
| Parity | Odd |
| Stop | 1 bit |
Here is the DE-15 male as viewed from the front of the Main Board.
Connect pin 15 to GND.
Instantiate a Z906 object and attach to Serial1, you may create multiple Z906 objects.
Z906 LOGI(Serial1)cmd method uses single or double argument, check next tables.
LOGI.cmd(arg)
LOGI.cmd(arg_a, arg_b)
Examples :
LOGI.cmd(MUTE_ON)         // Enable Mute
LOGI.cmd(MAIN_LEVEL, 15) // Set Main Level to 15LOGI.request(MAIN_LEVEL) // return current Main Level
LOGI.request(REAR_LEVEL) // return current Rear Level
LOGI.request(CENTER_LEVEL) // return current Center Level
LOGI.request(SUB_LEVEL) // return current Subwoofer Level
LOGI.request(STATUS_STBY) // return stand-by status
LOGI.request(VERSION) // return firmware version| argument | description |
|---|---|
| SELECT_INPUT_1 | Enable TRS 5.1 input |
| SELECT_INPUT_2 | Enable RCA 2.0 input |
| SELECT_INPUT_3 | Enable Optical 1 input |
| SELECT_INPUT_4 | Enable Optical 2 input |
| SELECT_INPUT_5 | Enable Coaxial input |
| SELECT_INPUT_AUX | Enable TRS 2.0 (console) input |
| LEVEL_MAIN_UP | Increase Main Level by one unit |
| LEVEL_MAIN_DOWN | Decrease Main Level by one unit |
| LEVEL_SUB_UP | Increase Subwoofer Level by one unit |
| LEVEL_SUB_DOWN | Decrease Subwoofer Level by one unit |
| LEVEL_CENTER_UP | Increase Center Level by one unit |
| LEVEL_CENTER_DOWN | Decrease Subwoofer Level by one unit |
| LEVEL_REAR_UP | Increase Rear Level by one unit |
| LEVEL_REAR_DOWN | Decrease Rear Level by one unit |
| PWM_OFF | PWM Generator OFF |
| PWM_ON | PWM Generator ON |
| SELECT_EFFECT_3D | Enable 3D Effect in current input |
| SELECT_EFFECT_41 | Enable 4.1 Effect in current input |
| SELECT_EFFECT_21 | Enable 2.1 Effect in current input |
| SELECT_EFFECT_NO | Disable all Effects in current input |
| BLOCK_INPUTS | Disable signal input |
| NO_BLOCK_INPUTS | Enable signal input |
| RESET_PWR_UP_TIME | Reset Power-Up Timer |
| EEPROM_SAVE | Save current settings to EEPROM |
| MUTE_ON | Enable Mute |
| MUTE_OFF | Disable Mute |
| argument a | argument b | description |
|---|---|---|
| MAIN_LEVEL | 0-255 | Set Main Level to argument b value |
| REAR_LEVEL | 0-255 | Set Rear Level to argument b value |
| CENTER_LEVEL | 0-255 | Set Center Level to argument b value |
| SUB_LEVEL | 0-255 | Set Sub Level to argument b value |
Use the EEPROM_SAVE function with caution. Each EEPROM has a limited number of write cycles (~100,000) per address. If you write excessively to the EEPROM, you will reduce the lifespan.
return the value of main temperature sensor.
LOGI.main_sensor()Turns the amplifier on or off. When turning off, the amplifier will also store the current state of the unit in EEPROM. Note, that the amplifier still draws a certain amount of power and will only fully turn off, if you also open the connection between pin15 and GND on the DSUB connector.
LOGI.on()
LOGI.off()Changes the input and applies the input effect. If no input effect is selected, the device's factory defaults will be used.
LOGI.input(input, effect)#include <Z906.h>
// Instantiate a Z906 object and Attach to Serial1
Z906 LOGI(Serial1);
void setup(){
Serial.begin(9600);
while(!Serial);
while(LOGI.request(VERSION) == 0)
{
Serial.println("Waiting Z906 Power-Up");
delay(1000);
}
Serial.println("Z906 Version : " + (String) LOGI.request(VERSION));
// Power ON the amplifier
LOGI.on();
// Select RCA 2.0 Input
LOGI.input(SELECT_INPUT_2);
// Disable Mute
LOGI.cmd(MUTE_OFF);
// Set Main Level to 15;
LOGI.cmd(MAIN_LEVEL, 15);
}
void loop(){
Serial.println("Temperature main sensor: " + (String) LOGI.main_sensor());
delay(1000);
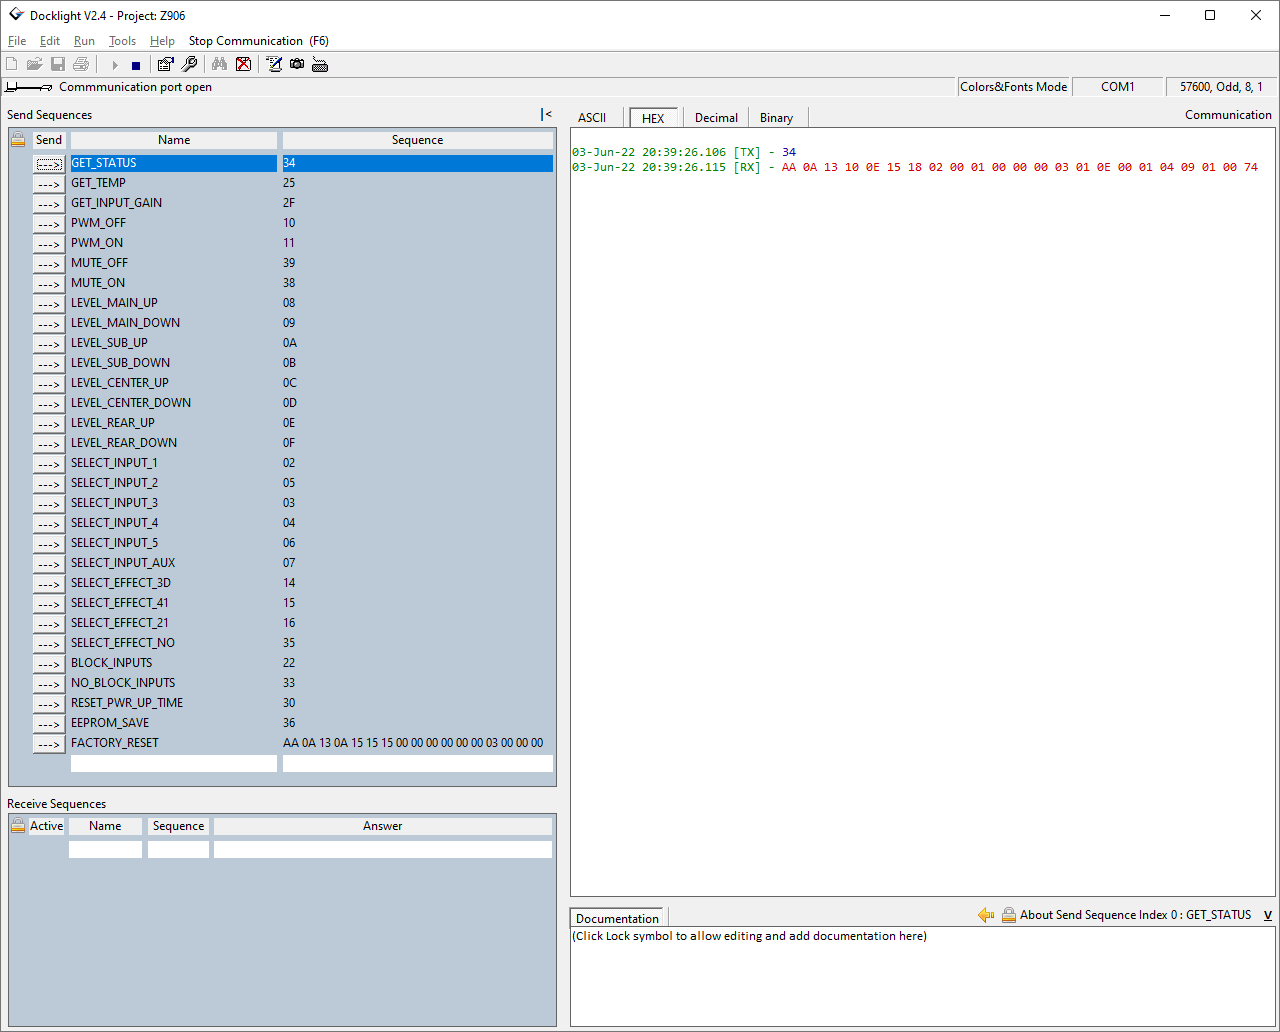
}Docklight is a testing, analysis and simulation tool for serial communication protocols.
Use the following project to use Z906 unit connected to a PC.


