Extends Twitter's typeahead.js to work with MVC 5 models
Code written by Tim Wilson and open sourced by Provision (http://provision.org)
This package extends upon the Twitter.Typeahead library and the Twitter.Typeahead.MVC library by hooking typeahead to MVC models. With a few configuration tweaks, you'll be connecting typeahead.js to your model in minutes!
Here's a screenshot of Typeahead connected to an MVC model in action (the rest of this README walks you through creating this example):
Download Typeahead.js for MVC 5 Models using NuGet
(Note: to use the Entity Framework queries in this document, you will need to install the Adventure Works database from CodePlex. If you don’t need to connect to a database or have a database connection, skip ahead. Likewise, if you already have a model you would like to connect to typeahead, skip right ahead. Finally, you can download the full source code of this example application, including the solution file, at the bottom of this page.)
-
Edit ~\Views\Shared_Layout.cshtml to load the typeahead.js bundle, Typeahead stylesheet and javascript that connects Typeahead to your MVC 5 model
a. Add the line to load the Typeahead stylesheet In ~\Views\Shared_Layout.cshtml, add the following line before the close of the head tag:
<link rel="stylesheet" type="text/css" href="~/Content/typeahead.css" />
b. Add the line to load the Typeahead MVC bundle javascript and Typeahead MVC Model javascript (that connects Typeahead to your MVC model):
In ~\Views\Shared_Layout.cshtml, add the following line after jquery and bootstrap are both loaded:
@Scripts.Render("~/bundles/typeahead") <script src="~/Scripts/typeahead.mvc.model.js" /> -
Add a new Model to your project
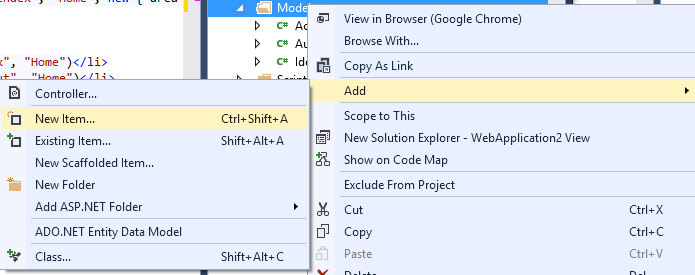
a. Right-click on the Models folder and choose Add > New Item…
b. For the Name, type HelloWorld.cs and click Add
c. In the Editor, add 4 new properties to the class. Hit F6 to Save and Build your project
        public int HelloWorldId { get; set; }
        public string Message { get; set; }
        public string Person { get; set; }
        public int PersonId { get; set; }
-
Add the Entity Framework for AdventureWorks2012 to your project.
a. Right-click on your project and choose Add > New Item…
b. Choose “ADO.NET Entity Data Model”. For Name, type “AWModel.” Click Add
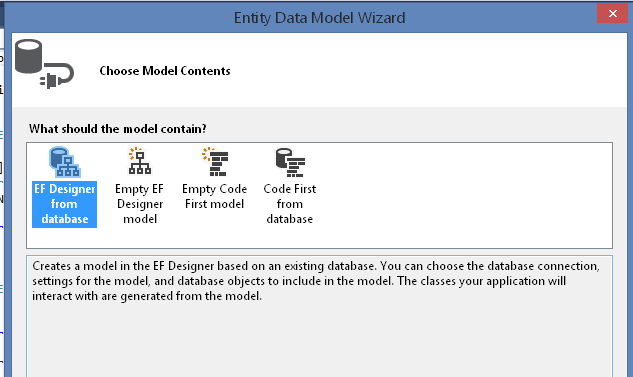
c. Choose “EF Designer from data…” Click Next >
d. Click New Connection…
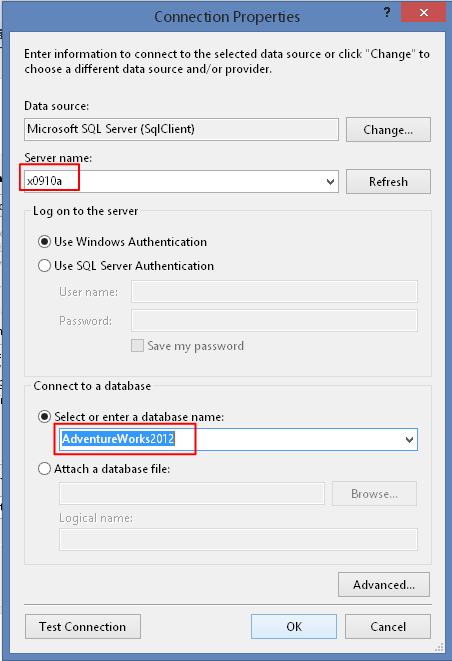
e. For Server name, type the name of the server you attached the AdventureWorks2012 database to. For “Select or enter a database name”, choose AdventureWorks2012. Click Ok
f. For “Save connection settings in Web.Config as”, type AWEntities. Click Next >
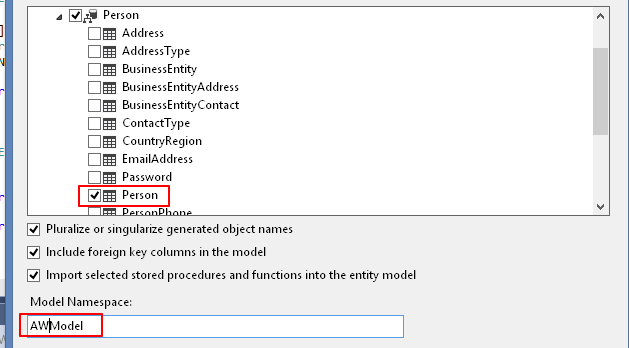
g. Expand Tables and Person. Choose Person. For Model Namespace, type AWModel. Click Finish
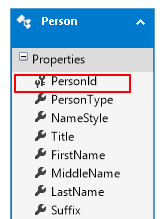
h. For some reason, Entity Framework does not like it when an entity’s primary key does not match the entity name. To fix this, open up AWModel.edmx
i. Rename the BusinessEntityId column to PersonId. Hit F6 to Save and Build your project
-
Add a new Scaffolded Item to your project
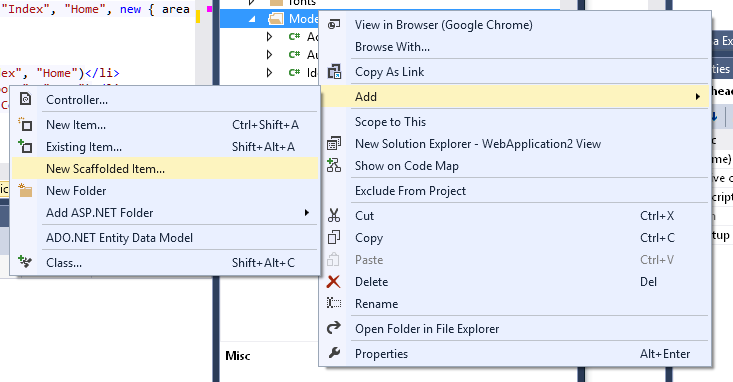
a. Right-click on the Controllers folder and choose Add > New Scaffolded Item…
b. Choose “MVC 5 Controller with views, using Entity Framework”. Click Add
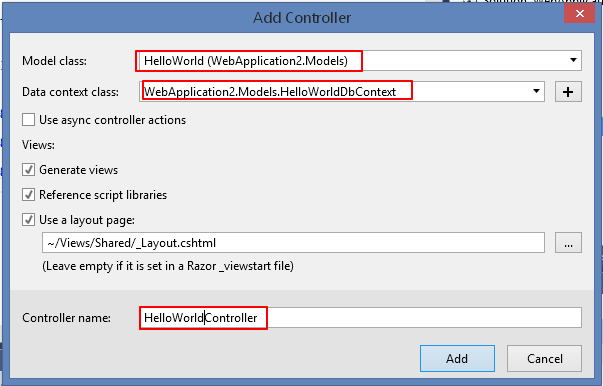
c. For the Model class, choose HelloWorld ([Project Name].Models). For the Data context class, choose the data context you created earlier, AWEntities ([Project Name]). For the Controller name, HelloWorldController. Click Add
You now have a Controller, Model and View. It’s time to get to work!
-
Add code to the HelloWorldController to get people from the database
a. Open up HelloWorldController.cs
b. Near the top of the file, add the using statements for Entity Framework exceptions:
using System.Data.Entity.Core;
c. Add code to get people out of the AdventureWorks2012 database using Entity Framework:
private List<Autocomplete> _GetPeople(string query)
{
    List<Autocomplete> people = new List<Autocomplete>();
    try
    {
        var results = (from p in db.People
                        where (p.FirstName + " " + p.LastName).Contains(query)
                        orderby p.FirstName,p.LastName
                        select p).Take(10).ToList();
        foreach (var r in results)
        {
            // create objects
            Autocomplete person = new Autocomplete();

            person.Name = string.Format("{0} {1}", r.FirstName, r.LastName);
            person.Id = r.PersonId;
            people.Add(person);
        }

    }
    catch (EntityCommandExecutionException eceex)
    {
        if (eceex.InnerException != null)
        {
            throw eceex.InnerException;
        }
        throw;
    }
    catch
    {
        throw;
    }
    return people;
}
d. Add code to return the people in JSON format:
public ActionResult GetPeople(string query)
{
    return Json(_GetPeople(query), JsonRequestBehavior.AllowGet);
}
-
Add the Autocomplete (textahead) control to the Create view for the HelloWorld model
a. Open up ~\Views\HelloWorld\Create.cshtml.
b. Add a using statement after the @model line at the top of the file so our HtmlHelper is available in the View:
@using WebApplication2.Models
c. Since we are hiding the PersonId, we can remove the following code from the View:
d. Add the PersonId property to the view, yet hide it. This property will be auto-populated by javascript after the user selects a typeahead value
@Html.HiddenFor(model => model.PersonId)e. We need to change the control from EditorFor to AutocompleteFor. We also need to specify the property name, property key field, the method that Typeahead will call to get the lookup values and keys. The last parameter is false which will keep this field from stealing the focus when the page is loaded.
@Html.AutocompleteFor(model => model.Name, model => model.PersonId, "GetPeople", "HelloWorld", false)
-
Test things out to see how they work
a. In HelloWorldController, set a breakpoint in the second Create() (under the [HttpPost] declaration) to inspect the results returned from web page after we test out Typeahead
b. Open up Create.cshtml again and hit F5 to test things out
c. For Message, type “Hello World!” For Name, type “Anna.” It might take a second or two but the list will populate with the top 10 matches. Choose “Anna Albright” Click Create
d. This should hit the breakpoint you set on Create()
e. Notice that, in your breakpoint, if you expand “helloWorld”, that PersonId is automatically set to 325. Neat, huh?
I will leave it to you to implement writing helloWorld back at to a database. This is an example after all :) Happy coding!
##Download the example application.
NOTES:
You can add any additional htmlAttributes which will be merged into the INPUT tag as well as the following "special" attributes
Any event on the typeahead object can be bound by specifying a data-typeahead-eventname attribute containing the name of the javascript function to bind to the event. If the function specified in the attribute exists then it will be bound to the typeahead object during initialisation.
-
For instance to bind the typeahead:select event an attribute with the name data-typeahead-select can be used to specify a javascript callback function that will be called after the internal typeahead-mvc-model onselected function has executed which sets the selected id value on the id field. The callback function has to have the same signature as the typeahead:select event handler: OnSelectedFunctionName(event)
Example:
@Html.AutocompleteFor(model => model.Name, model => model.PersonId, "GetPeople", "HelloWorld", false, new { htmlAttributes = new { @class = "form-control", data_typeahead_select = "OnSelectedFunctionName" } })
With the javascript function defined as:
<script type="application/javascript">
    function OnSelectedFunctionName(event)
    {
        //The default datum provided by this plugin has an id and name attribute
        var obj$ = $(event.target);
        var datum = {
                        id: $('#' + obj$.data("autocomplete-id-field")).val(),
                        value: event.target.value
                    };
        //Handle the selection value here//
    }
</script>
-
Refer to the typeahead page for event names and their signatures that can be bound this way: typeahead custom-events


