Hugo theme built using Tailwind CSS, mostly for bloggers.
Check https://hugo-theme-tailwind.tomo.dev/ for demo.
- High Lighthouse score
- Dark mode - switch between light and dark mode, or default by system prefers.
- SVG icons thanks to tabler icons
- Google Analytics - add your Google Analytics ID to
hugo.toml - Comments settings for disqus and giscus
- Social media link data settings
- Additional short code: bilibili, asciinema
- Responsive design
- Multilingual
- Default image process for lazy load and srcset
- Search (by using fuse.js and mark.js)
- Image support for article (using
imageparam in front matter) - Structured data JSON-LD for article (enable
jsonLDin config file or front matter) - Simple PWA support - check
params.pwain config file
You can install the theme by using git submodule or hugo module.
Add the theme as a submodule by running the following command in the root directory of your Hugo site:
git submodule add https://github.com/tomowang/hugo-theme-tailwind.git themes/tailwind
# Or to update to the latest version
git submodule update --remote- First, initialize module for your Hugo site:
hugo mod init github.com/username/xxxx - Then, add module import in your
hugo.toml:
[module]
  [[module.imports]]
path = "github.com/tomowang/hugo-theme-tailwind"- Finally, run
hugo mod get -uto download the theme.
Important
The exampleSite's giscus setting uses my own profile repo.
You SHOULD change it to your own repo (by using https://giscus.app/).
You can use the following configuration for basic usage.
baseURL = "https://example.com/"
title = "Hugo Theme Tailwind Example Site"
author = "Your Name"
copyright = "Your Name"
paginate = 10
languageCode = "en"
theme = "tailwind"

[markup]
  _merge = "deep"

[params]
  # dir name of your blog content (default is `content/posts`).
  # the list of set content will show up on your index page (baseurl).
  contentTypeName = "posts"

  [params.header]
    logo = "logo.webp"

  [params.footer]
    since = 2023
    poweredby = true

[menu]

  [[menu.main]]
    identifier = "post"
    name = "Post"
    pageRef = "/posts"
    weight = 10

  [[menu.main]]
    identifier = "about"
    name = "About"
    pageRef = "/about"
    weight = 20

[taxonomies]
category = "categories"
tag = "tags"
series = "series"
For advanced usage, please refer to config directory config/_default and
exampleSite/config/_default.
Some of the configuration options are:
markup: goldmark and options for markdown renderingparams.header: header settings (logo and sticky navbar)params.footer: footer settings (copyright years, powered by, etc.)contentTypeName: dir name of your blog content (default iscontent/posts).params.taxonomies.icons: icons for taxonomies (categories, tags, series, etc.).params.giscus: giscus settingsparams.social_media: social media links shown in the footerparams.search: search settingsparams.author: author used in the JSON-LDparams.showAuthor: show author name in article list and article pageparams.jsonLD: enable or disable JSON-LD (default disabled)params.pwa: enable or disable PWA (default disabled)
For social media link data, you can refer entries in params.social_media.items
(You can add more or disable existing entries in params.social_media.items).
[[social_media.items]]
enabled = false
title = 'Facebook'
icon = 'brand-facebook'
link = 'https://www.facebook.com/'The theme folder structure is as follows:
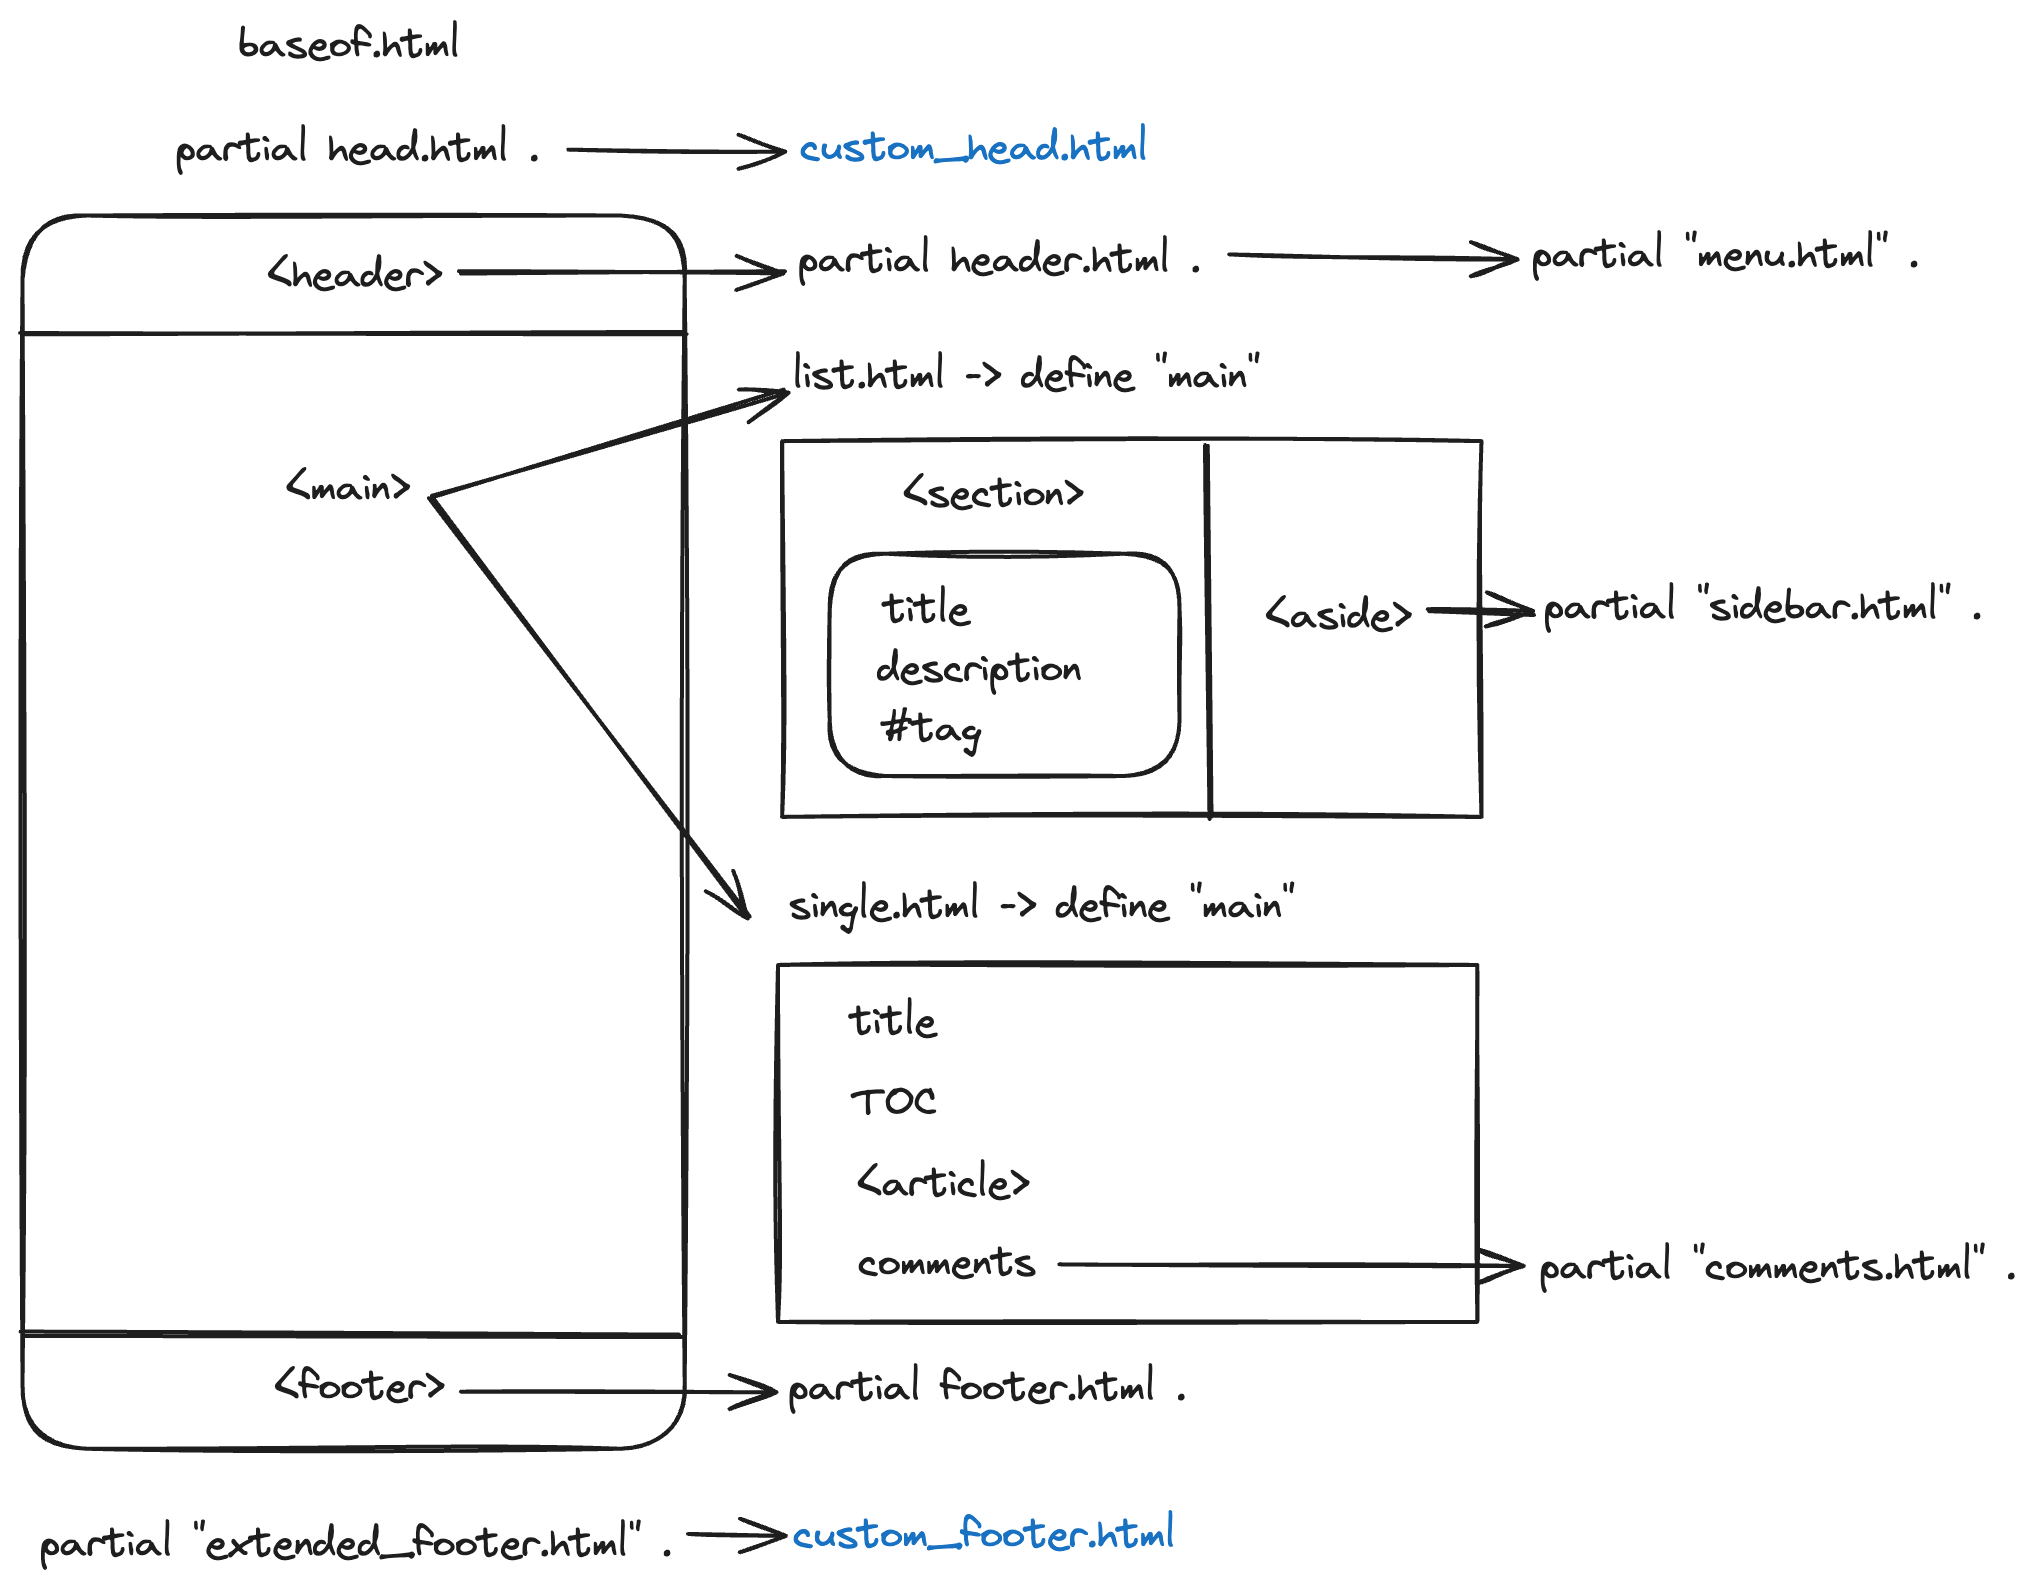
You can extend the theme by creating following files in your site folder:
layouts/partials/custom_head.htmllayouts/partials/custom_footer.html
This theme use Tailwind CSS for styling. If you want to make some changes,
use pnpm install to install dependencies.
- Development:
pnpm dev, this will generate css for theme users and start example site.
exampleSiteis fetched from https://github.com/gohugoio/hugoBasicExample with some modifications.
Search the icon in tabler icons.
Download or Copy SVG and paste to theme/tailwind/assets/icons/.
Remember to remove width="24" height="24" in the SVG file. Use the icon file
name in your site configuration. Or if you want to update theme layout content,
you can use the following code.
<i class="h-6 w-6 flex-none">
  {{ partial "icon.html" "brightness-down" }}
</i>


