This is recipe based training on Spring framework - which is VAST. We won't be covering them all but enough to get you started.
Every recipe has a focus point that trains you to analyze the template when you work on a specific problem statement at Spring framework level - just like how you instinctively exclaim "It's a sliding window problem!" or "It is a DP problem!"
Follow these recipes in order. Each recipe has solutions committed in this repo under a particular module. The name of this module is at Modules section in each recipe. Needless to say, you should also know how to write tests for each recipe.
Basic knowledge on Java is must. With each recipe, I have also added focus point on some java features for beginners. If you already know a little of spring and java, you can easily finish 10 recipes in just hours. Don't let the number scare you :)
- IDE - We prefer that you work on Intellij
- Gradle
- Java 8 or above
- Spring 4 or above
- Postgres DB
Postgres windows installation
- initdb
C:\Users\vino\Downloads\pgsql\bin>initdb -D "C:\Users\vino\Downloads\pgsql\datadir"
The files belonging to this database system will be owned by user "vino".
This user must also own the server process.

The database cluster will be initialized with locale "English_United States.1252".
The default database encoding has accordingly been set to "WIN1252".
The default text search configuration will be set to "english".

Data page checksums are disabled.

creating directory C:/Users/vino/Downloads/pgsql/datadir ... ok
creating subdirectories ... ok
selecting dynamic shared memory implementation ... windows
selecting default max_connections ... 100
selecting default shared_buffers ... 128MB
selecting default time zone ... Asia/Calcutta
creating configuration files ... ok
running bootstrap script ... ok
performing post-bootstrap initialization ... ok
syncing data to disk ... ok

initdb: warning: enabling "trust" authentication for local connections
You can change this by editing pg_hba.conf or using the option -A, or
--auth-local and --auth-host, the next time you run initdb.

Success. You can now start the database server using:

    pg_ctl -D ^"C^:^\Users^\vino^\Downloads^\pgsql^\datadir^" -l logfile start
- Start postgres server
C:\Users\vino\Downloads\pgsql\bin>pg_ctl -D "C:\Users\vino\Downloads\pgsql\datadir" start
- Use client (or use dbeaver) and give permissions to user "postgres" and assign password too.
C:\Users\vino\Downloads\pgsql\bin>psql -d postgres
psql (12.2)
WARNING: Console code page (437) differs from Windows code page (1252)
         8-bit characters might not work correctly. See psql reference
         page "Notes for Windows users" for details.
Type "help" for help.

postgres=# CREATE USER postgres SUPERUSER;
CREATE ROLE
postgres=# CREATE DATABASE postgres WITH OWNER postgres;
ERROR:  database "postgres" already exists
postgres=# ALTER USER postgres WITH PASSWORD 'admin';
ALTER ROLE
- Dependency Injection
- PropertySource
- Bean Scopes
- Profiles
- Java JDBC
- Spring JDBC
- JDBC Transaction
- Spring Transaction Management
- Transaction Propagation
- Transaction Isolation
- JPA - Mybatis
- Spring Batch Configuration
- Spring Scheduler
- Spring Batch - Flows and Decider
- Spring Batch - Chunk Processing and listeners
interface GreetingService {
    String greet();
}
GreetingService has 2 implementations
- one that returns "Hello"
- another that returns "Hola"
MessageService has GreetingService :
class MessageService {
  String getMessage() {
     return greetingService.greet();
  }
}
Exercise
- Inject "Hello" GreetingService into MessageService. Add a Junit test to assert the output for
MessageService.getMessage() - Repeat the above for "Hola" GreetingService
- Understand the buzzwords - Dependency Injection and Inversion of Control
You can try out xml config if you are interested but annotation based config solution is what I am looking for.
Focus Points
- Understand Bill of Materials (BOM), dependencyManagement and dependencies in gradle
- You will learn the following annotations :
@Component
@Primary
@ComponentScan
@Autowired
@Configuration
@Bean
@Qualifier
@ContextConfiguration
Modules
recipe1 has 4 submodules - recipe1a (xml based context), recipe1b, recipe1c, recipe1d - annotation based
Extend the above recipe by reading name from property file and displaying the same at both GreetingService Implementations.
Exercise
Set 1 :
- Add a property file -
app.properties- under src/main/resources - This property file should have an entry
name=Robert - Read this name at both greeting service implementations
- When the property is not found, it should default to "world"
- Assert in test cases accordingly.
Set 2 :
- Add a property file similar
app-test.properties- under src/test/resources. This should havename=Michael - Add another MessageServiceTest which reads property from
app-test.properties - Can you see Michael is assigned as name in GreetingService? Now comment out that entry at
app-test.properties. you will notice that it falls back toRobertdefined atapp.properties
Focus Points
With this recipe, you will be introduced to
@PropertySource
PropertySourcesPlaceholderConfigurer
@Value
@TestPropertySource
Module
recipe2
Exercise
Set 1:
- Create
Productclass that only hasnamefield - Create
ShoppingCartclass that containsList<Product> - ShoppingCart has
addProduct(Product product) - When I print ShoppingCart, I should see the products I have added so far Till here - try and understand toString(), equals() and hashCode() - These are just Java concepts.
Set 2:
- Coming to the spring recipe - Every time I request for ShoppingCart bean, I should get a new one.
- Enhance this recipe further by adding unique Id for ShoppingCart bean.
ShoppingCart shoppingCart1 = context.getBean(ShoppingCart.class);
shoppingCart1.addProduct(new Product("biscuit"));
shoppingCart1.addProduct(new Product("chocolate"));

ShoppingCart shoppingCart2 = context.getBean(ShoppingCart.class);
shoppingCart2.addProduct(new Product("vegetables"));
shoppingCart2.addProduct(new Product("fruits"));

System.out.println(shoppingCart1); //should print biscuit and chocolate
System.out.println(shoppingCart2); //should print vegetables and fruits
Focus points
- You will understand
@Scopewith this exercise. Understand default scope of a bean. Analyze the output when bean is singleton/prototype @PreDestroy, @PostConstruct- Read about Bean life cycle
Module
recipe3
Enhance the shopping cart recipe to introduce profile based Discount Service
Exercises
Set 1
- Introduce
pricefield toProductclass - Add a method called
checkout()inShoppingCart - Once an instance of shopping cart is checkedout, you should not add new product to that instance
- Add a junit test case for the above
Set 2
- Introduce
DiscountService- an interface with method,Double applyDiscount(Product product); - Add 3 implementations to this DiscountService
- NullDiscountService - no discounts
- FlashSaleDiscountService - 20% discount
- EndOfSeasonSaleDiscountService - 50% discount
- DiscountService should be injected to ShoppingCart based on the active profile the application is running for :
- default - NullDiscountService
- eos - EndOfSeasonSaleDiscountService
- flash - FlashSaleDiscountService
- Add test case for each profile and assert that discounts are applied correctly
Set 3
- Understand Java lambdas and try some basic exercises - https://code-exercises.com/programming/tags/java8-lambdas-streams/ms/
- Understand Exceptions in Java - checked and unchecked exceptions
Focus points
- Asserting expected exceptions in Junit test case
- You will be introduced to
@Profileand@ActiveProfiles - Try and set activeProfile to
AnnotationConfigApplicationContextinApplication.javaUnderstand the basics of inheritance in Java.
For eg : in Application.java
ApplicationContext applicationContext = new AnnotationConfigApplicationContext();
AnnotationConfigApplicationContext applicationContext = new AnnotationConfigApplicationContext();
both assignments are correct. So what is the difference?
Module
recipe4
Exercises
- Setup postgres
- Create a table,...wait for it....
Employee- columns ->
first name, last name, id, level
create table employee (id int, first_name varchar(50), last_name varchar(50), level int); - columns ->
- With just Java - not springs - write an EmployeeDao that does CRUD
create(employee)
Employee select(id)
List<Employee> select(level)
updateLevel(id, level)
deleteById(id)
JDBC basics : http://tutorials.jenkov.com/jdbc/index.html
This recipe is not on springs but in upcoming recipes you would see how much heavy lifting Spring's data access does for you.
Repeat the previous recipe - which was in plain Java - using Spring now.
Exercise
Set 1:
- Read the database properties such as url, password, etc from
application.properties- We have already done this in recipe2 using property source. - You will be introduced to
JdbcTemplate. Datasource can beDriverManagerDataSourcefor now. - Add a primary constraint on id column. Try inserting the same Employee record multiple times.
- Understand why postgres is added as a Runtime dependency in gradle.
Set 2:
- Enhance further directly extending EmployeeDaoImpl with
JdbcDaoSupport - Enhance further by extending EmployeeDaoImpl with
NamedParameterJdbcDaoSupportand try out the following :- MapSqlParameterSource
- BeanPropertySqlParameterSource
- If you look at the update() method of JdbcTemplate, there are so many flavors of it
org.springframework.jdbc.core.JdbcTemplate.update()This is called method overloading. - Understand overloading and overriding in Java
- Finally, try
batchUpdate(). You should generate random employee objects and batch insert and batch delete them.Use this library for random object creation :boolean create(List<Employee> employees); boolean delete(List<Employee> employees);org.jeasy:easy-random-core:4.0.0Of course in production you would never generate random Employee objects. But this library is extensively used in test cases to mock data. - Go over the coding guidelines related to Java 8 here. Especially dos and donts of stream()
- Add a test case for the EmployeeDao
- Each test should clear the test data after it is done running. No, do not call deleteAllEmployees in afterTest. Approach using transaction rollbacks
- You will be using :
@Transactional TransactionalManager @TransactionalConfiguration -> understand defaultRollback here @Import - I have committed a failing test case
EmployeeDaoFailingTest1: Understand why it does not fail the first time and fails only when the tests are repeated. Remove primary key constraint, if you have any, before running this test - What would you do if you have to connect to another test db for test cases? You should already know the answer for this. If not revise PropertySource recipe.
- Don't worry if you don't understand much about transactions here. We will have multiple recipes on Transaction Management. This recipe is to give you an idea about
TestExecutionListener-> one such listener isTransactionalTestExecutionListenerwhich automatically rollbacks the transaction when you annotate Test class with@Transactional. It is all made available by one magic annotation@RunWith(SpringJUnit4ClassRunner.class)which is a Junit extension for Springs.
Focus Points
- JdbcTemplate
- JdbcDaoSupport
- NamedParameterJdbcDaoSupport
@Import@TransactionalTestExecutionListener@TransactionalConfigurationTransactionalManager
Module
recipe5
We are going to extend the Java JDBC recipe.
Exercise
- Create the following tables in Postgres
CREATE TABLE book ( isbn VARCHAR(50) NOT NULL, book_name VARCHAR(100) NOT NULL, price INT, PRIMARY KEY (isbn) ); CREATE TABLE book_stock ( isbn VARCHAR(50) NOT NULL, stock INT NOT NULL, PRIMARY KEY (isbn), CONSTRAINT positive_stock CHECK (stock >= 0) ); CREATE TABLE amazon_pay ( username VARCHAR(50) NOT NULL, balance INT NOT NULL, PRIMARY KEY (username), CONSTRAINT positive_balance CHECK (balance >= 0) ); - Add an interface
KindleStorepublic interface KindleStore { void purchase(String isbn, String username); } - While purchasing, we need to reduce the
stockatbook_stockand reduce thebalanceatamazon_pay - Simulate data such that either book stock is not available or there is not enough balance in amazonPay
- How do you ensure book stock is restored to its old value when there is not enough balance in amazonPay? Transactions
- Add transaction support to purchase() only using Java JDBC.
Focus Point
By default, autocommit is turned on to commit each SQL statement immediately after its execution. To enable transaction management, you must turn off this default behavior and commit the connection only when all the SQL statements have been executed successfully. If any of the statements go wrong, you must roll back all changes made by this connection.
Module
recipe6
You would have guessed by now. If not, take the previous recipe and use spring transaction to achieve it.
Focus points
- There are 3 ways to achieve this.
- PlatformTransactionManager API
- TransactionTemplate
- @Transactional annotations
- I have all these approaches injected at different profiles. If you want to revisit profiles, check recipe4
- Bonus : Understand default methods in Java interfaces. Do you know interfaces can also have fields?
- Revisit Spring JDBC Template test case you have written at recipe5.
- If you are light-hearted just stick to testing your setup at a main method. Refer
com.kindle.AmazonAppundersrc/main/java/ - But for the curious brave hearted fellas, check out the
KindleStoreTest. Don't worry if you do not understand much of it, as we have more and more recipes on Transaction Management, things will get clearer.
Module
recipe7
- Enhance the previous recipe by adding a KindleCart that can checkout multiple books for an account
public void checkout(List<String> isbns, String username) { for(String isbn : isbns) { kindleStore.purchase(isbn, username); } } - Implement 2 behaviours of this Cart
- One that allows partial checkout - i.e. If the account balance for the user is only sufficient for few books in the cart, check out only those
- Another that does not checkout any books if the account balance for the user is not sufficient for all of them
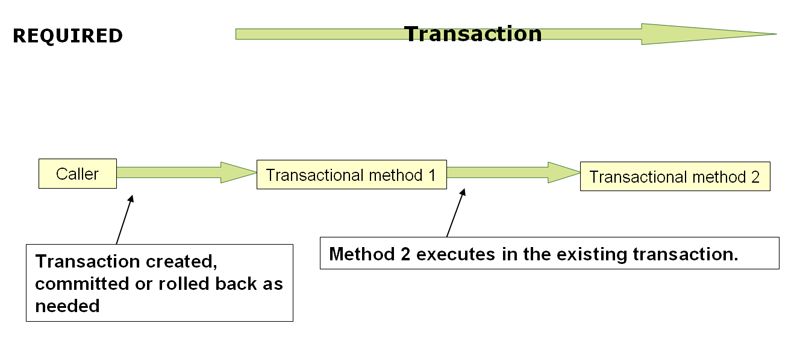
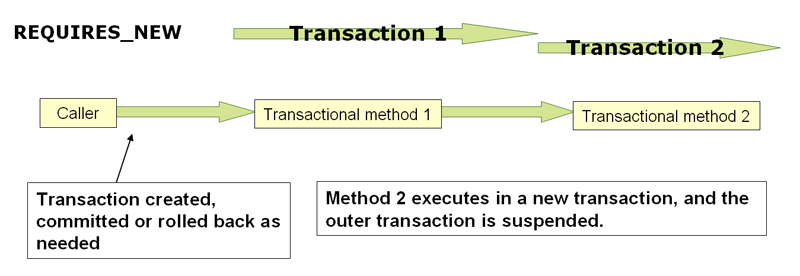
- Do not change the KindleStore implementations. i.e. the purchase logic remains the same. Try and approach this problem using Transaction Propagation.
Focus Points
- When a transactional method is called by another method, it is necessary to specify how the transaction should be propagated. For example, the method may continue to run within the existing transaction, or it may start a new transaction and run within its
own transaction. This propagation behavior is defined by
org.springframework.transaction.annotation.Propagation - Understand all the propagation types and find the suitable one for this use case.
- Check out the diagrams at Spring doc for Propagation.REQUIRED and Propagation.REQUIRES_NEW
- Bonus : Refer to this usecase
Module
recipe 8
Exercises
-
Introduce 2 new transactional methods to
KindleStorepublic void increaseStock(String isbn, int stock); public int checkStock(String isbn); -
Simulate the following :
- increaseStock() - increases stock by 5, sleeps for 10 seconds, rollsback the transaction
- checkStock() - reads the stock, sleeps for 10 seconds, reads it again
- create 2 threads - one that calls increaseStock() and another calls checkStock()
- increaseStockThread should be started first. 5 seconds later trigger checkStockThread
We are trying to read the stock value (checkStock), when it is getting updated at another transaction (increaseStock). checkStock should not read the updated value unless it is committed. What isolation level will you use?
-
Same scenario as above but increaseStock() commits the transaction. Observe what values checkStock() print before and after its sleep.
-
Simulate the following
- increaseStock() - increases stock by 5, sleeps for 2 seconds, commits the transaction
- checkStock() - reads the stock, sleeps for 15 seconds, reads it again
- create 2 threads - one that calls increaseStock() and another calls checkStock()
- checkStockThread should be started first. 5 seconds later trigger increaseStockThread
Between 2 reads within the same transaction at checkStock, the stock is updated at other transaction. i.e. checkStock has read the stock, say 10. Meanwhile increaseStock is updating the stock to 15 in another transaction and also successfully commits the transaction as well. Now the same checkStock reads the stock again. Instead of reading the updated value 15, I want checkStock to read the same value it read initially, which is 10. What isolation level would you use here?
Focus Points
- You will be introduced to Threads in Java
- Understand the problems caused by concurrent transactions - dirty reads, nonrepeatable reads, phantom reads, lost updates
- Understand the isolation levels in Transactions - read committed, read uncommitted, repeatable read, serializable
- Understand the scenario by running
ReadCommittedAppandRepeatableReadApp - Rerun
RepeatableAppwith Isolation set to READ_COMMITTED and observe what changed
Module
recipe9
Rewrite EmployeeDAO at JDBC recipe using spring-mybatis
Focus Points
- You will be introduced to
SqlSessionFactoryandSqlSessionin mybatis - You can add mappers via annotations or xml. Stick to xml mappers.
- Understand mapper namespace. Try and log the statements executed by mybatis. Refer this
Module
recipe10
Exercise
Set : 1
- Add spring batch dependency (update bom to the latest version)
- Configure Spring batch - Refer
@EnableBatchProcessingand initialize database with batch tables (hint :DataSourceInitializer) - Create a job called
simple-jobwhich has a single stepsimple-step - Step should be a
Taskletwhich just logs (not sysout. use Logger) - jobName, stepName, stepExecutionId and jobExecutionId - main() method should launch this job. Use
JobLauncher - If you got it working till this far, try running the main() method again. You should not be able to run the job again. Understand why.
Set : 2
- Understand the domain language of batch - for now understand the correlation between
Job, JobInstance, JobExecution - Look into the batch tables. Understand how they have been updated for the run at set 1.
- Understand what
@EnableBatchProcessingdoes for you. It abstracts -JobLauncher, JobRepositoryFactoryBean, JobRegistryBeanPostProcessor, JobRegistry. Understand what each of these components are for.
Set : 3
- Add a jobParameter to the job you are launching at main().
- Make sure this parameter is unique across runs (hint: currentTimeInMillis is a good thing to ensure uniqueness across runs)
- Log this jobParameter as well, at Tasklet.
- Try running main() twice. It should work now
Set : 4
- Modify the Tasklet to run twice with the help of an instance variable
count. Hint : Pay attention to the return typeRepeatStatus - Add this count to step execution context
- at main() launch the job twice. i.e we are launching the job twice within the same run.
- Why does the second job has tasklet executed only once? Hint :
@StepScope
Set : 5
- Add a asynchronous task executor for Job Launcher. By default JobLauncher does not come with task executor. How will you customize that? Hint : extending
DefaultBatchConfigurer - Observe the logs from Tasklet. you should see the thread name
[2020-04-07 03:39:36,139 [SimpleAsyncTaskExecutor-2] c.b.SimpleTasklet.execute():22 INFO ]: Executing step : simple-step for job : simple-job with stepExecutionId: 13, jobExecutionId : 13 & JobParameter : {currentTime=1586210969653}. Count : 1
Focus Points
- Domain language of spring batch
- Being able to query various batch tables and understand a job instance, job execution, step execution, how to find the execution status, job parameter, etc.
- Understand the components of spring batch :
@EnableBatchProcessing
DefaultBatchConfigurer
JobLauncher
JobParameter
Job
Step
Tasklet
@StepScope
RepeatStatus.CONTINUE/FINISHED
TaskExecutor
Module
spring-batch-recipes:recipe11
Exercise
- Extend the above recipe to run the job every 2 seconds - Use Spring scheduler for this.
@EnableScheduling @Scheduled - Use a
Job Operatorto launch job. jobOperator should just invokestartNextInstance(job)in the scheduler. - Job should be aware of what an
instanceis. Introduce an incrementer to the Job -RunIdIncrementershould do. - Extend above by using your own incrementer - that just adds
System.currentTimeMillisas job parameter. - Understand the difference between fixedDelay and fixedRate. Analyse the following snippet in case of fixedRate and fixedDelay
   AtomicInteger count = new AtomicInteger(0);
   @Scheduled(fixedDelay = 2_000L)
   public void run() throws InterruptedException {
       int runId = count.getAndIncrement();
       System.out.println("Starting "+runId);
       if(runId < 2) {
           Thread.sleep(10_000L);
       }
       System.out.println("Ending : "+runId);
   }
Focus Points
- Spring scheduler
@EnableScheduling @Scheduled - JobOperator
- JobParameterIncrementer
- Difference b/w fixedDelay and fixedRate
Module
spring-batch-recipes:recipe12
Exercise Set : 1
- Create a step called
odd-stepthat just prints odd - Create a step called
even-stepthat just prints even - Create a job with
RunIdIncrementerthat executesodd-stepif therun.idis odd and executes 'even-step' if therun.idis even - Invoke this job using
JobOperatorat main() atleast twice - Study the table
BATCH_STEP_EXECUTIONfor the execution Ids
Set : 2
- Create a step called
flaky-stepthat throwsRuntimeExceptionrandomly. - Create a step called
backup-stepthat just prints 'backup' - Create a job that calls
flaky-step-> if it succeeds, the job ends. if the flaky step failed, thenbackup-stepshould kick in - Invoke this job using
JobOperatorat main() for cases where flaky-step succeeds and fails - Study the table
BATCH_STEP_EXECUTIONfor the execution Ids
Focus Points
- Understand Flows
- Set 1 will require you to understand JobExecutionDecider
- Set 2 will require you to understand Conditional Flow
Modules
spring-batch-recipes:recipe13
Exercise
This recipe is not strictly a hands-on. It serves as a reference for you to run the job and understand how chunk processing in spring batch works.
Set : 1
-
Create class
ComicCharacter. Copy it fromspring-batch-recipes:recipe14 -
Create a reader that iterators over
DataUtil.villainCharactersif jobParameter 'isVillain' is set to true and overDataUtil.heroCharactersotherwise.DataUtilclass is inspring-batch-recipes:recipe14- Remember
@StepScope - How to acquire job parameter within a step scope? Hint :
@BeforeStep - Use
ItemReader
- Remember
-
Create processor that converts
ComicCharactertoStringwhich is just the name of the character in uppercase- These processors should also filter by universe they are initialized with
- Use
ItemProcessor
-
Create a writer that just writes the string to console. Use
ItemWriter -
Combine the reader-processor-writer for step
guardian-stepwhich in turn is used byguardian-job -
Repeat the same for step
avenger-stepwhich in turn is used byavenger-job@Bean public Step avengerStep() { return stepBuilderFactory.get("avenger-step") .<ComicCharacter, String>chunk(3) .reader(comicCharacterReader) .processor(avengerComicCharacterProcessor()) .writer(consoleWriter()) .build(); } @Bean public Job avengerJob() { return jobBuilderFactory.get("avenger-job") .start(avengerStep()) .build(); } -
Understand the advantage of processing in chunks. Refer this
-
Did you notice that at read() and process() is on single item and write() is for list of items? ItemReader :
ComicCharacter read()ItemProcessor:
String process(ComicCharacter item)ItemWriter :
void write(List<String> items)If you have chunk size 100, items are read and processed one by one but all 100 items are written at once.
Set : 2
- Add
StepExecutionListenerwith log statements in beforeStep() and afterStep() - Similarly add
ChunkListenerandJobExecutionListeneras well
Set : 3
- Use
JobOperatorto start a job with parameterisVillain=true - You would have to add
ParameterConverterto JobOperator. ReferJobParametersConverter - Understand how the listeners work.
Set : 4
- Add Test case to verify if
avenger-stepwith parameterisVillain=trueis giving only villain names - Another test with parameter isVillain=false
- Use
JobLauncherTestUtils - Enhance recipe13 by adding test for set 1 and set 2
Focus Point
- Chunk processing - reader, processor, writer
- Chunk, step execution and job execution listeners
- ParameterConverter
- @BeforeStep
- JobLauncherTestUtils
Module
spring-batch-recipes:recipe14