Access through SSH any JupyterHub, regardless how it was deployed and easily transfer files through SFTP.
With a JupyterHub SSH server deployed, you can start and access your JupyterHub user environment through SSH. With a JupyterHub
SFTP server deployed alongside the JupyterHub's user storage, you can use SFTP to work against your JupyterHub user's home directory.
These services are authenticated using an access token acquired from your JupyterHub's user interface under /hub/token.
This project is under active develpoment 🎉, so expect a few changes along the way.
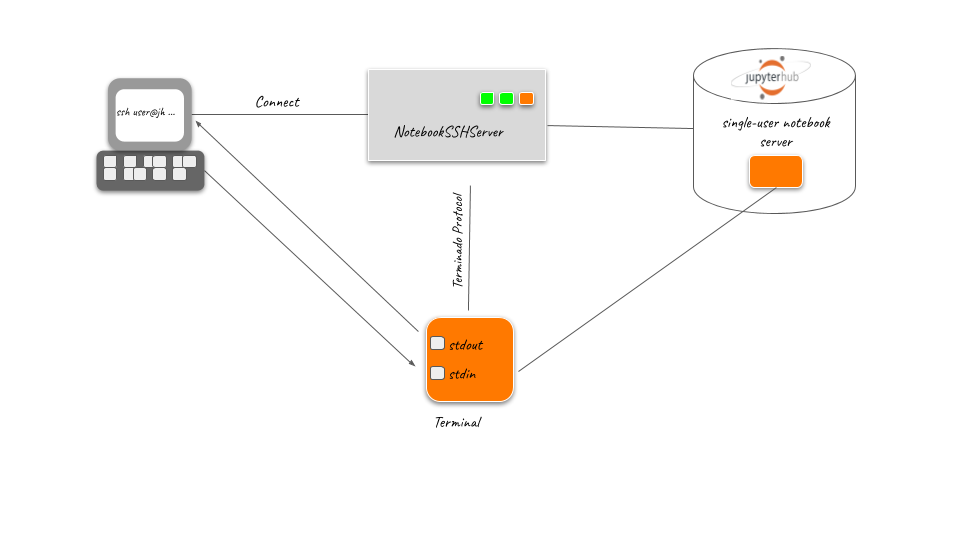
The JupyterHub SSH service provides SSH access to your user environment in a JupyterHub. JupyterHub SSH is made up of two main components:
- an SSH server that maps a SSH connection to a Notebook server on a JupyterHub.
- a Terminado client that knows how to connect and communicate to a Jupyter terminal.
Apart from SSH access to JupyterHub, once jupyterhub-ssh was deployed, you can also use it to transfer files from your local
home directory into your remote hub home directory. This is achieved through jupyterhub-sftp, a service that provides a SFTP
setup using OpenSSH. jupyterhub-sftp currently supports only NFS
based home directories.
Instructions on how to install and deploy JupyterHub SSH & SFTP services.
-
Clone the repo and install the jupyterhub-ssh package:
$ git clone https://github.com/yuvipanda/jupyterhub-ssh.git
$ cd jupyterhub-ssh
$ pip install -e .
-
Or install the package directly:
$ pip install git+https://github.com/yuvipanda/jupyterhub-ssh.git
-
Create the config file:
$ touch jupyterhub_ssh_config.py
-
Put in the config file at least the following two config options:
c.JupyterHubSSH.hub_url: URL of JupyterHub to connect to.c.JupyterHubSSH.host_key_path: Path to host's private SSH Key.
More configuration options can be found in the docs here.
-
Start the JupyterHubSSH app from the directory where the config file
jupyterhub_ssh_config.pyis located:python -m jupyterhub_ssh
If your JupyterHub has been deployed to Kubernetes, you can use the Helm chart available in this repo to deploy JupyterHub SSH and/or JupyterHub SFTP directly into your Kubernetes cluster.
helm install <helm-release-name> \
   --repo https://yuvipanda.github.io/jupyterhub-ssh/ jupyterhub-ssh \
   --version <helm chart version> \
   --set hubUrl=https://jupyter.example.org \
   --set ssh.enabled=true \
   --set sftp.enabled=false
If you install JupyterHub SFTP, then it needs access to the home folders. These
home folders are assumed to be exposed via a k8s PVC resource that you should
name via the sftp.pvc.name configuration.
If your JupyterHub has been deployed using the official JupyterHub Helm
chart version 1.1.0 or later, and you have
configured the official JupyterHub Helm chart with proxy.https.enabled=true
and proxy.https.type=letsencrypt, then you can add the following to to acquire
access to the jupyterhub-ssh and jupyterhub-sftp services via that setup.
# Configuration for the official JupyterHub Helm chart to accept traffic via
proxy:
  https:
    enabled: true
    type: letsencrypt
    letsencryptEmail: <my-email-here>

  service:
    # jupyterhub-ssh/sftp integration part 1/3:
    #
    # We must accept traffic to the k8s Service (proxy-public) receiving traffic
    # from the internet. Port 22 is typically used for both SSH and SFTP, but we
    # can't use the same port for both so we use 2222 for SFTP in this example.
    #
    extraPorts:
      - name: ssh
        port: 22
        targetPort: ssh
      - name: sftp
        port: 2222
        targetPort: sftp

  traefik:
    # jupyterhub-ssh/sftp integration part 2/3:
    #
    # We must accept traffic arriving to the autohttps pod (traefik) from the
    # proxy-public service. Expose a port and update the NetworkPolicy
    # to tolerate incoming (ingress) traffic on the exposed port.
    #
    extraPorts:
      - name: ssh
        containerPort: 8022
      - name: sftp
        containerPort: 2222
    networkPolicy:
      allowedIngressPorts: [http, https, ssh, sftp]

    # jupyterhub-ssh/sftp integration part 3/3:
    #
    # We must let traefik know it should listen for traffic (traefik entrypoint)
    # and route it (traefik router) onwards to the jupyterhub-ssh k8s Service
    # (traefik service).
    #
    extraStaticConfig:
      entryPoints:
        ssh-entrypoint:
          address: :8022
        sftp-entrypoint:
          address: :2222
    extraDynamicConfig:
      tcp:
        services:
          ssh-service:
            loadBalancer:
              servers:
                - address: jupyterhub-ssh:22
          sftp-service:
            loadBalancer:
              servers:
                - address: jupyterhub-sftp:22
        routers:
          ssh-router:
            entrypoints: [ssh-entrypoint]
            rule: HostSNI(`*`)
            service: ssh-service
          sftp-router:
            entrypoints: [sftp-entrypoint]
            rule: HostSNI(`*`)
service: sftp-service-
Login into your JupyterHub and go to
https://<hub-address>/hub/token. -
Copy the token from JupyterHub.
-
SSH into JupyterHub:
ssh <hub-username>@<hub-address>
The
<hub-username>should be what you see in the top right corner when viewinghttps://<hub-address>/hub/home. This may different from the UNIX user you see within the started server, for example in a terminal prompt. -
Enter the token received from JupyterHub as a password.
-
TADA 🎉 Now you have an interactive terminal! You can do anything you would generally interactively do via ssh: run editors, fully interactive programs, use the commandline, etc. Some features like non-interactive command running, tunneling, etc are currently unavailable.
-
Login into your JupyterHub and go to
https://<hub-address>/hub/token. -
Copy the token from JupyterHub.
-
Transfer file into Jupyterhub:
-
Using the
sftpcommand:sftp <hub-username>@<hub-address>
-
-
Enter the token received from JupyterHub as a password.
-
TADA 🎉 Now you can transfer files to and from your home directory on the hubs.


