-
Notifications
You must be signed in to change notification settings - Fork 0
Real Robot Local Deployment
On this page we discuss how to get started with the robots. To start with, we'll work with ROS 'locally', that is: creating and deploying ROS Packages and Nodes directly on the robot operating system.
- Launching ROS
- Accessing the Robot using VS Code
- Connecting to the robot from another device
- Local Deployment Exercises:
- Local Deployment Summary
- Wrapping Up
The ROS Master always runs on the robot, regardless of whether we are deploying nodes locally or remotely. In either case, the steps in this section are essential, otherwise the ROS Master will not be running, the robot's core functionality won't be active, and it therefore won't be able to do anything!
There are a number of initial steps that need to be carried out in order to start up the robot and get ROS running.
Step 1: Identify your robot
Robots are named as follows:
dia-waffleX
... where X indicates the 'Robot Number' (a number between 1 and 50). Make sure you know which robot you are working with, or check the label printed on top of it!
Step 2: Log in to the robot's operating system wirelessly using ssh.
Note: We'll assume that you are working with one of our Robot Laptops when doing this, but it is also possible to do this from other machines too. If you are doing this on a Robot Laptop make sure it's connected to the DIA-LAB WiFi network!
-
Open up a terminal instance, which we will refer to as REMOTE 1. Then, enter the following to establish a connection to your robot via
ssh:[REMOTE 1] $ ssh robot@dia-waffleX... replacing
Xwith the number of the robot that you are working with. Enter the password when requested (we'll tell you what this is in the lab). -
The terminal prompt should change as follows:
robot@dia-waffleX:~$This indicates that you are now logged in to the robot's operating system (hostname:
dia-waffleX, user:robot).Because this terminal instance is now running on the robot, we'll refer to this as ROBOT 1 instead.
-
From here, launch
tmux, which allows us to create multiple terminal instances inside the singlesshsession that we've just established:[ROBOT 1] $ tmuxAny text in the terminal should now clear, and a green banner should appear across the bottom of the terminal window:

You can find a (very quick) guide on how to use tmux here.
Step 3: Launching ROS
Now, we need to launch the ROS Master and all the core packages on the robot that provide its basic functionality. We can do this using a single launch file located within a ROS package called turtlebot3_bringup. To do this, enter the following command in ROBOT 1:
[ROBOT 1] $ roslaunch turtlebot3_bringup turtlebot3_robot.launch
Pro Tip: Alternatively, you could use one of our handy bash aliases for this command instead.
Once you see a message containing the text:
[INFO] [#####] Calibration End
... then the robot core packages are up and running.
Job done: ROS is now running, and you are ready to work with the robot!
Note: Leave the ROBOT 1 terminal instance alone now and definitely don't shut down these processes (using
Ctrl+C), otherwise ROS won't be active anymore, and your robot won't do anything!
The instructions that follow assume that you are working on one of our Robot Laptops. See the section below for further details on how to work with other devices.
-
Click the green icon in the bottom left-hand corner of the VS Code screen:

-
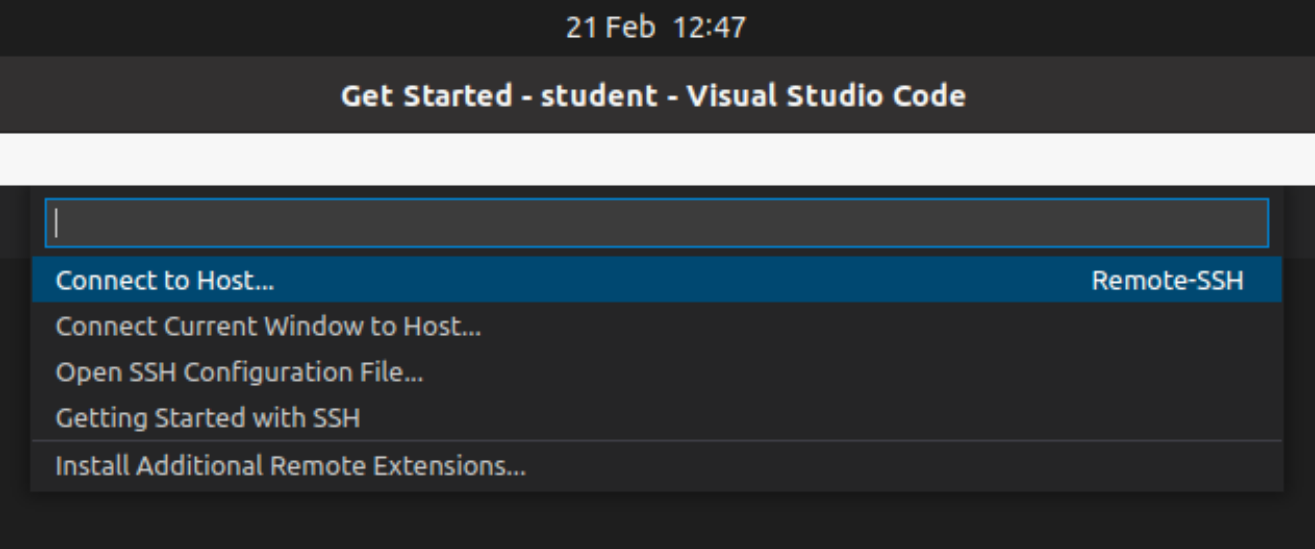
A menu should appear at the top of the screen, select
Connect to Host....
-
Enter the details of the robot that you are trying to connect to, exactly the same way as you would when trying to establish an
sshconnection from a terminal:robot@dia-waffleX... replacing
Xwith the number of the robot, as printed on its body.Hit
Enterand a new VS Code instance should launch. -
In the new VS Code Instance the following message might then appear:

... hit
Enteror click the"Continue"button. -
Enter the password for the
robotuser account when prompted. -
If the connection was successful, the green "Remote" icon in the bottom left-hand corner of the VS Code screen should now look something like this:

-
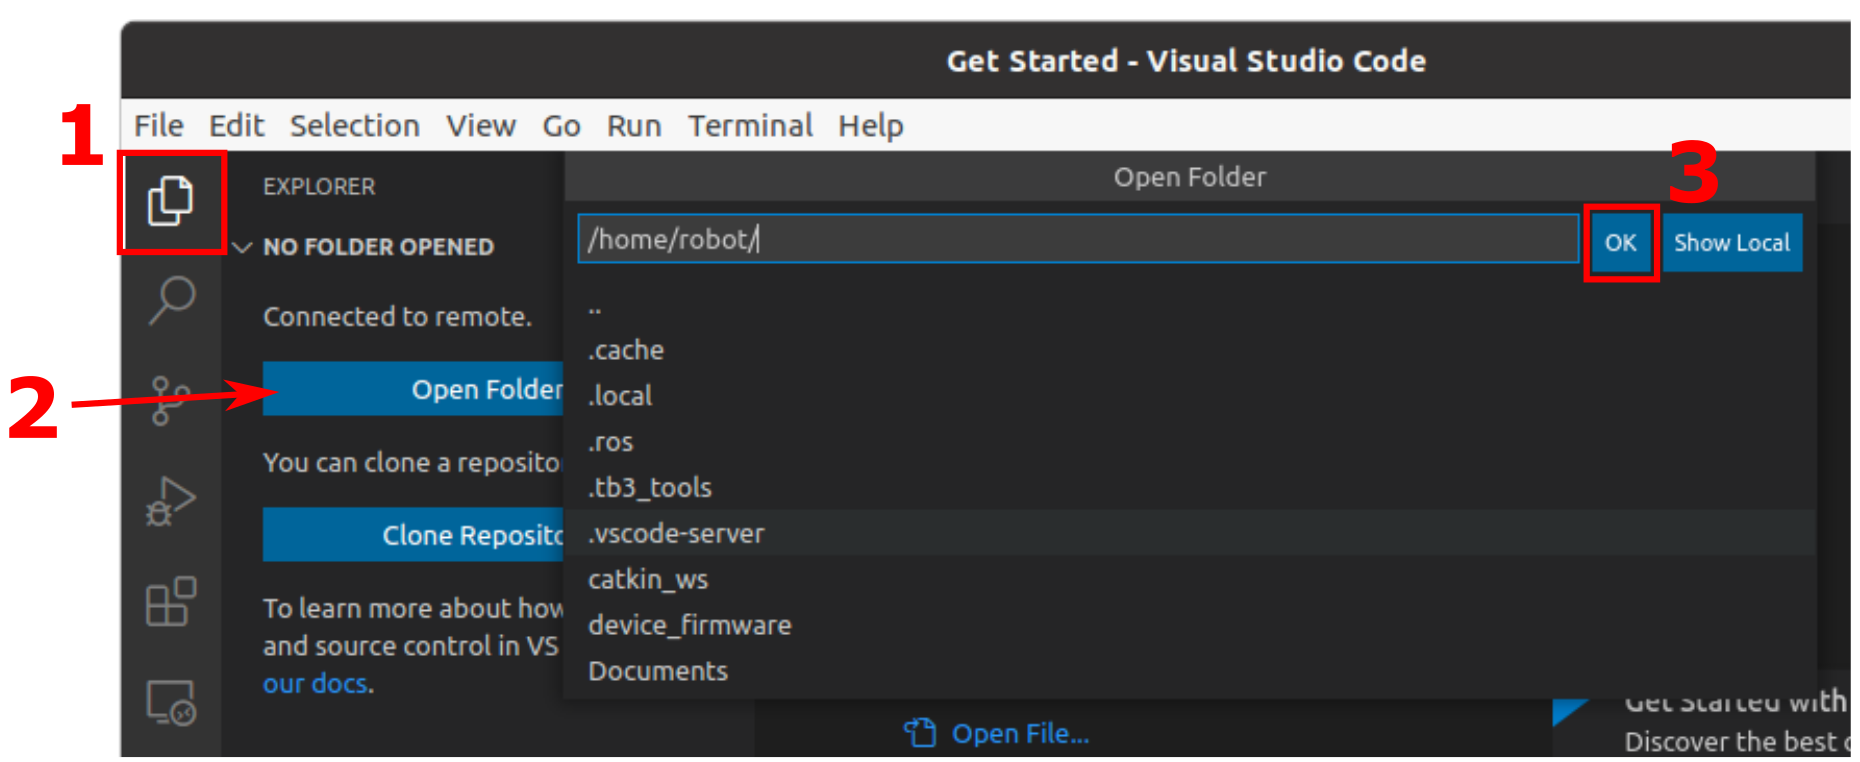
Access the robot's filesystem in VS Code by:
- Clicking the "Explorer" icon in the left-hand toolbar (or use the
Ctrl+Shift+Ekeyboard shortcut), - Clicking the blue
"Open Folder"button, - Clicking
"OK"to select the default/home/robot/filesystem location (the "home" folder).

- Clicking the "Explorer" icon in the left-hand toolbar (or use the
-
Finally, a trust pop-up may appear. Click the checkbox to
"Trust the authors of all files in the parent folder 'home'"and then click the blue"Yes, I trust the authors"button.
You can launch any number of terminal instances on the robot from within VS Code by going to the "Terminal" menu at the top of the screen and selecting "New Terminal".
From here you can navigate the robot's filesystem, run commands and launch ROS applications exactly as you have done within WSL-ROS.
Remember: Before you try to launch any of your own ROS nodes on the robot, you will need to make sure ROS and the core robot packages are all up and running!
It's also possible to do all the above from another device such as a Diamond Computer Room Workstation, or your own machine, provided:
- The device is connected to the "eduroam" WiFi network.
- VS Code is installed.
- The VS Code "Remote - SSH" extension is installed.
When establishing the connection, you may be asked to "Select the platform of the remote host", and should select "Linux" here.
Note: You won't be able to establish a ROS Network between the robot and any device other than a Robot Laptop (but you can at least interact with the filesystem and run commands on the robot etc.)
Here are some exercises that you could have a go at now, based on some of the things that we have done in simulation through Weeks 1-6 of this Wiki.
As you'll know by now, before we can create any of our own ROS nodes we need to create a ROS package, and we must do this inside a Catkin Workspace. Fortunately, a Catkin Workspace already exists on the robot's filesystem here:
/home/robot/catkin_ws/
Remember though, that you should create your package in its src directory.
-
To do all this, you'll first need to create a new terminal instance on the robot, which can be achieved in one of two ways (select whichever you prefer, you don't need to do both):
-
Either, return to the
tmuxinstance that you used to launched ROS (on the robot) earlier (ROBOT 1). From here, use theCtrl+B,Ckey combination to create a new tmux window (see here for some tips on using Tmux). - Or, create a new terminal instance from a VS Code Remote - SSH session running on the robot.
We'll call this new terminal instance ROBOT 2.
-
Either, return to the
-
In ROBOT 2 navigate to the Catkin Workspace
srcdirectory on the robot's filesystem:[ROBOT 2] $ cd ~/catkin_ws/src/ -
Use the
catkin_create_pkgtool (as you have done in simulation) to create a new ROS package on the robot:[ROBOT 2] $ catkin_create_pkg {your package name} rospy... replacing
{your package name}as appropriate. -
Remember that
catkin buildwill not work on the robots, so you'll need to use the following command to runcatkin_makeinstead:[ROBOT 2] $ cd ~/catkin_ws && catkin_make -
You can then re-source the environment using our handy alias:
[ROBOT 2] $ src
Have a go at writing a ROS node (in Python) to control your robot now. Why not try recreating the move_circle.py node that you developed in Week 2?
-
Make sure that the robot core packages are still running in the ROBOT 1
tmuxinstance. -
Navigate to the
srcdirectory of the package that you created in the previous exercise (if you're not already there):[ROBOT 2] $ roscd {your package name}/src -
Create a new Python file (using
touch) and make it executable (usingchmod) -
Start programming! Remember that you can do this in VS Code via a Remote - SSH session.
-
When you're ready, you can launch your node using the
rosruncommand (remember:rosrun {your package name} {script name}). Alternatively, you could create a launch file to launch your node usingroslaunch...
The first exercise in the Week 3 Lab required you to develop an odometry-based controller for your simulated robot, with the aim of making the robot follow a square path. Have a go at implementing this on a real robot now.
-
Create a new Python file on the robot, inside the
srcdirectory of the package that you created previously. -
Start programming your node:
-
Perhaps you already created a good
move_square.pynode in the WSL-ROS environment during the Week 3 lab? -
If not, take a look at this worked example (University of Sheffield only).
-
Tom also demonstrated a waypoint-based approach during COM2009 Lecture 9, have a look at that one too if you want to (COM2009 students only).
-
Or, use the
move_squaretemplate from Week 3 and create a new odometry-based controller yourself!
-
The robots run headless (i.e. without a display!) and therefore cannot run any graphical applications. You therefore can't run any processes that require RViz, Gazebo or anything rqt-based. Any nodes requiring this sort of functionality should be executed remotely on the Robot Laptops instead, which is discussed in the next section.
When you can though, it may be more reliable/efficient to run nodes locally (i.e. on the robot) rather than remotely (on the laptop) for certain tasks such as:
- Open-loop velocity control (such as that discussed in Exercise 2).
- Closed-loop (odometry-based) velocity control (such as that discussed in Exercise 3).
- Closed-loop velocity control with LiDAR-based obstacle avoidance.
- On-board object detection that doesn't use any of the
cv2image display functions (e.g.cv2.imshow())
On the next page, we'll discuss how to introduce an additional device onto the ROS network (i.e. a laptop) and take advantage of the ROS visualisation tools that allow us to see what our robot "sees"...
When you're finished working with a robot, remember that it needs to be shut down properly.
-
First, close down any active processes that are running on the robot by checking through all of your open ROBOT terminals and stopping these processes using
Ctrl+C. -
Then, shut down the robot by entering the following command in ROBOT 1:
[ROBOT 1] $ offEnter the password when asked then wait for the
"Connection to dia-waffleX closed"message.
Real Robot Lab Instructions:
← Getting Started [Previous] |
[Next] 'Remote' Deployment →
COM2009/3009 Robotics Lab Course
Updated for the 2021-22 Academic Year
Dr Tom Howard | Multidisciplinary Engineering Education (MEE) | The University of Sheffield
The documentation within this Wiki is licensed under Creative Commons License CC BY-NC:
You are free to distribute, remix, adapt, and build upon this work (for non-commercial purposes only) as long as credit is given to the original author.