Real Robots Getting Started
Read this page IN FULL before you do anything else!
This section of the Wiki is here to help you apply your simulation-based ROS knowledge to our Real TurtleBot3 Waffle Robots!
TODO::
- Launching ROS on the Robot
- Accessing the Robot through VS Code
catkin buildnot installed on the robots!- Configuring a Robot Laptop for Remote Deployment
- Shutting Down the Robot Properly
Note: You'll need to have completed a Health & Safety Assessment before using the robots for the first time. Head to the Blackboard course page and complete this now (if you haven't done so already).
You'll be very familiar with the simulated version of our TurtleBot3 Waffle robots by now, but the real ones are even better! You may recall the overview of the robots from the Home Page, but here is the figure again, to remind you what the real ones look like:
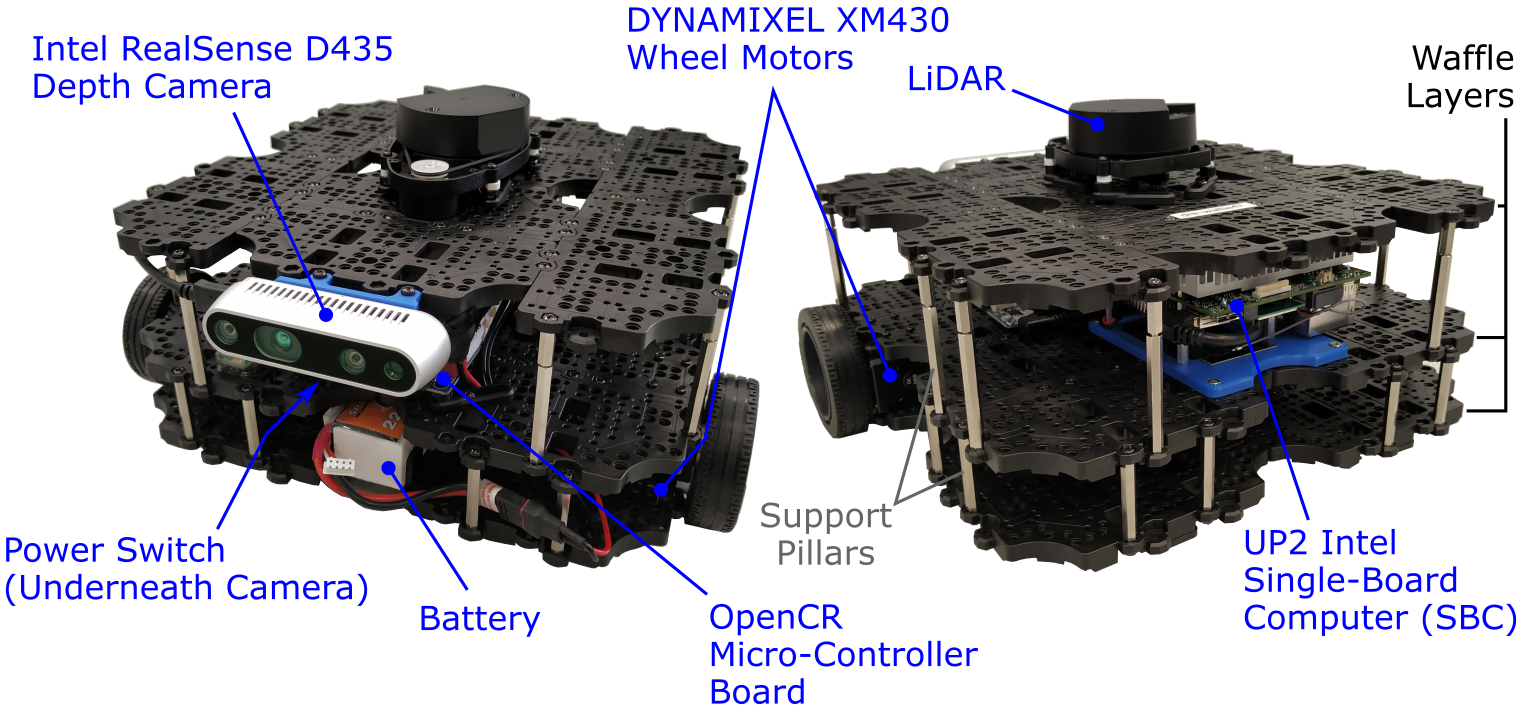
As you can see, the robots have lots of exposed sensors and electronics and so you must take great care when handling them to avoid the robots becoming damaged in any way. When handling a robot, always hold it by either the black waffle layers, or the vertical support pillars.
Do not pick the robot up or carry it by the camera or LiDAR sensor! These are delicate devices that could be easily damaged!
A lot of the electronics are housed on the middle waffle layer. Try not to touch any of the circuit boards, and take care not to pull on any of the cabling or try to remove or rehouse any of the connections. If you have any concerns with any of the electronics or cabling, if something has come loose, or if your robot doesn't seem to be working properly then ask a member of the teaching team to have a look for you.
The robots will be provided to you with a battery already installed and ready to go. Don't try to disconnect or remove the battery yourselves! The robot will beep when the battery is low, and if this happens ask a member of the team to get you a replacement (we have plenty).
There are two options when working with the real robots:
- "Local" Deployment: Each robot has a Single Board Computer on-board (an UP Squared), which runs Linux and ROS. We can therefore create ROS packages and nodes directly on the robot's filesystem and execute them on the robot itself, i.e. executing them "locally".
- "Remote" Deployment: ROS is network-based and can work over a WiFi connection, so we can very easily add additional external ("remote") devices into our ROS network (e.g. a laptop computer), create ROS Packages and Nodes, and execute these on the remote device to control a robot wirelessly, via a single ROS network.
For certain applications, it might be better to deploy nodes locally, and we'll look at this in more detail later...
In order to take advantage of the 'ROS visualisation tools' such as RViz and rqt_image_view, and do more advanced or computationally intensive things, we'll need to rely on an external computer (with a display!) and deploy certain nodes remotely. We have a fleet of pre-configured Robot Laptops in the lab that are set up to allow you to do this. We'll get to this part shortly!
Much like the WSL-ROS environment, our Robot Laptops (and Robots) run Ubuntu 20.04 and ROS Noetic.
On the laptops there is a "student" user account that you should use when working in the lab. The laptop should log you into this user account automatically on startup, but we will provide you with the account password as well, during the lab sessions, should you need it.
The Robots and Laptops connect to a dedicated wireless network running in the Diamond called 'DIA-LAB'. There are a few things that you need to know about this:
- Laptops must be connected to the DIA-LAB network in order to establish a ROS network between them and the robots.
- Laptops do not have internet access when connected to DIA-LAB.
- You'll need to connect the laptop to eduroam (or use a Computer Room 3 workstation) to access any external resources (such as this Wiki).
Credentials for DIA-LAB and eduroam have already been setup on the laptops, allowing you to connect to either network straight away, but speak to a member of the teaching team if you are having any issues.
Visual Studio Code is installed on the laptops for you to use when writing/editing your Python ROS nodes. Launch VS Code from any terminal by simply typing code, or you could also launch it by clicking the icon in the favourites bar on the left-hand side of the screen:
![]()
It doesn't matter whether you are intending to deploy nodes locally or remotely, the ROS Master always runs on the robot. It's therefore important to get this up and running before you do anything else! This section will guide you through the process of connecting to a robot and launching ROS.
Because the ROS Master runs on the robot, the laptop needs to know where to look for this in order to connect to the same ROS network. The first step is to therefore pair the two devices and set them up to work with one another.
-
Identify the robot that you are working with.
Robots are named as follows:
dia-waffle[NUM]... where
[NUM]is a unique 'Robot Number' (a number between 1 and 50). Check the label printed on top of the robot to find out which one you have! -
Use our
wafflecommand-line interface to pair the laptop with your robot.-
Open up a terminal instance on the laptop, either by using the
Ctrl+Alt+Tkeyboard shortcut, or by clicking the terminal icon in the favourites bar on the left-hand side of the desktop:
We'll refer to this as TERMINAL 1.
-
Then, enter the following command to pair your laptop and robot:
[TERMINAL 1] $ waffle [NUM] pair... replacing
[NUM]with the number of the robot that you are working with. -
Enter the password for the robot, when requested (we'll tell you what this is in the lab).
-
You may see a message like this early on in the process:

... just type
yesand then hitEnterto confirm that you want to continue with this connection. -
The whole pairing process may take a minute or so, and it should tell you exactly what is happening throughout. Once it's done, the message:
pairing completeshould be displayed in blue.
-
-
The terminal prompt should change as follows:
robot@dia-waffleX:~$This indicates that you are now logged in to the robot's operating system (hostname:
dia-waffleX, user:robot).Because this terminal instance is now running on the robot, we'll refer to this as ROBOT 1 instead.
-
From here, launch
tmux, which allows us to create multiple terminal instances inside the singlesshsession that we've just established:[ROBOT 1] $ tmuxAny text in the terminal should now clear, and a green banner should appear across the bottom of the terminal window:

You can find a (very quick) guide on how to use tmux here.
Step 3: Launching ROS
Now, we need to launch the ROS Master and all the core packages on the robot that provide its basic functionality. We can do this using a single launch file located within a ROS package called turtlebot3_bringup. To do this, enter the following command in ROBOT 1:
[ROBOT 1] $ roslaunch turtlebot3_bringup turtlebot3_robot.launch
Pro Tip: Alternatively, you could use one of our handy bash aliases for this command instead.
Once you see a message containing the text:
[INFO] [#####] Calibration End
... then the robot core packages are up and running.
Job done: ROS is now running, and you are ready to work with the robot!
Note: Leave the ROBOT 1 terminal instance alone now and definitely don't shut down these processes (using
Ctrl+C), otherwise ROS won't be active anymore, and your robot won't do anything!
Real Robot Lab Instructions:
[Next] 'Local' Deployment →