Debugging a Red5 application
By now you probably know how the different ways of creating Red5 application. But what happens when you need to test your code, update it and again test it ? The actual real life development process includes a huge chunk of time spent on debugging your code. Red5 development is no different. If i may add, it is more complex that your average java application , since ist a real-time media server application. But worry not, as in this section we will see how we can debug our code in a red5 development process.
There are two types of debugging methods (That's how I would classify) that can be used while developing red5 applications:
Internal debugging would refer to creating a local server from within eclipse and debugging your application code against it.This method has been explained multiple times, in previous lessons. Simply jump back and go through it to understand the workflow of creating a Red5 runtime based local server in eclipse and debugging your code through it. This is the fastest way to debug a red5 application in my opinion. (As mentioned earlier, there are hiccups in stopping the server, but not that it its a show stopper.) Let us go over the steps for internal debugging from the beginning.
-
Ensure that you have red5-eclipse plugin installed in your eclipse .
-
Create a Red5 server runtime from Windows => Preferences => Server => Runtime Environment (Explained in previous lessons)
-
Create a local server using the Red5 runtime created
-
Add your red5 application to the local server
-
Run / Debug your application from the local server from within eclipse
External debugging, also known as remote java debugging is the second way to debug red5 applications. Its definitely slower than the previous method but still widely used among experienced java developers. This topic is also well known across the internet, so i won't go into the depth of setting it up. Rather i am going to briefly discuss it and leave you with reference links which will help you get started. The main advantage of external debugging (remote debugging) is that you don't need any special setup for it.Your code could be running anywhere and you can still debug it in your local IDE.Remote debug port for Red5 is 8787. So if you are on LAN / WAN and your code is not running on your machine, make sure the debug port is open and Red5 starts in debug mode (using red5-debug.sh / red5-debug.bat).
If you came here from the previous lessons, let me remind you that there were three ways of creating a red5 application that we talked about:
- Using an existing application template.
- Using the red5-plugin for eclipse.
- Using maven
Irrespective of which approach you choose, remote debugging can be applicable to all of them.You just have to make sure that the build output of your project setup is deployed into red5 media server root => webapps folder.Once your application is deployed, you can run the server using the red5-debug.x file to get red5 started in debug mode.Then use your eclipse IDE to connect to Red5 and start debugging some code.
Let us go over the steps for external debugging (Remote debugging):
-
Build and deploy your application(and all inclusive files) into
{RED5HOME}/webappsdirectory -
Run Red5 media server in debug mode, using red5-debug.sh / red5-debug.bat file (as per your OS platform)
-
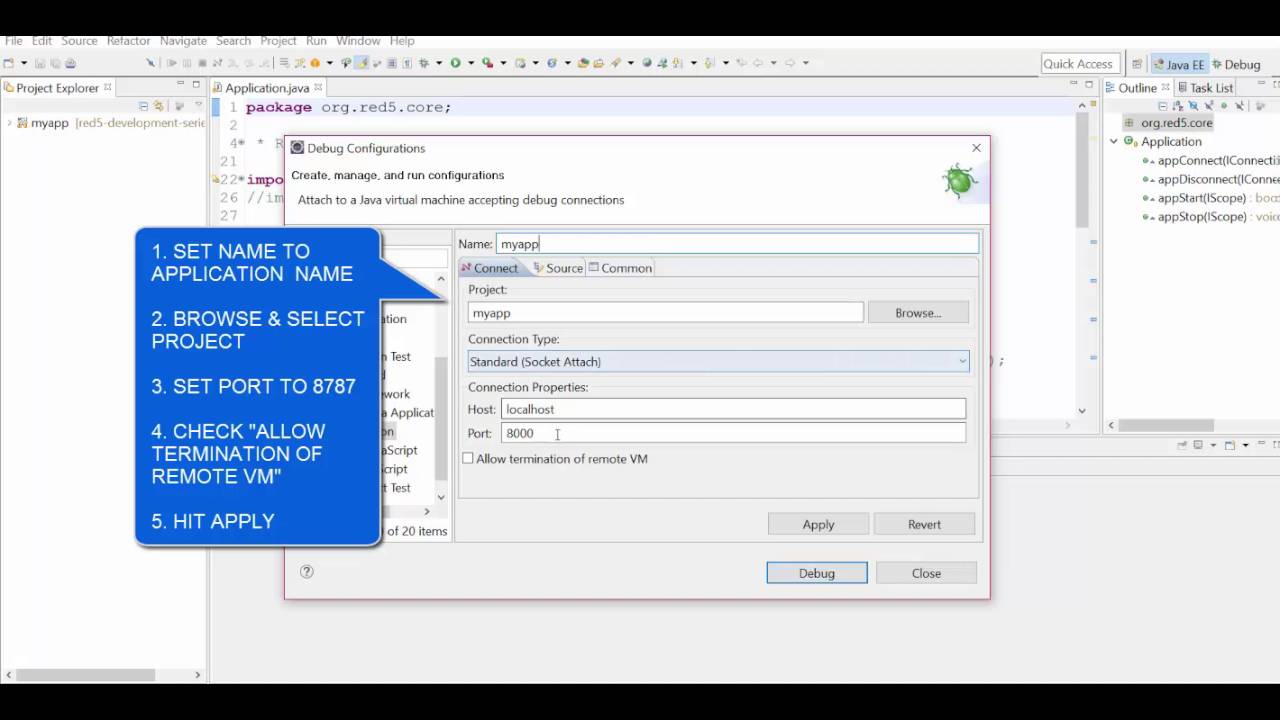
Connect to Red5 media server instance using eclipse remote debug option, from Debug Configurations => Remote java application (double click to create new configuration)
- Click Apply
- Click Debug to connect to the running server
- You can now add breakpoints to your code and work with it
- https://www.youtube.com/watch?v=fkai4P3a0_E : Video on remote debugging by Dominick Accattato.In fact, there are a lot more Red5 videos on the channel and you should explore those as well for a better understanding of red5.
- Remote Debugging Red5 Applications : A nice article on Red5 remote debugging by Carl Sziebert.