-
Notifications
You must be signed in to change notification settings - Fork 393
Administration
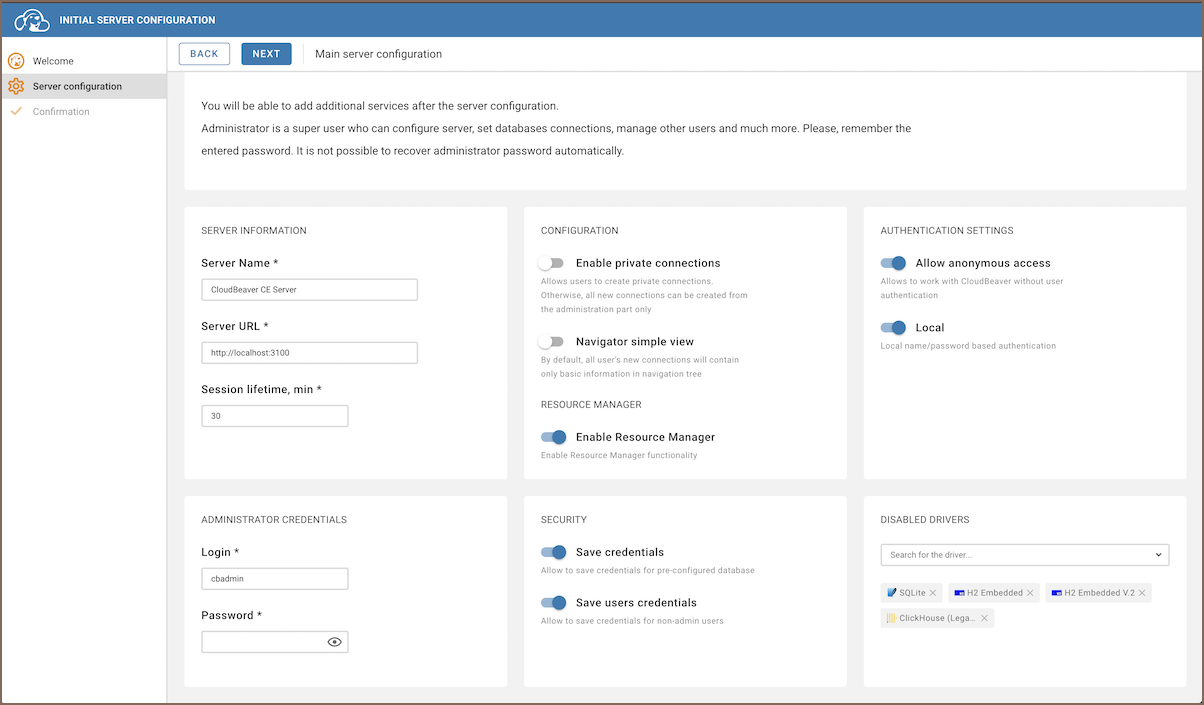
Upon launching the application for the first time, it necessitates an initial setup process. This setup primarily involves configuring specific aspects of the application to ensure optimal functionality.
The initial configuration is a vital step to ensure that the application functions correctly and according to your preferences.
The base application settings require specific essential configurations on initial launch. This includes the following components: administrator account, server info, and base application behavior.

After the initial server configuration, you can log in as an administrator:
-
If the authentication is enabled: Settings (top right corner, the cog icon) -> login
-
Another option is to enter the
/#/adminpage
If you see the error "Unsupported authentication provider: local" then you need to enable local authentication in the server configuration and restart the server: Server Configuration Documentation:
"enabledAuthProviders": [
  "local"
]
After successful authentication with the administrator account, you can enter the Administration page:
- via menu: Settings (top right corner, the cog icon) -> Administration
- Directly go to
/#/adminpage
On the administration page, select the Connection Templates tab. On the Connection Templates tab, you can create or delete templates. You can read more about it here.
On the administration page, select the Users and Teams tab. On the Users tab, you can create, delete, and edit users. You can read more about it here.
On the administration page, select the Server configuration tab. On the Server configuration tab, you can edit the base application settings. You can read more about it here.
On the administration page, select the Preferences tab. On the Preferences tab, you can customize settings for the interface, Data Viewer, SQL Editor, and Tools. You can find initial guidelines in Preferences article.
- Application overview
- Demo Server
- Administration
- Server configuration
- Create Connection
- Connection Templates Management
- Access Management
-
Authentication methods
-
Local Access Authentication

- Anonymous Access Configuration
- Reverse proxy header authentication
- LDAP
-
Single Sign On

-
SAML

-
OpenID

-
AWS OpenID

-
AWS SAML

-
AWS IAM

-
AWS OpenId via Okta

-
Snowflake SSO

-
Okta OpenId

-
Cognito OpenId

-
JWT authentication

-
Kerberos authentication

-
NTLM

-
Microsoft Entra ID authentication

-
Google authentication

-
Local Access Authentication
- User credentials storage
-
Cloud Explorer

-
Cloud storage

-
Query Manager

-
Drivers Management

- Supported databases
- Accessibility
- Keyboard shortcuts
- Features
- Server configuration
- CloudBeaver and Nginx
-
Domain manager

- Configuring HTTPS for Jetty server
- Product configuration parameters
- Command line parameters
- Local Preferences
- API
-
CloudBeaver Community
-
CloudBeaver AWS
-
CloudBeaver Enterprise
-
Deployment options
-
Development