Sonoff Mini
This page describes how to configure a Sonoff mini to work with Misterhouse and MQTT, it should be read in conjunction with the Tasmota page in this wiki.
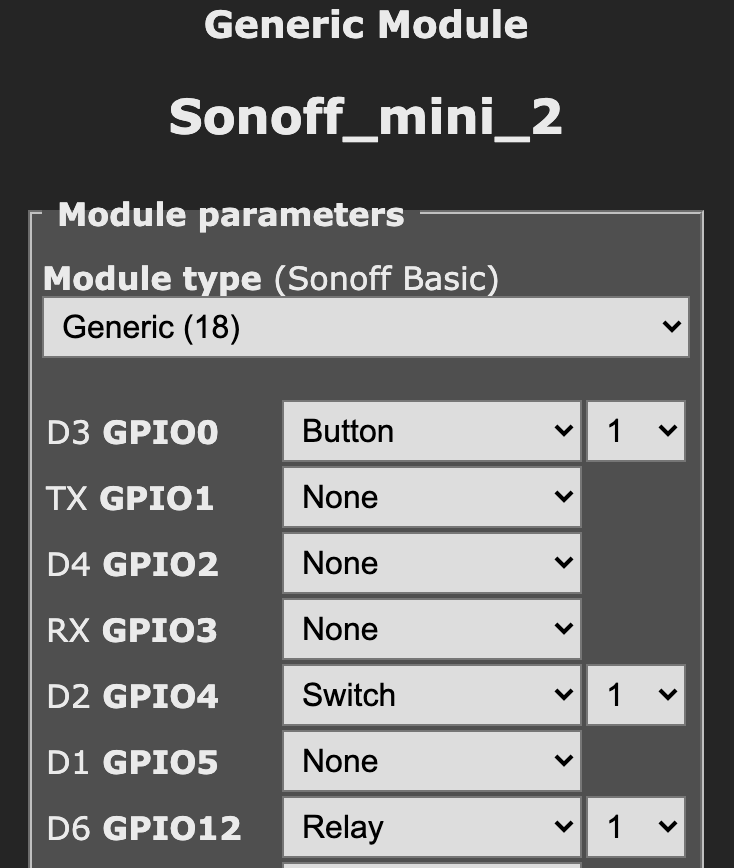
After you have flashed the mini with Tasmota, it will be configured as a generic device, so you need to go to its configuration screen and set up the relay and external switch. go to the device's Configuration -> Configure Module screen, and set the device to Generic(18). After it has rebooted, return to the same Configure Module screen and set D3-GPIO0 to Button 1, D2-GPIO4 to Switch 1, D6-GPIO12 to Relay 1 and D7-GPIO13 to Led_i 1, save this and it will reboot again.

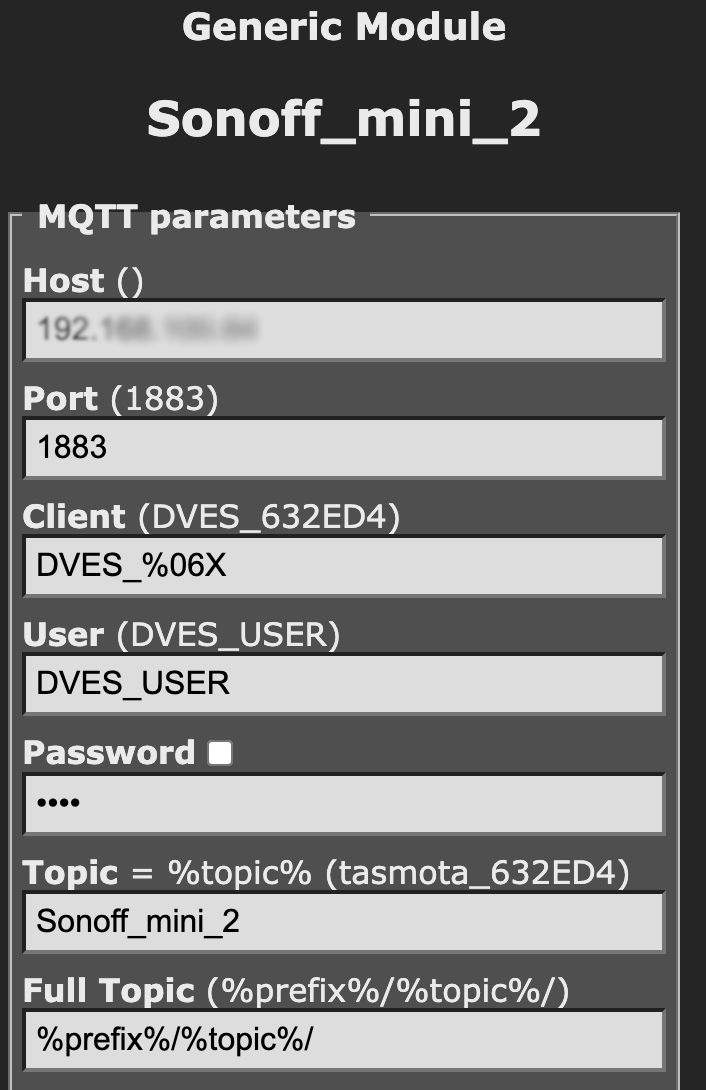
Next access the Configure MQTT screen and set the IP adress of your broker, the MQTT port it uses and a sensible name for the Topic, I use the same name as I intend to use for Misterhouse (Sonoff_mini_2 in these examples), leave other parameters as defaults.

Next prepare Misterhouse as per the Tasmota Wiki to add the changes to mqtt.pm and read_table_A.pl, note these may already be in depending on when you downloaded Misterhouse.
Next add your broker coordinates to mh.ini e.g.
#********************************************************
# Category = MQTT
# ********************************************************
CODE, require mqtt; #noloop
mqtt_host=aaa.bbb.ccc.ddd
mqtt_server_port=1883
mqtt_topic=#
#mqtt_LWT_topic=tele/Misterhouse/LWT
#mqtt_LWT_payload=offline
mqtt_debug=0
Substituting your brokers ip address for aaa.bbb.ccc.ddd, and change the port number if you are not using the default. Make sure you set the topic to # and that your mqtt.pm supports wildcards as described in the Wiki.
Now add the device to items.pl e.g.
MQTT_BROKER, mqtt_1
MQTT_DEVICE, Sonoff_mini_2, , mqtt_1, cmnd/Sonoff_mini_2/POWER
Restart MH and you can now turn your device on and off using commands like
$v_Sonoff_mini = new Voice_Cmd('Sonoff mini [on,off]');

#--------------------------------------------------------------------
# handle sonoff mini tests
#--------------------------------------------------------------------
if ( $state = said $v_Sonoff_mini) {
	print_log("setting sonoff mini to $state");
	$Sonoff_mini_2->set( $state, "voice command: testing sonoff mini" );
}

if ( $state = state_now $Sonoff_mini_2) {
	print_log("sonoff mini changed to $state ");
}
The built in button and the switch (if fitted) will toggle the relay locally, but not transmit anything back for MH to act on. You can check this in an MQTT monitor like mqtt.fx and subscribe to +/Sonoff_mini_2/+. As an aside you will also see its LWT messages which you can subscribe to and handle in MH as described in the wiki.
What you do next depends on what you want to achieve.
Scenario 1 – you want the switch to continue to toggle locally, but want to know when the relay status changes.
Define another MH device to subscribe to the stat/topic/POWER message e.g in items.mht
MQTT_DEVICE, Sonoff_mini_2_switch, , mqtt_1, stat/Sonoff_mini_2/POWERThen add a handler to detect state changes on this mh device.
if ( $state = state_now $Sonoff_mini_2_switch) {
	print_log("sonoff mini switch changed to $state checking mh relay state");
	if ($Sonoff_mini_2->{state} ne $state) {
		$Sonoff_mini_2->set( $state, "switch toggled" );
	}
}Define your new switch in Misterhouse e.g.
MQTT_DEVICE, Sonoff_mini_2_separate_switch_2, , mqtt_1, stat/Sonoff_mini_2/SWITCH2Set your Sonoff so the switch no longer does a local toggle and instead sends the command you defined for mh to subscribe to above.
Go to the device console and enter the following 3 lines to create a rule to publish on and off to stat/Sonoff_mini_2/SWITCH2 when the switch is changed.
Backlog SwitchMode 1; SwitchTopic 0
Rule1 on Switch1#state=1 do Publish stat/%topic%/SWITCH2 on endon on Switch1#state=0 do Publish stat/%topic%/SWITCH2 off endon
Rule1 1
Add your state handler in mh e.g.
if ( $state = state_now $Sonoff_mini_2_separate_switch_2) {
	print_log("sonoff mini separate switch changed to $state");
}
NOTE: With this example, the button on the mini still locally toggles the relay and sends the mqtt message back to MH and fires the $Sonoff_mini_2_switch handler describe above.
If you have a number of devices, you may be able to reduce this by using wildcards, e.g. a device defined in MH like;
MQTT_DEVICE, MQTT_switch_toggles, , mqtt_1, stat/+/SWITCH1TWill change state whenever a device which matches the wildcard changes state. The mqtt payload is put into $MQTT_switch_toggles->{state} and the actual topic that caused the state change is put into $MQTT_switch_toggles->{set_by_topic}
Remember that wildcards can only be used when subscribing to a topic, not publishing, i.e MH can only listen to wildcard topics, it cannot send a message to multiple devices using them.
If you want to add one of the peripherals supported by Tasmota to the switch connector, you may need to pick up power for it, in which case see the Tasmota Sonoff mini Wiki to see the internals of the device.
Though written for the Sonoff mini, most of this is also applicable to many Tasmota devices.