Guide to deploying and installing omaha server in production
- Open the IAM console.
- From the navigation menu, click Users.
- Select your IAM user name
- Click User Actions, and then click Manage Access Keys.
- Click Create Access Key. Your keys will look something like this: - Access key ID example: AKIAIOSFODNN7EXAMPLE - Secret access key example: wJalrXUtnFEMI/K7MDENG/bPxRfiCYEXAMPLEKEY
- Click Download Credentials, and store the keys in a secure location.
Note: it can happen you don't have permissions to create IAM users. In this case ask your AWS administrator to create one for you and send you the keys.
To create a new security group:
- Open the Amazon EC2 console.
- In the navigation pane, click Security Groups.
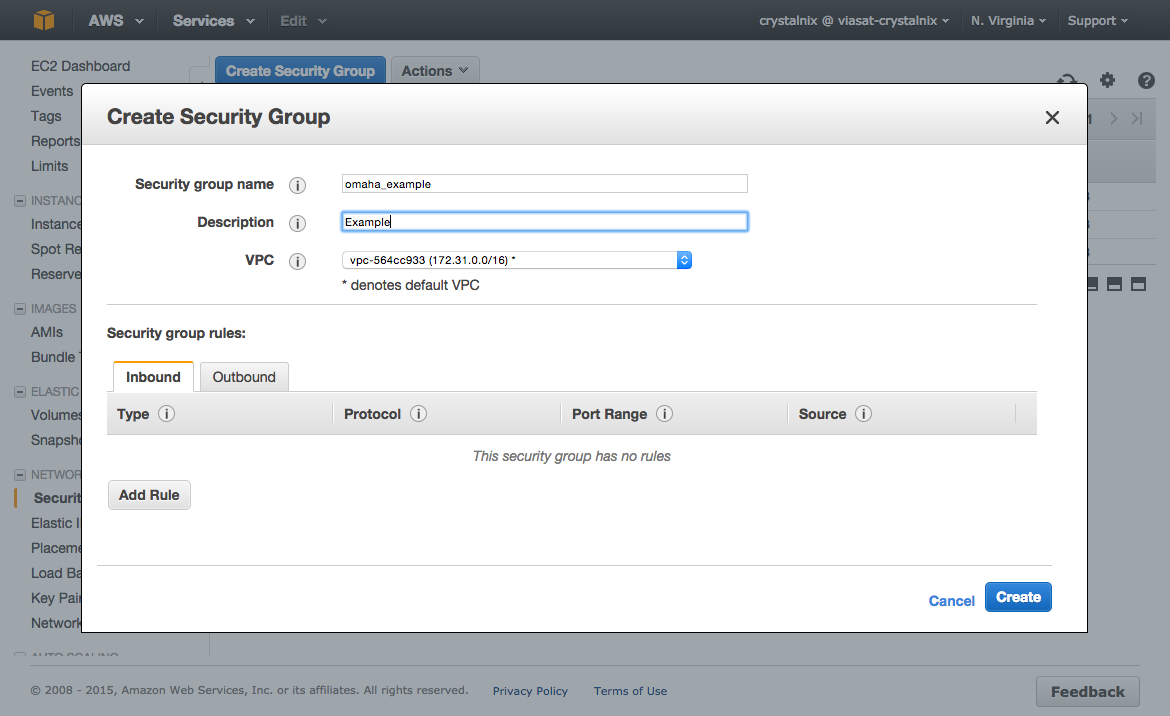
- Click Create Security Group.
- Specify a name and description for the security group.
- You can start adding rules, or you can click Create to create the security group now (you can always add rules later). For more information about adding rules, see Adding Rules to a Security Group.
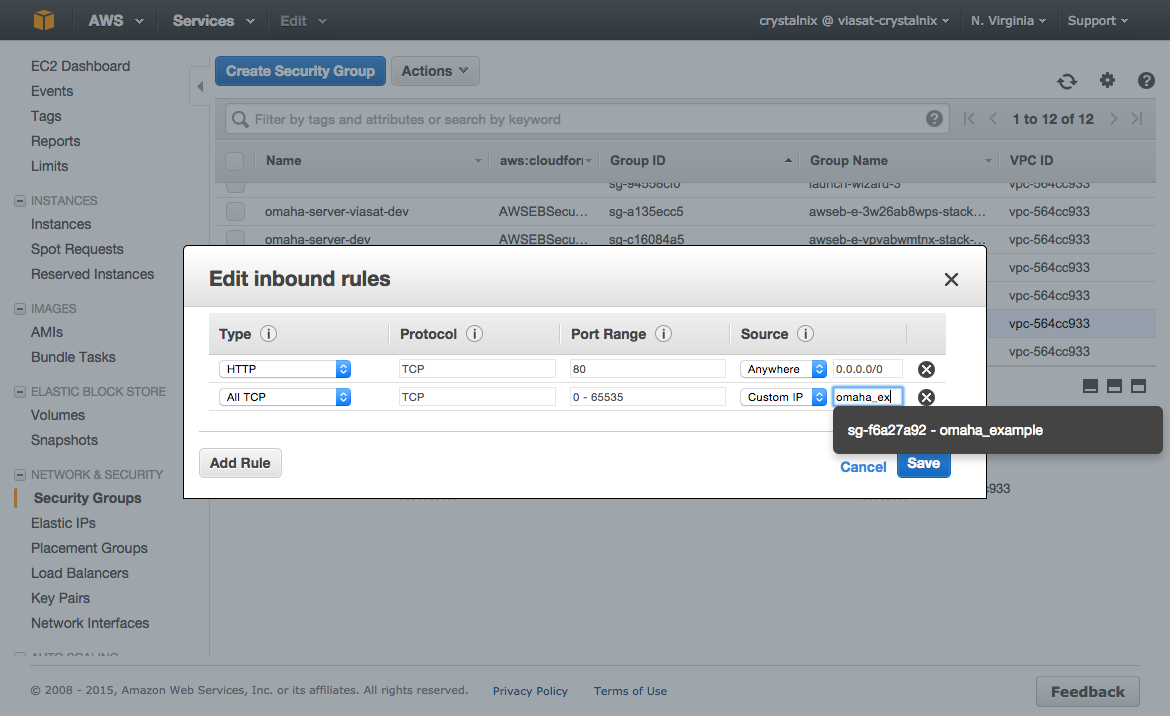
Click Add Rule, select All TCP, then start typing the ID of the security group in Source; this provides you with a list of security groups. Select the security group from the list. Click Save when you are done.
To create your key pair using the console:
- Open the Amazon EC2 console.
- From the navigation bar, select a region for the key pair. You can select any region that's available to you, regardless of your location. This choice is important because some Amazon EC2 resources can be shared between regions, but key pairs can't. For example, if you create a key pair in the US West (Oregon) region, you can't see or use the key pair in another region.
- Click Key Pairs in the navigation pane.
- Click Create Key Pair.
- Enter a name for the new key pair in the Key pair name field of the Create Key Pair dialog box, and then click Create.
- The private key file is automatically downloaded by your browser. The base file name is the name you specified as the name of your key pair, and the file name extension is .pem. Save the private key file in a safe place.

- Sign into the AWS Management Console and open the Amazon S3 console.
- Click Create Bucket.
- In the Create Bucket dialog box, in the Bucket Name box, type a name for your bucket.
- In the Region box, click the region where you want the bucket to reside.
- Click Create.

- Sign in to the AWS Management Console and open the Amazon RDS console
- In the top right corner of the AWS Management Console, select the region in which you want to create the DB instance.
- In the navigation pane, click DB Instances.
- Click Launch DB Instance to start the Launch DB Instance Wizard.
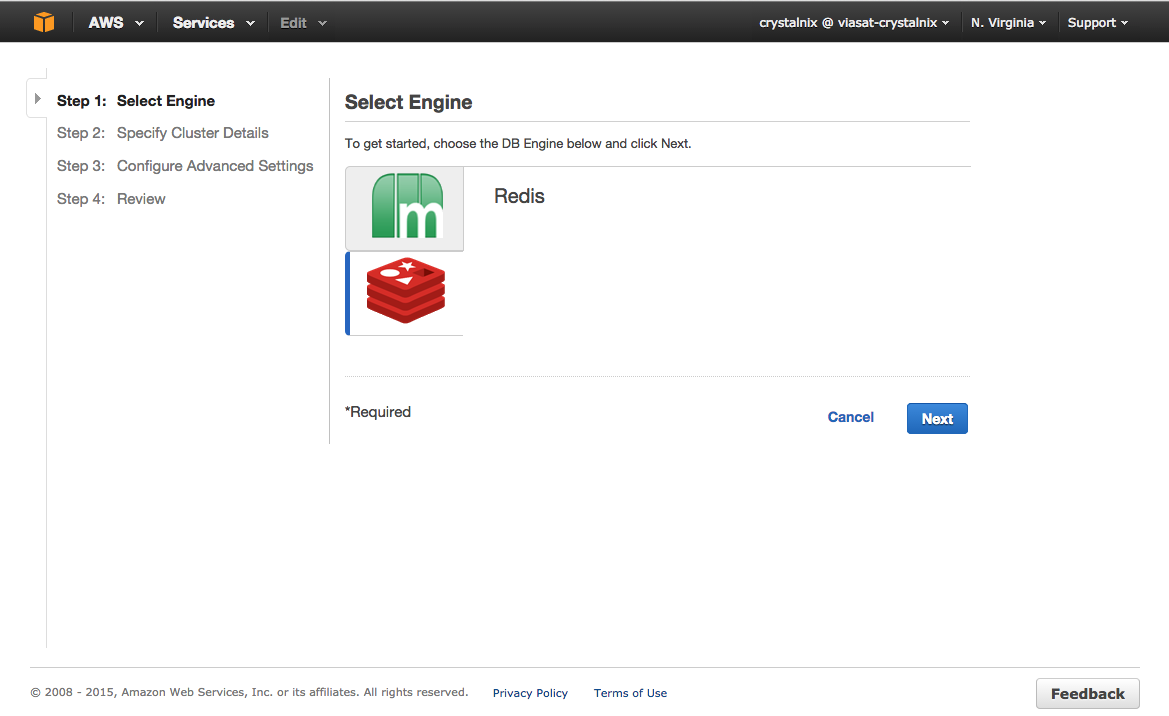
The wizard opens on the Select Engine page.

- On the Select Engine page, click the PostgreSQL icon and then click the Select button for the PostgreSQL DB engine.
- On the Specify DB Details page, specify your DB instance information. You also will be asked if you're going to use the database for production purposes. In case you do, select
MultiAZ Deploymentoption. In other case use outside of production option (answerNo). Click Next when you are finished.
[](images/guide/rds_detail.png) 7. On the **Configure Advanced Settings** page, provide additional information that Amazon RDS needs to launch the PostgreSQL DB instance. The table shows settings for an example DB instance. Specify your DB instance information, then click Launch DB Instance.For this parameter... ...Do this: License Model
PostgreSQL has only one license model. Select the default,
postgresql-license, to use the general license agreement for PostgreSQL.DB Engine Version
Select the version of PostgreSQL that you want to work with.
DB Instance Class
Select a DB instance class that defines the processing and memory requirements for the DB instance. For more information about all the DB instance class options, see DB Instance Class.
Multi-AZ Deployment
Determine if you want to create a standby replica of your DB instance in another Availability Zone for failover support. For more information about multiple Availability Zones, see Regions and Availability Zones.
Allocated Storage
Type a value to allocate storage for your database (in gigabytes). In some cases, allocating a higher amount of storage for your DB instance than the size of your database can improve I/O performance. The minimum allocated storage for a PostgreSQL instance is 5 GB. For more information about storage allocation, see Amazon Relational Database Service Features.
Storage Type Select the storage type you want to use. For more information about storage, see Storage for Amazon RDS.
DB Instance Identifier
Type a name for the DB instance that is unique for your account in the region you selected. You may chose to add some intelligence to the name such as including the region and DB engine you selected, for example
postgresql-instance1.Master Username
Type a name using alphanumeric characters that you will use as the master user name to log on to your DB instance. For information on the default privileges granted to the master user name, see Amazon RDS PostgreSQL Planning Information
Master Password and Confirm Password
Type a password that contains from 8 to 128 printable ASCII characters (excluding /,", and @) for your master user password. Retype the password in the Confirm Password text box.
[](images/guide/rds_advanced.png) 8. On the final page of the wizard, click *Close*. 9. On the Amazon RDS console, the new DB instance appears in the list of DB instances. The DB instance will have a status of **creating** until the DB instance is created and ready for use. When the state changes to **available**, you can connect to the DB instance. Depending on the DB instance class and store allocated, it could take several minutes for the new instance to be available.For this parameter... ...Do this: VPC
This setting depends on the platform you are on. If you are a new customer to AWS, select the default VPC shown. If you are creating a DB instance on the previous E2-Classic platform that does not use a VPC, select
Not in VPC. For more information about VPC, see Amazon RDS and Amazon Virtual Private Cloud (VPC).DB Subnet Group
This setting depends on the platform you are on. If you are a new customer to AWS, select
default, which will be the default DB subnet group that was created for your account. If you are creating a DB instance on the previous E2-Classic platform and you want your DB instance in a specific VPC, select the DB subnet group you created for that VPC. For more information about VPC, see Amazon RDS and Amazon Virtual Private Cloud (VPC).Publicly Accessible
Select
Yesto give the DB instance a public IP address, meaning that it will be accessible outside the VPC; otherwise, selectNo, so the DB instance will only be accessible from inside the VPC. For more information about hiding DB instances from public access, see Hiding a DB instance in a VPC from the Internet.Availability Zone
Use the default value of
No Preferenceunless you want to specify an Availability Zone.VPC Security Group
If you are a new customer to AWS, select the default VPC. If you created a VPC security group, select the VPC security group you previously created.
Database Name
If you want to specify a database name for the default database, type a name for your database of up to 63 alpha-numeric characters. If you do not provide a name, no default database on the DB instance is created.
Database Port
Specify a port you want to use to access the database. PostgreSQL installations default to port 5432 .
Parameter Group
Select a parameter group. Each PostgreSQL version has a default parameter group you can use, or you can create your own parameter group. For more information about parameter groups, see Working with DB Parameter Groups.
Option Group
Option groups are currently not used with PostgreSQL DB instances. For more information about option groups, see Working with Option Groups.
Enable Encryption
Select
Yesto enable encryption at rest for this DB instance. For more information, see Encrypting Amazon RDS Resources.Backup Retention Period
Set the number of days you want automatic backups of your database to be retained. For non-trivial instances set this value to
1or greater.Backup Window
Unless you have a specific time that you want to have your database backup, use the default of
No Preference.Auto Minor Version Upgrade
Select
Yesto enable your DB instance to receive minor DB engine version upgrades automatically when they become available.Maintenance Window
Select the 30 minute window in which pending modifications to your DB instance are applied. If you the time period doesn't matter, select
No Preference.- Sign in to the AWS Management Console and open the Amazon ElastiCache console.
- On the ElastiCache console dashboard, click Launch Cache Cluster to start the Launch Cache Cluster wizard.
To select your cluster's engine:
- On the Select Engine screen, click the Redis tab.
- Click Next.
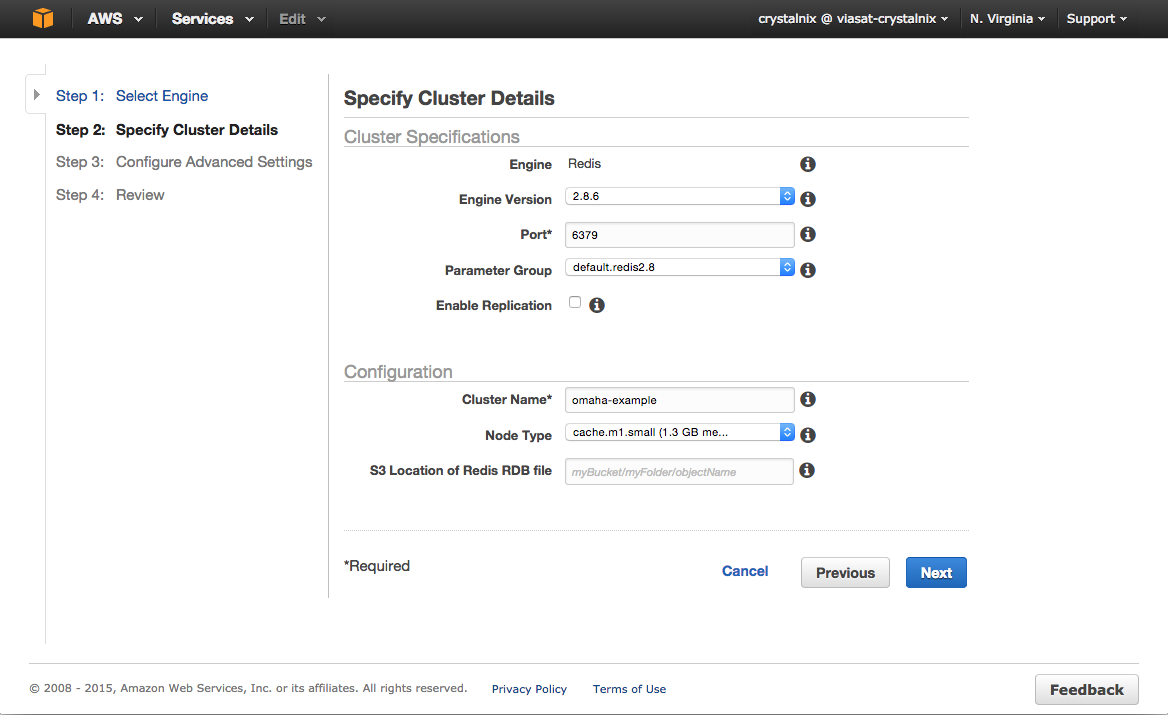
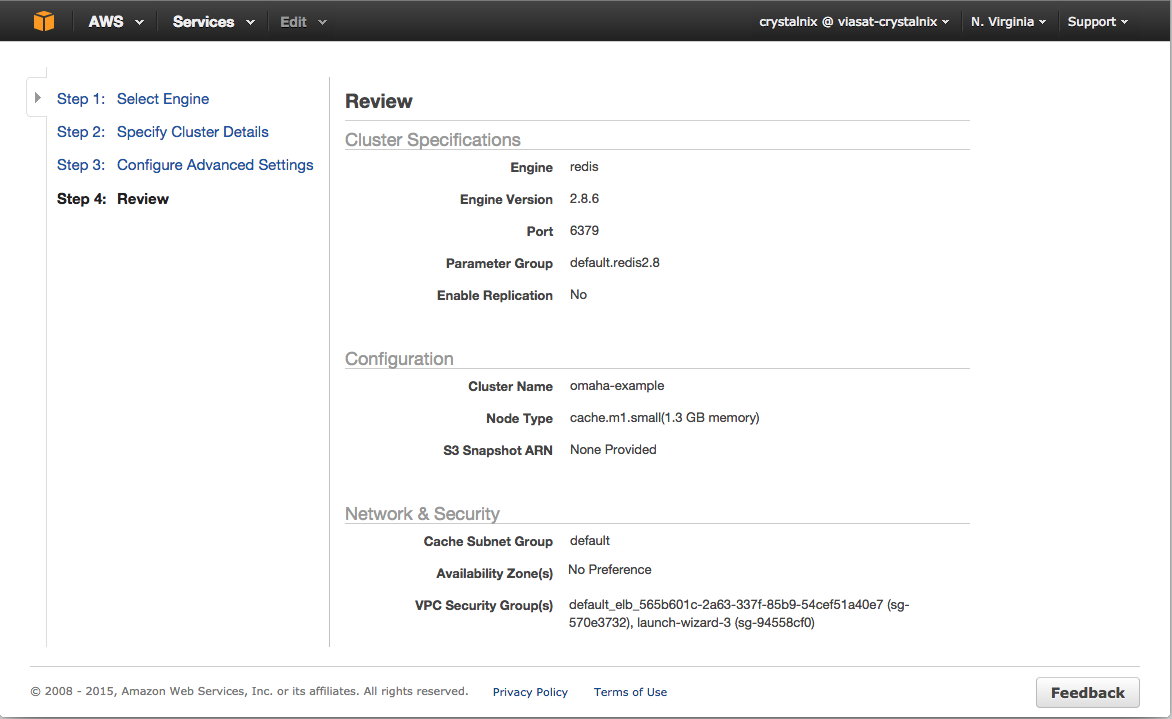
To configure your cluster's specifications and details:
- In the Cluster Specifications section of the Specify Cluster Details page, specify settings as shown following:
- Engine: Redis
- Engine Version: From the list, select the version of the cache engine to run for this cluster. Unless you have a specific reason not to, we recommend you select the latest engine version.
- Cache Port: Type a new port number for your cluster, or leave it at its default value. For Redis, the default port is 6379.
- Parameter Group: From the list, select a parameter group for this cluster. Parameter groups control the run-time parameters of your cluster. For more information on parameter groups, see Node Type-Specific Parameters for Redis.
- Enable Replication: To create a single Redis cluster, uncheck this check box.
- In the Configuration section of the Specify Cluster Details page, specify settings as shown following:
- Cluster Name: Type a meaningful name for this cluster.
- Node Type: From the list, select the node type you want to use for this cluster. For information on node types, see Node Type-Specific Parameters for Redis.
- S3 Location of Redis RDB file: Amazon S3 location of the .rdb file used to seed this cluster. If this is left blank, this cluster will not be seeded upon creation. For more information on snapshots and seeding a Redis cluster, see Backup and Restore for Redis Clusters and Migrate Your Redis Cluster to ElastiCache.
- Click Next.
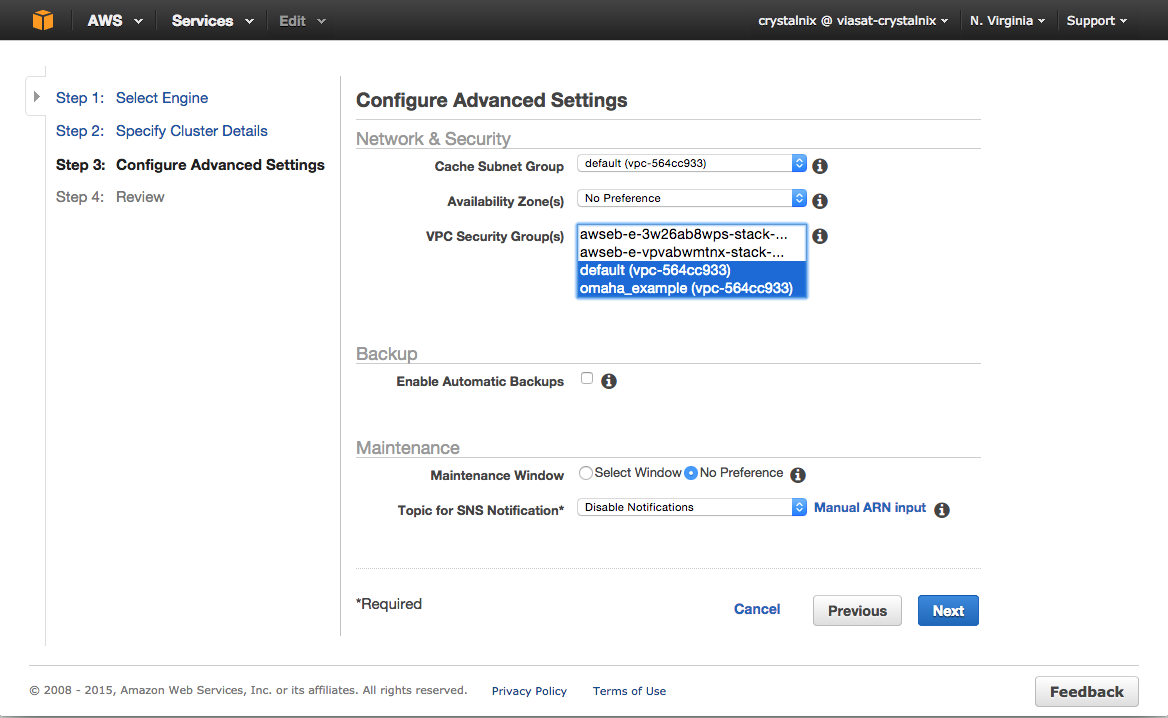
To configure your cluster's advanced settings:
- In the Network & Security section of the Configure Advanced Settings page, specify settings as shown following:
- Cache Subnet Group
- Availability Zone(s)
- Cache Security Group(s)
Requirements:
- Ubuntu Trusty 14.04 (LTS) (64-bit)
- docker
- docker-compose
- Email account for sending messages (e.g gmail, mailgun or self-hosted solution)
- Create mailgun account
- Get credentials

$ curl -sSL https://get.docker.com/ubuntu/ | sudo sh
$ sudo apt-get install python-pip
$ sudo pip install -U docker-compose
Create ~/docker-compose.yml file:
sentry:
  image: slafs/sentry
  ports:
    - "80:9000"
  links:
    - redis
    - db
  environment:
    SENTRY_URL_PREFIX: http://example.com
    SECRET_KEY: 'sentry_ab!e@t8blnu0n+s=q!at%vdy54n49zm=nm2l#nuasgrrg5mcw@'
    SENTRY_ADMIN_USERNAME: 'admin'
    SENTRY_ADMIN_PASSWORD: 'admin'
    SENTRY_ADMIN_EMAIL: 'admin@example.com'
    DATABASE_URL: 'postgres://sentry:password@db_1/sentry'
    SENTRY_REDIS_HOST: 'redis_1'
    SENTRY_EMAIL_BACKEND: 'django.core.mail.backends.smtp.EmailBackend'
    SENTRY_EMAIL_HOST: 'smtp.mailgun.org'
    SENTRY_EMAIL_HOST_USER: 'postmaster@sandbox4ff2aaa88bae553f2a9281d794c80984.mailgun.org'
    SENTRY_EMAIL_HOST_PASSWORD: '**********'
    SENTRY_SERVER_EMAIL: 'omaha.server.sentry@sandbox4f88bae553f2a9281df2794c80984aaa.mailgun.org'
redis:
  image: redis
db:
  image: postgres
  environment:
    POSTGRES_USER: 'sentry'
    POSTGRES_PASSWORD: 'password'
sentry server will use the local database, but you can also configure settings for RDS
- SENTRY_URL_PREFIX Absolute URL to the sentry root directory. Should not include a trailing slash.
- SENTRY_EMAIL_HOST The host to use for sending e-mail.
- SENTRY_EMAIL_HOST_USER Username to use for the SMTP server defined in SENTRY_EMAIL_HOST
- SENTRY_EMAIL_HOST_PASSWORD Password to use for the SMTP server defined in SENTRY_EMAIL_HOST. This setting is used in conjunction with SENTRY_EMAIL_HOST_USER when authenticating to the SMTP server.
# Start sentry server $ sudo docker-compose up -d- Create a new organization

- Create a team
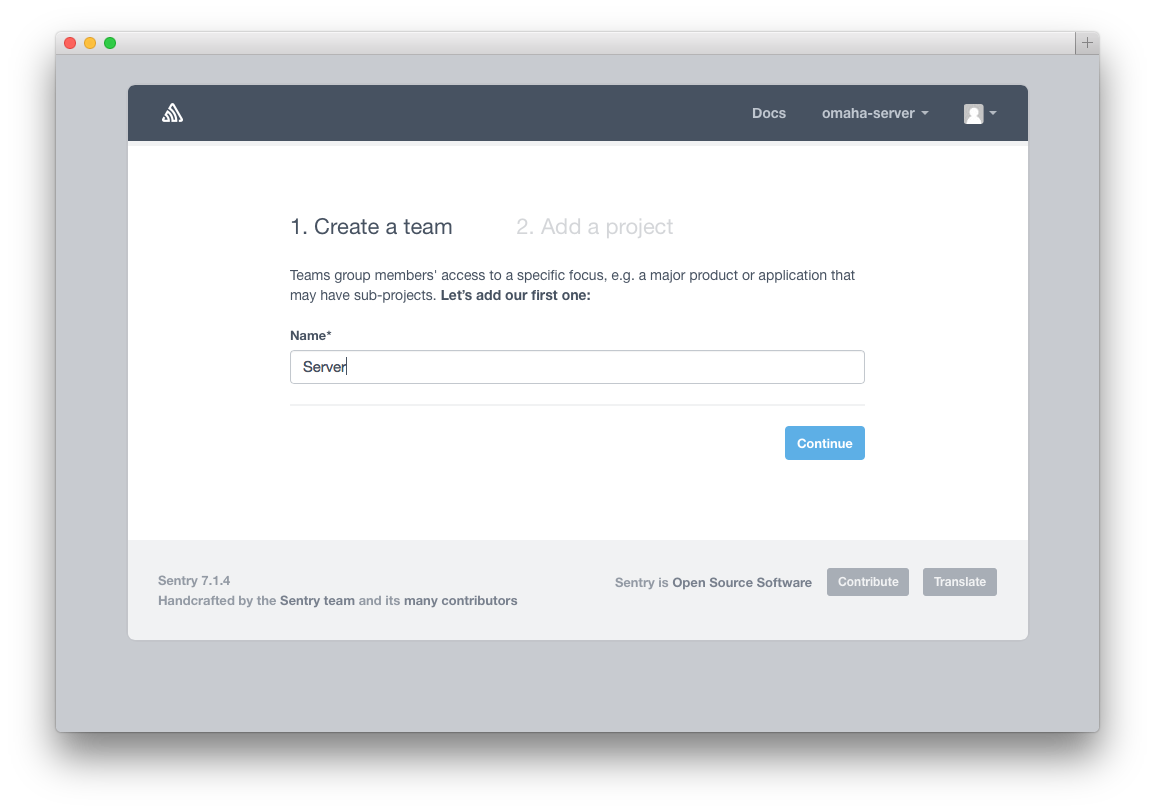
- Add a project

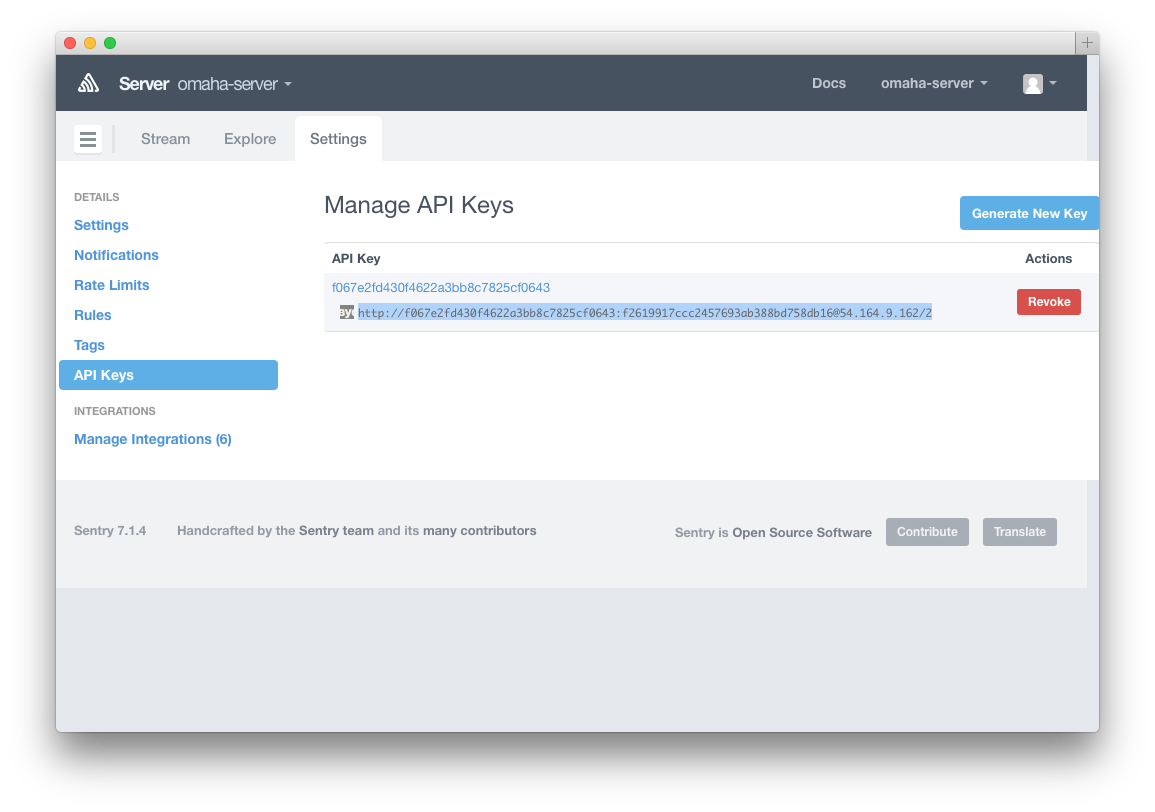
- Get RAVEN_DNS
Requirements:
- git
- python 2.7
- virtualenvwrapper
$ git clone https://github.com/Crystalnix/omaha-server.git
$ cd omaha-server
$ sudo apt-get install virtualenvwrapper
# create new environment and install requirements
$ mkvirtualenv omaha-server
$ pip install ebs-deploy
# or activate omaha-server, if environment it was created
$ workon omaha-server
$ cp ebs.config.example ebs.config
To change Omaha-Server configuration, add the settings that you want to modify to the
ebs.configfile. For example:aws: access_key: 'AKIAIOSFODNN7EXAMPLE' secret_key: 'wJalrXUtnFEMI/K7MDENG/bPxRfiCYEXAMPLEKEY' region: 'us-east-1' bucket: 'omaha-example' bucket_path: 'omaha-example' app: versions_to_keep: 10 app_name: 'omaha-example' description: 'Omaha Server Example' all_environments: solution_stack_name: '64bit Amazon Linux 2014.09 v1.0.9 running Docker 1.2.0' tier_name: 'WebServer' tier_type: 'Standard' tier_version: '1.0' # http://docs.aws.amazon.com/elasticbeanstalk/latest/dg/command-options.html option_settings: 'aws:autoscaling:launchconfiguration': InstanceType: 't2.small' SecurityGroups: 'omaha_example' EC2KeyName: 'omaha_example' 'aws:autoscaling:asg': MinSize: 1 MaxSize: 10 'aws:autoscaling:trigger': BreachDuration: 300 MeasureName: 'CPUUtilization' Unit: 'Percent' LowerThreshold: 20 UpperThreshold: 70 UpperBreachScaleIncrement: 1 'aws:elasticbeanstalk:application': Application Healthcheck URL: '/admin/login/' 'aws:elasticbeanstalk:application:environment': AWS_ACCESS_KEY_ID: 'AKIAIOSFODNN7EXAMPLE' AWS_SECRET_KEY: 'wJalrXUtnFEMI/K7MDENG/bPxRfiCYEXAMPLEKEY' archive: files: - .ebextensions/01_nginx.config: yaml: files: "/etc/nginx/conf.d/proxy.conf": mode: "000755" owner: root group: root content: | client_max_body_size 2048M; - .ebextensions/02-commands.config: yaml: commands: 00001-docker-privileged: command: 'sed -i "s/docker run -d/docker run --privileged -d/" /opt/elasticbeanstalk/hooks/appdeploy/pre/04run.sh' 00002-add-swap: command: '[ -f /var/swap ] || (dd if=/dev/zero of=/var/swap bs=1M count=1024 && mkswap /var/swap && swapon /var/swap)' includes: - 'Dockerrun.aws.json' environments: # env name 'omaha-server-example': # The prefix used when this CNAME is reserved (required) cname_prefix: 'omaha-server-example' option_settings: 'aws:elasticbeanstalk:application:environment': APP_VERSION: 'DEV' DJANGO_SETTINGS_MODULE: 'omaha_server.settings_prod' SECRET_KEY: '@31%oox**rk6=$a5u6k6w3==2t+bib6&rx&3q7##jc8qkfqwts' HOST_NAME: 'omaha-server-example.cmh0hvrqulkr.us-east-1.rds.amazonaws.com' DB_HOST: 'omaha-example.cmh0hvrqulkr.us-east-1.rds.amazonaws.com' DB_USER: 'omaha' DB_NAME: 'omaha' DB_PASSWORD: 'password' AWS_ACCESS_KEY_ID: 'AKIAIOSFODNN7EXAMPLE' AWS_SECRET_ACCESS_KEY: 'wJalrXUtnFEMI/K7MDENG/bPxRfiCYEXAMPLEKEY' AWS_STORAGE_BUCKET_NAME: 'omaha-example' RAVEN_DNS: 'http://4d30bdc0a2c81a570748534d5b00972b:d80d3e2932738aa29a41b792c3e49b29@sentry.example.com/3' RAVEN_DNS_STACKTRACE: 'http://4d30bdc0a2c81a570748534d5b00972b:d80d3e2932738aa29a41b792c3e49b29@sentry.example.com/4' REDIS_HOST: 'omaha-example.vq8wcf.0001.use1.cache.amazonaws.com'
The following environment variables affect ebs-deploy configuration but can be overriden on a per project basis in the configuration file:
- AWS_ACCESS_KEY_ID - the aws access key id
- AWS_SECRET_ACCESS_KEY - the secret access key
- AWS_DEFAULT_REGION - the region
- AWS_BEANSTALK_BUCKET_NAME - the bucket that beanstalk apps will be stored in
- AWS_BEANSTALK_BUCKET_NAME_PATH - the path in the bucket where beanstalk apps will be stored
More info about option_settings
Environment variable name Description Default value APP_VERSION App version DEV DJANGO_SETTINGS_MODULE omaha_server.settings_prod SECRET_KEY Django SECRET_KEY HOST_NAME Eb app host name DB_HOST DB Host 127.0.0.1 DB_USER DB User postgres DB_NAME DB Name postgres DB_PASSWORD DB Password '' DB_PORT DB port 5432 AWS_ACCESS_KEY_ID AWS Access Key AWS_SECRET_ACCESS_KEY AWS Secret Key AWS_STORAGE_BUCKET_NAME S3 storage bucket RAVEN_DNS Sentry url RAVEN_DSN_STACKTRACE Sentry url RAVEN_DNS REDIS_HOST Redis host 127.0.0.1 REDIS_PORT Redis port 6379 REDIS_DB Redis db 1 REDIS_STAT_PORT For statistics REDIS_PORT REDIS_STAT_HOST REDIS_HOST REDIS_STAT_DB 15 UWSGI_PROCESSES UWSGI_THREADS REQUIRED / OPTIONAL
- RAVEN_DNS for server errors
- RAVEN_DSN_STACKTRACE for crash reports
- uWSGI Options & Environment variables
- Sentry
$ ebs-deploy init
$ ebs-deploy deploy -e omaha-server-dev
# where omaha-server-dev is environment name