-
Notifications
You must be signed in to change notification settings - Fork 36
designguide building basics
Congratulations, you have decided to take the first step in becoming an expert in Melody. In what might be considered rites of initiation your first task is to create a blog in Melody, and then to delete all of its templates, thereby cleansing you of any preconceptions you have about Melody and how it works. When this process is complete, your system will consist exclusively of a raw publishing engine. And that's it, nothing more. Your system will then be ready for you to begin layering on one feature after another, and in so doing slowly build a strong foundation of knowledge in the Melody Publishing Platform.
Let's begin.
-
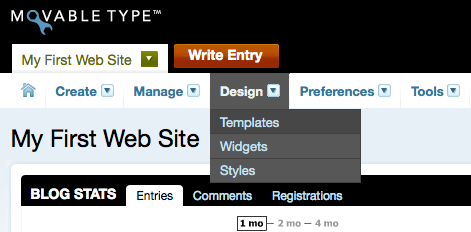
The first thing you need to do, after creating a blog, is navigate to its listing of templates: select "Templates" from the Design menu.

-
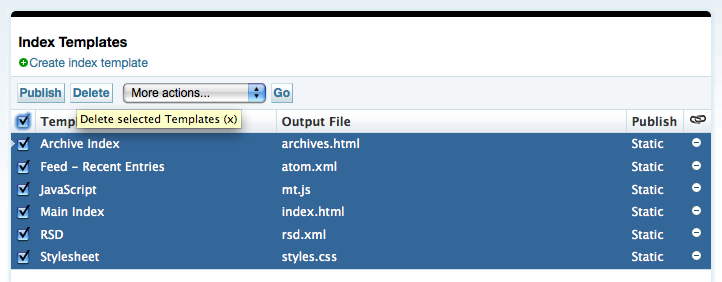
Next, select all of your Index Templates, and click the Delete button.

-
Then, do the same for your Archive Templates and Template modules. When you are complete, you should have no templates in your system, except for a small set of "System Templates."

Like a newly committed monk freed of his earthly possessions you must feel a great release from all your burdens. Or perhaps not, but at least you are now ready to officially begin your training.
So you want to create a website? The good news is that you have already contracted a designer to design your website and create its HTML. Right? Now it is your job to deploy this site and augment it with content.
The most critical component of any website is its homepage, the page you reach when typing in the website's URL. To create your homepage, or your "Main Index" as it is commonly called in Melody-land, you will need to create an Index template.
Your Main Index
An "Index Template" is a template that outputs a single file, with a file name you designate. You can publish HTML, PHP, ASP, JSP or any kind of page, in any kind of language you can imagine or wish for. The contents of the file can contain template tags that will be evaluated at the time the template is published.
In this example, your homepage will just contain static content and will not contain any template tags. This should show you how Melody can serve as a very light weight website publishing tool.
Let's begin:
-
Select Templates from the Design Menu.
-
Click the "Create index template" link directly below the heading "Index Templates" near the top of the screen.
-
Enter in "Main Index" as the title for the template.
-
Cut and paste the HTML for your homepage into the body of the template.
- Download Sample HTML (1 - main_index.txt)
-
Under "Template Options" enter in "index.html" (or "index.php" or "index.jsp" etc) as the output file. Select "main_index" as this template's type. Leave all the other options as-is.
-
Click Save, then "Save and Publish."
-
Finally, view your new website.
A little underwhelming huh? Well, if you ever wondered what the Internet would look like without designers, this is it.
TODO - <screenshot: 4 - plain site>
Now, let's see what we can do to make this a little prettier.
Your Stylesheet
To give your site a design you will next need to publish a stylesheet for your website. A "stylesheet," written in a language called CSS (Cascading Style Sheets), is what gives a website its unique layout and appearance. Every page on your website, including the main index you just created, will reference this stylesheet, which browsers will then use to style and give your site some life.
-
Click "Create index template" from the template listing screen.
-
Enter in "Stylesheet" as the title for the template.
-
Cut and paste the CSS for your website into the body of the template.
- Download Sample CSS (2 - stylesheet.txt)
The sample stylesheet provided has a lot of additional style information defined within it, much of which will not be utilized until later in this guide. For now, let's just settle on understanding that it is from this template that the entire website we will be building will derive its look and feel.
-
Under "Template Options" enter in "styles.css" as the output file. Select "styles" as this template's type. Finally, select "Manually" from the Publishing menu -- this will instruct Melody to publish your stylesheet only when you specifically ask it to. This is helpful because your stylesheet is something whose content is not dynamic in any way, and setting its publishing setting to anything else will result in it being published and republished needlessly.
-
Click Save, then "Save and Publish."
Now that your stylesheet has been created you will need to associate it with your homepage. Let's do that now.
-
Go back to your template listing screen by clicking "Templates" in your Design menu.
-
Click "Main Index" under "Index Templates" to edit your homepage.
-
Near the top of your Main Index template, just after the
<head>tag, add the following:<link rel="stylesheet" type="text/css" href="<mt:Link template="styles">" />The
<mt:Link>tag is a Melody template tag. It provides the very simple capability of generating a fully qualified URL to another template within the system. It is convenient because it keeps you from having to remember the template's output file. Just enter in the template's type into thetemplateargument and Melody will do the rest. -
Click "Save and Publish" and view your site.
Presto, your website is no longer an eye sore.
Adding Some Template Tags
Right now your website is completely static and will output the exact same text no matter how you configure Melody. This is less than ideal, so let's add some additional template tags that will allow you to:
- output the name and description of your blog
- output a more complete link back to your homepage
Our first task will be output your website's name into the <title> tag and in the main banner for your site.
-
Edit your Main Index template.
-
Locate the text bounded by
<title>and</title>, and replace it so that is appears as so:<title><mt:BlogName></title> -
Locate the following text:
<h1 id="header-name"><a href="index.html" accesskey="1">Your Website Name</a></h1>And replace "Your Website Name" so it appears as so:
<h1 id="header-name"><a href="index.html" accesskey="1"><mt:BlogName></a></h1> -
Now, let's replace "index.html" with a more adaptable equivalent by using a
<mt:Link>tag like so:<h1 id="header-name"><a href="<mt:Link template="main_index">" accesskey="1"><mt:BlogName></a></h1> -
Finally, let's output your website's description in a similar manner. Look for the text:
<h2 id="header-description">A description for your website.</h2>And replace it with the following:
<h2 id="header-description"><mt:BlogDescription></h2>
Summary
Congratulations, you have successfully created your website. It is simple right now, just a homepage and a basic style, but you are well on your way. Now it is time to expand your website with additional content and see how Melody can serve as an excellent website content management tool.
- Prev: Building Websites with Melody, a Guide for Designers
- Next: Adding an About Page to your Website
- Table of Contents: Building Websites with Melody, a Guide for Designers
Category: Guide
Tags: design guide, main index

Questions, comments, can't find something? Let us know at our community outpost on Get Satisfaction.
- Author: Byrne Reese
- Edited by: Violet Bliss Dietz
