-
Notifications
You must be signed in to change notification settings - Fork 2
Adding Layers
In this page we document how to:
- Load a shapefile (polygon) spatial layer, and access it via web services and the spatial portal UI.
- Load a grid (raster) spatial layer, and access it via web services and the spatial portal UI.
- Using a browser go to your: http://spatial.l-a.site/ws
- Upload shapefile (SHP) in zip file using the “Manage layer uploads”. Your shapefile should be zipped and contain at least
SHP,DBF,PRJandSHXfiles with aISO-8859-1DBF charset (you can convert DBF charset using libreoffice calc), more info about this charset issue and future support of other charsets. Verify that the DBF have some field with unique values (and if not, add it with QGis or similar). You can download an example shapefile here or here. Also aWGS84CSRis highly recommended. - Wait until the upload is complete, create the “Layer” using the UI, and once the layer is loaded, continue with the next steps (verify the jobs in
/ws/>Background tasks. - View the
DBFfields of the Shapefile by clicking on the map (this requires thePRJfile to included) - view the layers and click “edit layer” - Define one or “Fields” for your layer. These are the properties used in sampling. Make sure to:
- Select a sensible field from the layer. For this you use
libreoffice calcto open the DBF and see the fields aka column names and values, so you can choose something like a region or country name, as is what name the user will see in each region of the layer. You can also useqgisand select some region to see the properties (field names and values). - Change the display name. This is how the layer can be found in the spatial portal
- Edit the layer and set values for the properties
Classification1andClassification2. This is visible in a tree hierarchy in the spatial portal
- Select a sensible field from the layer. For this you use
- Monitor progress of Field generation using the “Tasks” UI. All these tasks are time consuming so, be patient.
- Refresh intersect config: http://spatial.l-a.site/ws/intersect/reloadConfig
- Verify the layer and fields in spatial service &
geoserverand web services are working:- Use the
geoserverUI http://spatial.l-a.site/geoserver- Preview the layer in OpenLayers
- View configuration for layers (default username/password = admin/geoserver)
- Test the following JSON services:
- Check your layer appears in the layer list: http://spatial.l-a.site/ws/layers
- Check your field(s) appears in the fields list: http://spatial.l-a.site/ws/fields
- List the objects in the field http://spatial.l-a.site/ws/objects/
<FIELD_ID>
- eg. http://spatial.l-a.site/ws/objects/
cl10003
- Retrieve the details of single object http://spatial.l-a.site/ws/object/
<OBJECT_ID> - Download the KML for an object: http://spatial.l-a.site/ws/shape/kml/
<OBJECT_ID> - Check point intersection works for your field(s) http://spatial.l-a.site/ws/intersect/
<FIELD_ID>/<LATITUDE>/<LONGITUDE>
- Use the
- Test the uploaded layer in the spatial portal
- Use “Add to Map > Areas > Gazetteer Polygon”
- Use “Add to Map > Areas > Select from Polygon Layer”
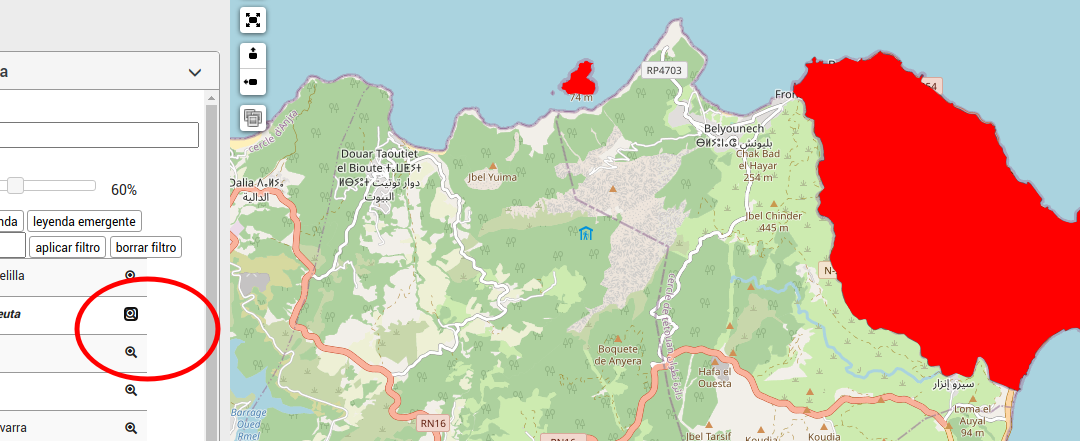
If you add some layer to the map, and you try to select a region by pressing a zoom icon, you should zoom to that region correctly:

but if instead you get a world image, it's an indication that something is not supported or correct in your layer (like some not supported projection and/or encoding):

One way to fix this is to import your shapefiles into eg. QGIS-desktop, then re-export them with new encoding (ISO-8859-1) and new Coordinate Reference System (EPSG:4326 - WGS 84, or just 'WGS84'):

Typical utf-8 issue:

With something like from your spatial VM:
scp -i your-ssh-key /data/spatial-data/layer/*{shp,dbf,prj,shx} ubuntu@your-biocache.l-a.site:/data/biocache/layers

TODO: Why do we do this? (Like: 'biocache sample uses layers files for sampling.')
Examples can be downloaded from: http://www.worldclim.org/current. Look for the BioClim layers. You can get an example of grid layers here. If you are only testing, use a 10 minute grid (smaller). Note: the zips from this website will fail. Uploads require a zip with a single set of HDR, BIL, PRJ and bil.aux.xml files).
But you can for example download 1.4 version from http://worldclim.org/version1 like http://biogeo.ucdavis.edu/data/climate/worldclim/1_4/grid/cur/prec_10m_bil.zip, unzip and zip again a single set of .hdr and .bil files, such as prec1.hdr and prec1.bil and then zip that up and use that file.
For http://worldclim.org/version2, that is, GeoTIFF files, use gdal_translate before hand: gdal_translate -of EHdr -ot Float32 wc2.0_bio_10m_01.tif wc2.0_bio_10m_01.bil.
- Using a browser go to your: http://spatial.l-a.site/ws for the admin screen
- Upload grid file (must contain
HDR,BILandPRJfiles) in zip file using the “Manage layer uploads”. - Create the “Layer” using the UI
- Create a “Field” associated with this layer using the UI
- Monitor progress of Field generation using the “Tasks” UI
- Refresh intersect config: http://spatial.l-a.site/ws/intersect/reloadConfig
- Verify the layer and fields in spatial service &
geoserverand web services are working:- Use the
geoserverUI http://spatial.l-a.site/geoserver- Preview the layer in OpenLayers
- Test the following
JSONservices:- Check you layer appears in the layer list: http://spatial.l-a.site/ws/layers
- Check you field(s) appears in the fields list: http://spatial.l-a.site/ws/fields
- Check point intersection works for your field(s) http://spatial.l-a.site/ws/intersect/
<FIELD_ID>/<LAT>/<LNG>
- Use the
Index
- Wiki home
- Community
- Getting Started
- Support
- Portals in production
- ALA modules
- Demonstration portal
- Data management in ALA Architecture
- DataHub
- Customization
- Internationalization (i18n)
- Administration system
- Contribution to main project
- Study case