-
Notifications
You must be signed in to change notification settings - Fork 1
2014_yakindu
From Wikipedia (http://en.wikipedia.org/wiki/YAKINDU_Statechart_Tools): Yakindu (http://statecharts.org/) Statechart Tools (SCT) is an open source tool for the specification and development of reactive, event-driven systems with the help of state machines. It consists of an easy-to-use tool for graphical editing and provides validation, simulation and code generators for different target platforms. The users come from both the industrial and academic sectors.''

Yakindu is developed by itemis, the same company that created Xtext.

From the Yakindu update site, install the following plug-ins for Eclipse:
- Yakindu SCT 2
- Copy Paste Patch
- YAKINDU SCT Generator C
- YAKINDU SCT Generator Java
- Yakindu Statechart Tools (SCT) 2
- Yakindu Statechart Tools (SCT) 2 SDK
-
Create a new YAKINDU Xpand Generator Project.
-
Add a new YAKINDU Statechart Model.
-
Add the following code to the editor:
interface Service: in event request in event read var success : boolean internal: event complete -
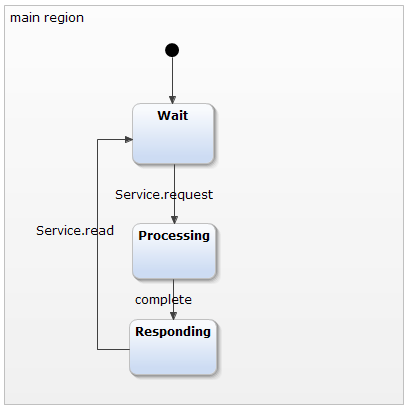
Create the statechart #1 as shown on the figure.
-
Run the statechart (Run As | YAKINDU Statechart) and experiment with the Simulation View.
-
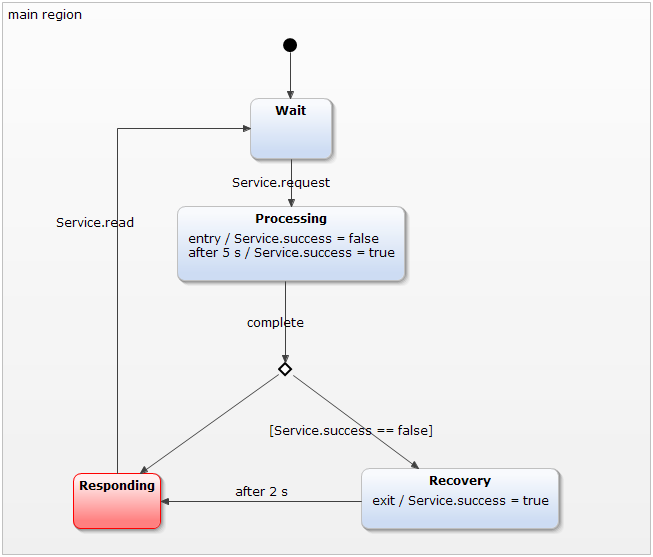
Extend your statechart to #2 by adding a new State and a Choice. Keep in mind that the transitions have priorities, which may cause them to behave differently than expected.
You can edit the Transition Priority in the Choice's Properties view (Right click the Choice on the canvas and pick Show Properties View).
-
Extend your statechart to #3 by adding a new Composite State called
Frontend.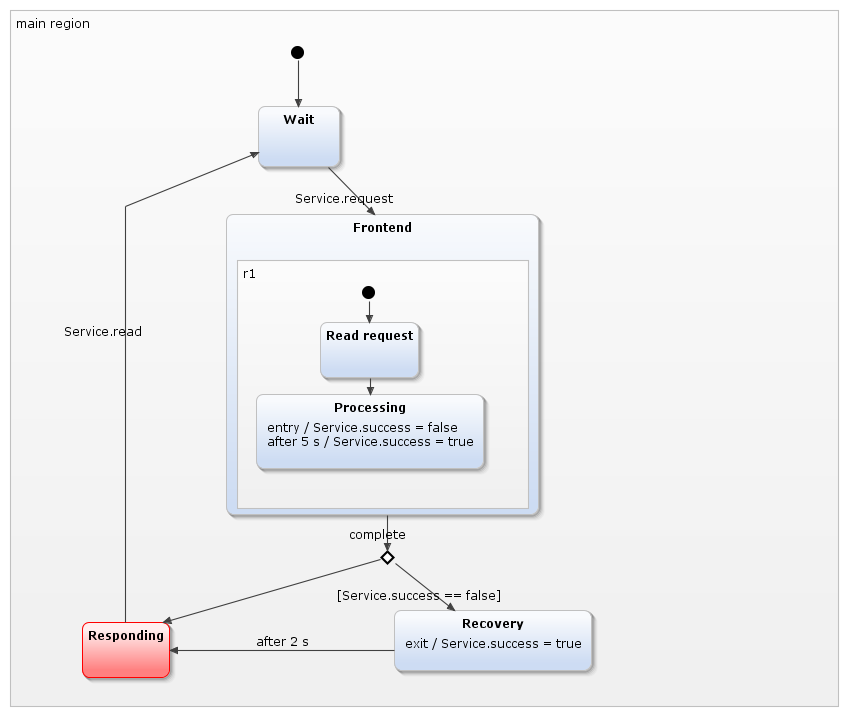
-
Modify the statechart definition block to the following:
interface Service: in event request in event read var success : boolean internal: event complete event execute event finish interface DB: in event access in event response var data: integer -
Using the new events, extend your statechart to #4 by adding a new Composite State called
Database.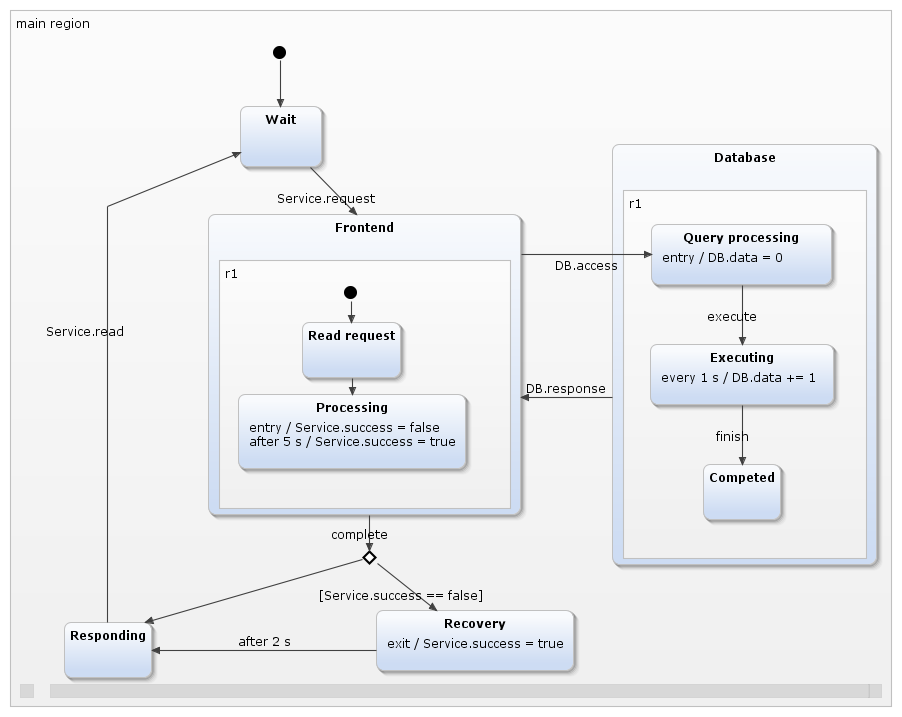
-
Modify your statechart to get #5 by adding a new Shallow History to the
Frontendstate.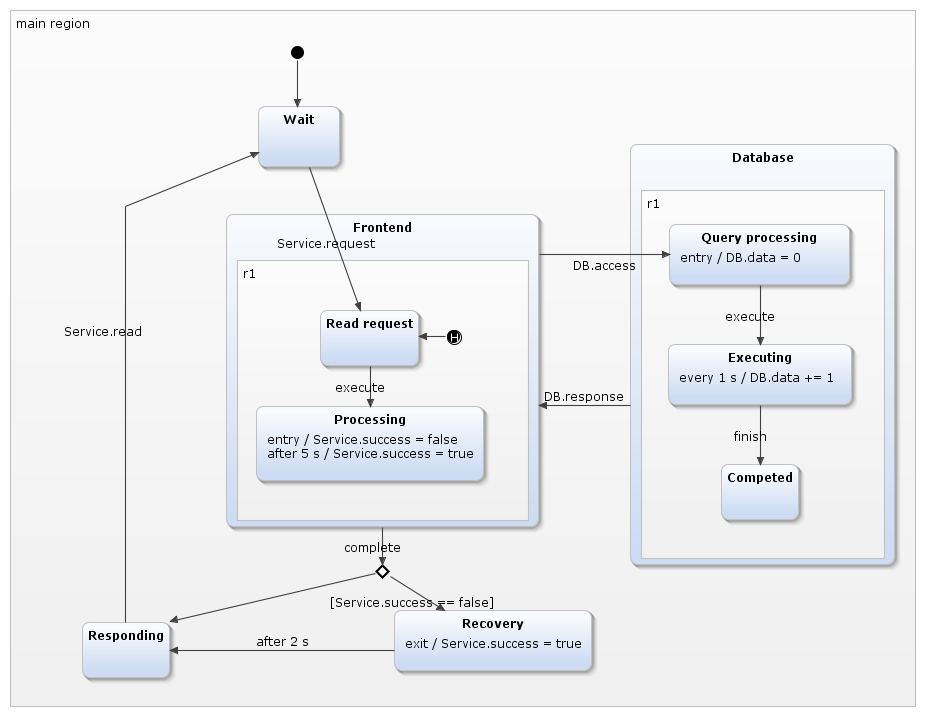
-
Add a generator by clicking File | New | Other... and picking Yakindu Statechart Generator Model. Name it
service.sgen, choose YAKINDU SCT Java Code Generator and tick theservice.sctstatechart. -
Modify the
service.sgenfile to the following:GeneratorModel for yakindu::java { statechart service { feature Outlet { targetProject = "yakindu.labor" targetFolder = "src-gen" } feature GeneralFeatures { TimerService = true } } } -
Add the
src-genfolder to the Build Path. -
Create a class named
ServiceClientin thesrcfolder in a package namedservice:package service; import org.yakindu.scr.TimerService; import org.yakindu.scr.service.ServiceStatemachine; import org.yakindu.scr.service.ServiceStatemachine.State; public class ServiceClient { public static void main(String[] args) throws InterruptedException { ServiceStatemachine sm = new ServiceStatemachine(); sm.setTimerService(new TimerService()); sm.enter(); sm.getSCIService().raiseRequest(); sm.runCycle(); if (sm.isStateActive(State.main_region_Frontend_r1_Read_request)) { System.out.println("Reading request."); } } }
-
Run the program. It will produce the following output:
Reading request. -
Create a method that runs a number of cycles, each of which sleeps for 0.2 seconds and then notifies the statechart.
private static void sleep(ServiceStatemachine sm, int limit)
    throws InterruptedException {
  for (int i = 0; i < limit; i++) {
    Thread.sleep(200);
    sm.runCycle();
  }
}
-
Add the following call to the
mainmethod:sm.getSCICommon().raiseExecute();
-
This will cause a compile-time error. The problem is that the
executeevent is internal, therefore theraiseExecute()method is private and cannot be accessed from themainmethod. To address this, create a new interfaced calledCommonfor the the internal events.interface Common: in event complete in event execute in event finish -
Modify your statechart's transitions accodingly to get statechart #6.
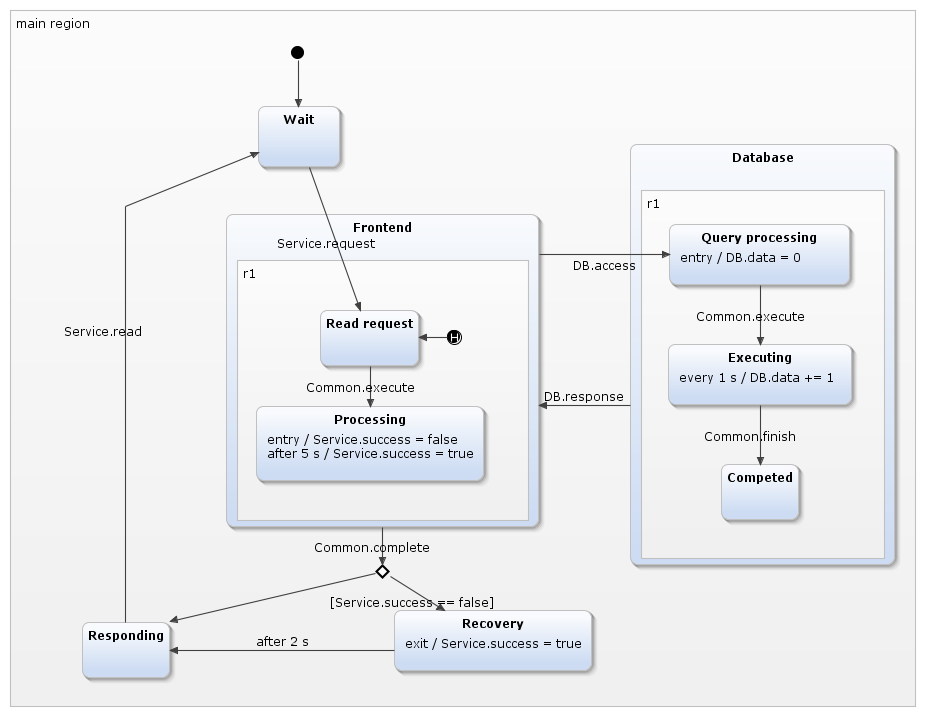
-
After this, the
raiseExecute()will be visible. Continue expanding themainmethod with the following:sm.getSCICommon().raiseExecute(); // we added this previously sm.getSCIDB().raiseAccess(); sm.runCycle(); sm.getSCICommon().raiseExecute(); sm.runCycle(); sleep(sm, 30); sm.getSCIDB().raiseResponse(); sm.runCycle(); System.out.println("Data = " + sm.getSCIDB().getData()); sleep(sm, 10); sm.getSCICommon().raiseComplete(); sm.runCycle(); if (!sm.getSCIService().getSuccess()) { System.out.println("Unsuccessful call."); System.out.println("Recovery state active: " + sm.isStateActive(State.main_region_Recovery) + "."); sleep(sm, 11); // more than 2 seconds } if (sm.isStateActive(State.main_region_Responding)) { System.out.println("Responding."); } sm.exit();
-
Run the application. The output is the following:
Reading request.
Data = 6
Unsuccessful call.
Recovery state active: true.
Responding.
If you run the program multiple times, you can observe that the
Datavalue is sometimes 5 instead of 6. Think about reason behind this.
- If the Java code is not generated automatically, right click the
service.sgenfile and click Generate Statechart Artifacts. - If you cannot find the Simulation View, right click the SC Simulation perspective's name and choose Reset.
- Eclipse basics
- EMF (incl. advanced topics)
- VIATRA Query
- Sirius
- Xtext+Xtend
- M2M
- Eclipse basics
- EMF (incl. advanced topics)
- VIATRA Query
- Sirius
- Xtext
- M2M
(Gradually replaced with updated content)
- Eclipse basics
- EGit
- EMF (incl. advanced topics)
- VIATRA Query
- Sirius
- Xtext
- M2M (VIATRA)
- Eclipse basics
- EGit
- EMF (incl. advanced topics)
- VIATRA Query
- Sirius
- Xtext
- M2M (VIATRA)