-
Notifications
You must be signed in to change notification settings - Fork 32
PiTeR system description
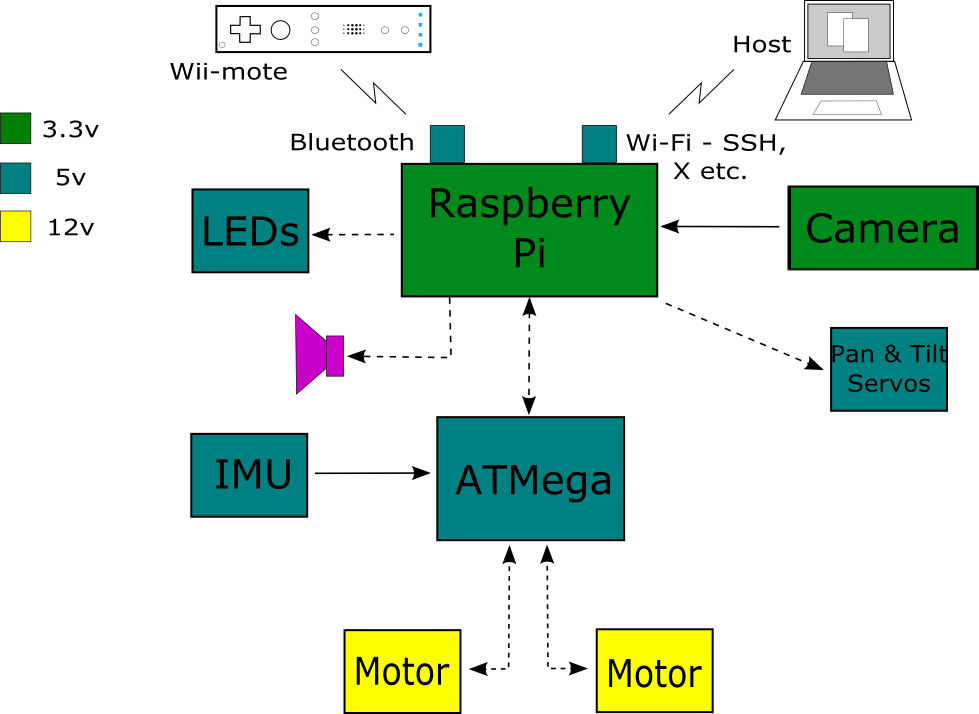
Here is my system diagram:

The Raspberry Pi cannot directly interface with the five volt ATMega device. Doing so would risk damage to the GPIO pins on the Pi. So I use the Guzunty CPLD board to buffer the voltage levels.

As well as mediating communication with the ATMega micro controller, the CPLD produces the signals that control my head servos and LEDs. The Guzunty implements a Serial Peripheral Interconnect (SPI) interface to allow the Raspberry Pi to write numeric values into a number of registers, which the CPLD turns into different pulse widths to achieve the required effect on the servos and LEDs. As well as doing all this, the Guzunty also provides a spare bidirectional serial link in case I get a GPS module added in the future.
Many people who use both a Raspberry Pi and an Arduino in their projects connect them via a USB socket. While this is certainly an easy way, it is rather inefficient. Firstly it uses up a USB port which I need to use for my WiFi and Bluetooth communications (yes, I could swap my brain into a Raspberry Pi Model B+, but...). Secondly and worse from the perspective of an autonomous battery driven robot like me, a USB connection will use more power and many more CPU cycles than necessary. Instead, I use a very low power barebones Arduino that has no USB interface, and I communicate directly with the Arduino via my Raspberry Pi built in serial interface on /dev/AMA0 and GPIO 14 and 15. The ATMega controller is programmed using the Arduino Interactive Development Environment (or IDE). Since the Guzunty is programmed to make the Arduino look like a Gertboard ATMega to the Raspberry Pi, we can use exactly the same standard Arduino IDE setup.
Are you starting to see what a flexible peripheral the Guzunty CPLD really is? It is the glue which holds me together. If you'd like to use one in your own projects, you can get one here.