Cashier Handbook
- Sign In / Sign Out / Lock
- The Lane Interface
- Scanning / Item Entry
- Membership Functions
- Transaction Operations
- Hardware Components
- Troubleshooting Issues

- All register functions require that a unique cashier password be entered first. All entries made on a lane are tied to the employee number associated with this login.
-
Permissions There are 2 levels of permissions for all register functions.
- Cashier logins are allowed to do basic cashiering functions such as ring in items and accept tenders
- Manager logins are required for any operation that is designated as admin-only. These functions are configurable via the Lane Installer Interface and may include cancels, suspend/resumes, printing of tender reports, issuing refunds, applying line-item discounts, or voiding above a specified dollar amount.
-
Training Mode may be used for training/testing purposes. The POS will record activity under training mode however all transactions rung under training mode will be ignored by ALL reports, and tender reports. Additionally, Attempts made to authorize payment cards while signed into training mode will result in an error.
- To access training mode sign in using the password 9999
- Please Note: The CASHIER will display "Training Mode" and the top of the screen will display a red bar indicating that the lane is logged in to training mode. This is a visual alert to cashiers to prevent accidentally ringing out actual customers while logged into training mode.
-
Lock Any time a cashier steps away from a register for any reason they should be using the
LOCKfunction to lock their screen. This is a basic security precaution and should be a part of any cashier training program.- To unlock the screen upon returning to the register, simply re-enter your cashier password.
- Cashiers with Manager-level permissions have the ability to unlock ANY cashiers screen. Non-manager cashiers do not have this capability.
-
Sign Out While practice varies from store to store, the intention is that cashiers sign out of their lane only once, at the end of their shift (or possibly on their lunch break as well). To sign out use the
SIGN OUTfunction. Often this is performed by holdingSHIFT+LOCK.


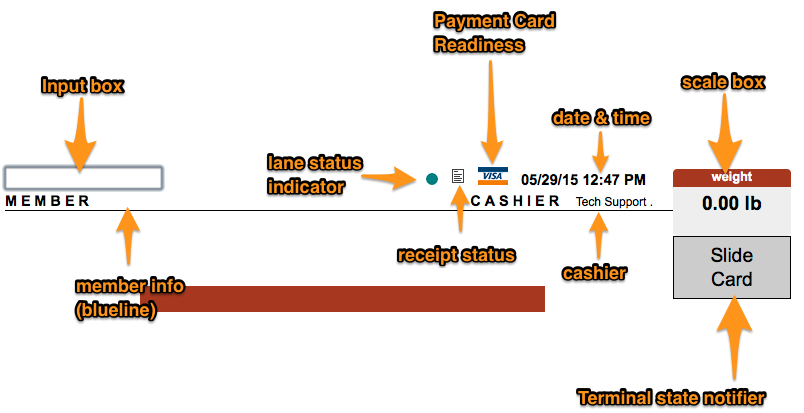
- Input Box is where the magic happens. All register functions are entered via the Input Box. This is also where cashiers can see what they are typing.
-
Lane Status Indicator - Indicates one of 3 states the lane might be in:
- Green = Online. The lane is online and communicating with the POS server. Hooray!
- Red = Standalone. Standalone means that the lane is not communicating with the server for some reason. This in itself is not cause for alarm, CORE-POS is designed to be able to run in standalone mode with little affect to functionality. If a lane does stay in standalone mode for an extended period the cashier should alert a supervisor, IT staff, or support provider.
- Blue = Training mode.
-
Receipt status indicates whether receipt printing is enabled for the current transaction or not. To toggle receipt printing you can hit the
RECEIPT TOGGLE(orREPRINTduring a transaction). The icon will look like this if receipt printing is disabled: - Card Readiness indicates integrated card processing is enabled. The Icon will get a green border when there is a card being swiped
- Date & Time no explanation needed. Is there?
- Scale Box indicates the weight being sent by the scale device
- Terminal State Notifier Pertains only to integrated card processing. When enabled, this box will display for the cashier the current state of the PIN Pad. Slide Card, Select Card Type, Cash Back, or Ready. When the box turns green and says Ready then the cashier may proceed with tendering out the transaction to the card.
- Member Info (Blueline) Will display the customer name, number and any other details after a member (or non-member) number has been entered into the transaction.
- Cashier displays the name of the currently logged in cashier. This is the cashier who will be associated with any transactions being rung through the register.

- Letter codes
- F = Foodstampable
- T = Taxable
- VD = Voided
- R = Refunded
The footerboxes are configurable and can vary from store to store, but these are the default footerboxes and what they indicate:

- Could Have Saved / You Saved displays the total savings to the shopper from sale items, discounts, manufacturers coupons, etc. "Could have saved" applies to member-only sale item purchased by a non-member, i.e. "If you were a member you could have saved $X.XX"
- XX% Discount Lies dormant until member number has been entered or a transaction-wide discount has been applied, at which point it updates to display the percentage of the transaction-wide discount and the dollar amount
- Mbr Special total savings from member-only sales
- Special total savings from everyone sales
- Amount Due displays the running total for the entire transaction. Can alternately display the Foodstampable subtotal.
Available via CORE Plugin
-
Foodstamp Total displays a running Foodstampable subtotal, without having to hit
EBT SUBTOTAL.
-
Scanning items Items can be pushed or dragged across the front of the scannerscale in almost any orientation to be scanned. Avoind lifting items up off the counter surface as this can lead to repetitive stress injuries. The POS will emit a single "beep" upon successfully grabbing the barcode and adding it to the transaction list.
-
Multiple Items Use the
@button to ring in multiples of the same item. eg.3@<<SCANNED BARCODE>>' will add 3 of the scanned item to the transaction. Using the@` button will add the multiple to a single line.-
REPEATWill re-enter the last item rung into the transaction.REPEATmay be used--ahem--repeatedly. Each item entered using theREPEATbutton will appear on its own line in the transaction list.
-
-
Weighing items Place items in the center of the scale platter (the horizontal surface of the scannerscale) and enter the PLU for the item followed by
[ENTER].- Make sure that the item is completely on the scale platter.
- Make sure that nothing else is also on the scale platter (like your thumb!)
- For weighing large items or oddly shaped items:
- If a weighed PLU is entered but nothing is on the scale the resister will prompt you to place the item on the scale. The item will automatically be added to the transaction as soon as a weight is registered.
-
Entering a Tare Weight Primarily for bulk or deli items, to subtract the weight of the container from the weight that the scale reports.
-
45TAREwhere45is the tare weight to be subtracted. Tare weights are in hundredths of a pound, so a tare weight of 1.5 pounds would be entered as150TARE. A tare weight of 0.01 pounds would be entered as1TARE.
-
-
Searching for items CORE-POS eliminates the need for cumbersome, painful-to-maintain flip-books by allowing the cashiers to search for PLU'd items by name. To search for an item simply press the
SEARCHbutton.


Now you can enter in the name or part of the name of the item you are looking for. Helpful tip: Search for less, not more. Due to variation in item descriptions you may inadvertantly filter out the particular item you are looking for. e.g. Search for "MELON", not "WATERMELON", not "MELONS".

-
Voiding items Voiding means to remove an item from the transaction list. To void the last item rung in you can simply press the
VOIDbutton. To void any other item, use your UP and DOWN arrow keys to select the item, once highlighted, pressVOID -
Refunding items A refund is a return of a previously purchased item for cashback or credit. To refund any item press the
REFUNDbutton and then scan or ring in the item to be refunded. You will be presented with a prompt asking for a reason for the refund. Use the UP or DOWN arrow keys to select the reason and hit[ENTER]- Available refund reasons include: Overcharge, Spoiled, Did not like, Did not need, Other
- Refund reason "Other". Cashiers may enter any additional refund reason by selecting "Other" from the list of options and typing in a brief explanation. Hit
[ENTER]to finish and add the refund to the transaction list. - Once the refund has been applied to the transaction list it will look like this:
-
Price Check is used to verify the price of an item without immediately adding it to the transaction. Hit the
PRICE CHECKbutton to use. Scan an item or enter a PLU to check the price.- After price check your options are:
-
[CLEAR]to return to the transaction -
[ENTER]to add the item to the current transaction and then return to the transaction - Scan another item to do more price checks
-
- After price check your options are:
-
Manually Entering Items
- In some cases you may need to hand-enter a weight for an item. In this rare circumstance, you must use the decimal point
.button while entering the weight.- ex.
1.23``@``2002``[ENTER]Would ring in 1.23 lbs. of PLU 2002, whatever that may be.
- ex.
-
<< UPC >>[ENTER]If a barcode doesn't scan for any reason you can hand-enter the UPC in the input box, followed by the[ENTER]button. Remember! Always ignore the final UPC digit in any hand-entry of barcodes, anywhere in the POS.
- In some cases you may need to hand-enter a weight for an item. In this rare circumstance, you must use the decimal point
-
Price Overrides adjust the price of an item already rung into the transaction. Requires a manager login.
- To override a POS price, use the UP and DOWN arrows to select the item from the transaction to override. Press the
PRICE OVERbutton. Enter a managers login. Now enter the shelf price and hit[ENTER]
- To override a POS price, use the UP and DOWN arrows to select the item from the transaction to override. Press the


Every transaction in CORE-POS requires that a member number be entered before the transaction can be subtotaled. This is true even for non-members. They just get their own non-member number.
For non-members you can simply hit the NON MEM button on the register keyboard.
There are 3 primary ways to enter a member number:
-
<<Member #>>MEMBERbutton - Scan a member card with a barcode
-
MEMBERbutton, search by last name- You may enter a member number here, or a search term.
- ex.
SMITH,SMI, or1234
- ex.
- The next screen will display the results of your search. Use the UP and DOWN arrows to select the correct member name and number, hit
[ENTER]to select. - In cases where there is more than one person associated with a member number the register will display all the names associated with that member number
- You may enter a member number here, or a search term.


If no member number has been entered the register will alert the cashier for the member number when they try to tender out a payment method.
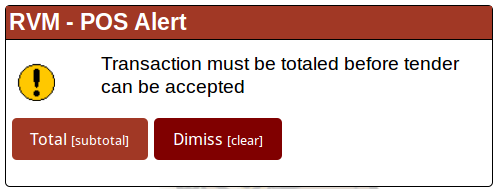
- Hit
SUBTOTALto proceed to the member number entry form
-
Coupons Coupons are a way to decrease the amount due, and as such they are treated by CORE-POS as a tender type. In other words, a method of payment.
-
Manufacturers Coupons are any coupons for savings on packaged items you sell. These come printed with scannable barcodes and the savings will automatically apply to the relevant items.
- Manufacturers Coupons can be scanned at any point in the transaction after the relevant item has been added to the transaction list. This functionality differs from most other tender types, which require subtotaling first.
- If a coupon is scanned for which no relevant items currently exist in the transaction you will receive an error message.
- A coupon cannot be applied more times than is allowed based on the relevant items in the transaction, an error message will alert the cashier when this is attempted
- Certain Manufacturers coupons only apply to multiples of the same item or item family. The POS will alert the cashier if the requirements for the coupon have not yet been met. For example, a coupon which applies $1.00 in saving when 3 of an item are purchased:
-
Manual Coupons are similar to Manufacturers Coupons, but must be hand-entered. The most likely scenario for using a Manual Coupon would be a cashier is handed a Manufacturers Coupon that doesn't scan for some reason. Either because the barcode is damaged/unreadable, or it is invalid (this happens with roughly 5% of all manufacturers coupons).
- Entering a Manual Coupon requires first subtotaling the transaction by hitting
SUBTOTAL, or by entering the member number, or hittingNON MEMfor non-member shoppers. - To apply a Manual Coupon enter the coupon amount and hit the
COUPONbutton- ex.
150COUPONto apply a $1.50 Manual Coupon
- ex.
- Entering a Manual Coupon requires first subtotaling the transaction by hitting
-
House Coupons are similar to manufacturers coupons but they are redeemable only in your store. They are created by the POS and may have either scannable barcode, PLUs, or neither.
- To view a list of available House Coupons hit the
HOUSE COUPONbutton.
- To view a list of available House Coupons hit the
-
Manufacturers Coupons are any coupons for savings on packaged items you sell. These come printed with scannable barcodes and the savings will automatically apply to the relevant items.
-
Tendering a transaction All dollar amount entered into the POS are entered as pennies. In other words, never use the decimal point
.when entering in a tender amount. Ex.1000CASHwould tender out $10.00 in cash,5CASHwould tender out $0.05 in cash. A negative tender, as in the case of a refund, can be entered by pressing the appropriate tender key, with no amount preceding it.-
Tender Menu in some cases, there will not be a dedicated keyboard button for every tender type, to use any of these additional tender types you may use the
TENDER MENUbutton if available. If the tender amount is not for exact change you must enter the tender amount before pressing theTENDER MENUbutton -
Cash
- Entering any tender requires first subtotaling the transaction by hitting
SUBTOTAL, or by entering the member number, or hittingNON MEMfor non-member shoppers. - To apply a Cash tender enter the amount of cash given and hit the
CASHbutton, alternatively, you can simply hit theCASHbutton to tender the transaction for exact change- ex.
2000CASHto apply a $20.00 Cash tender - ex.
CASHto tender for exact change
- ex.
- Entering any tender requires first subtotaling the transaction by hitting
-
Checks IMPORTANT: Check acceptance policies vary from store to store. Please study and abide by the check acceptance policy at your store.
- Entering a Check tender requires first subtotaling the transaction by hitting
SUBTOTAL, or by entering the member number, or hittingNON MEMfor non-member shoppers. - To apply a Check tender enter the check amount and hit the
COUPONbutton, alternatively, you can simply hit theCHECKbutton to tender the transaction for exact change- ex.
2384CHECKto apply a $23.84 Check tender - ex.
CHECKto tender for exact change
- ex.
- Check Acceptance Guidelines: A valid check must contain all of the following:
- Todays Date
- The numeric check value and the hand-written check value must match
- A signature
- Phone Number and/or Drivers License ID - Not strictly necessary but its always a good practice. In the event of a bad check.
- Cashback. If your store offers cashback on checks you may tender these by entering the total amount of the check, including cashback, before hitting the
CHECKbutton. Do not use theCHECKbutton with no amount in this case, cashback on checks must be hand-entered. - Endorsing / Franking. In most cases checks get endorsed at the point-of-purchase. This imprints each check with a datetime stamp, transaction ID, and amounts, as well as bank info useful when making bank deposits. Endorsement at the point-of-purchase also means that customer funds availability is assessed from the time the purchase was made. And not a day or two later when the bank deposit happens.
- The register will prompt you to insert the check into the receipt printer. Press
[ENTER]when the check is in place. The printer will snatch up the check, and endorse it. Removing the check from the top of the printer will cause the receipt to print, and the draw to open if cashback is entered. - Proper check alignment:
- The register prompt:
- The register will prompt you to insert the check into the receipt printer. Press
- Checkwriting restrictions. Certain check-acceptance policies prohibit non-members, or individuals with bad-check outstanding, from using personal checks at the register. In these cases you will be given a message with the reason why the check tender has been prevented.
- Entering a Check tender requires first subtotaling the transaction by hitting
-
EBT / SNAP / Foodstamps Before a foodstamp tender can be accepted the cashier must first use the EBT Subtotal function to get a subototal for only the items in the transaction that are foodstamp-eligible.
- Use the
EBT TOTALbutton to get the subtotal for the foodstampable portion of the transaction. The POS will prompt to select whether the benefits are EBT Food or EBT Cash. - After selecting Food or Cash, you will be returned to the transaction list, the Amt Due footerbox now displays the foodstamp-eligible subtotal.
- To apply an EBT tender enter the amount and hit the
EBTbutton, alternatively, you can simply hit theEBTbutton to tender the transaction for exact change- ex.
2493EBTto apply a $24.93 Check tender - ex.
EBTto tender for exact change
- ex.
- Use the
- External Card Processing
- Integrated Card Processing
-
Tender Menu in some cases, there will not be a dedicated keyboard button for every tender type, to use any of these additional tender types you may use the
- Canceling a transaction requires a managers password. Make sure this is really what you want to do. Cancelled transactions cannot be un-cancelled.
-
Suspending a transaction allows you to "pause" a transaction at any point to be resumed at a later time, or at a different cash register. Useful when customers left their wallet in the car, or at home. Or if a customer needs to grab a few more items, you can suspend and proceed with ringing out other customers until they return.
- The suspend function is available via the Managers Menu, hit the
MGR MENUbutton. Use the DOWN arrow to select "Suspend Transaction" from the menu, and hit[ENTER]. This will cause a suspended transaction receipt to print out of the printer and immediately starts a new transaction. Keep the receipt with the customers groceries, it has info that can be useful when it come time to resume the transaction.
- The suspend function is available via the Managers Menu, hit the
-
Resuming a transaction is available via the Managers Menu. Selecting this menu option will result in a selection menu. Use the UP and DOWN arrows to select the transaction to resume based on the transaction ID number, or the subtotal.
- Printing Tender Report is available via the managers menu. Depending on cash-handling and accountability procedures at your store, tender reports may be configured to report on all transaction rung on this till, or all transactions rung by the currently logged-in cashier, or even all transactions rung on this till by the currently logged in cashier. Standard shift-change procedure includes running your own tender report when you are done with your shift. The tender report contains all necessary totals for counting down your till.


-
Printer
- Loading / replacing paper roll
- Loading / replacing paper roll
-
Scannerscale
-
>0<Tare or Zero button - Volume - Depress button to cycle through volume levels
- Press-and-hold to cycle through tone frequencies.
-

-
Printer
- Is it out of paper? Replace it!
- Is the paper roll seated properly? Re-seat it!
- Are there any red or flashing lights on the front of the printer?
- Is the "slip light" on? If so, feed the check endorser any old piece of paper for it to endorse to clear the error.
- Turn the printer off. Then on. Try again.
- Printer indicators and parts
-
Cash Drawer
- Not opening? See the Printer troubleshooting steps above.
- Still not opening? Make sure that the key was removed while in an up/down position. Otherwise the drawer may be locked, or the electronic drawer kicking mechanism might be turned off.
-
Scannerscale Has the weight readout in the scale box frozen? The scale is non-responsive?
- There are some errors that will display in the scale box
-
_ _ _ _means the scale is in the process of settling itself, just wait. -
err -0means that the scale is registering a weight below 0.00 lbs. -
? ? . ? ?means the POS is receiving messages from the scannerscale that it doesn't understand.
-
- Logging out of the POS and then logging back in has proven to resolve some scannerscale issues.
- Re-tare the scannerscale. Use the
>0<button on the front of the scannerscale unit itself. Make sure the scale platter is empty when performing this step. - Use the
WAKEUPcommand to reset the scannerscale via the POS. - Powercycle the scannerscale - Power off the unit, either by unplugging or flipping the power switch on your register counter. Wait a few seconds. Power the unit back on. Wait until you hear a single loud "beep". Test the scale and scanning capabilities.
- If none of these are successful contact your POS technical support provider immediately.
- There are some errors that will display in the scale box
-
PIN Pads - PIN Pads have 2 options for resetting in the event of a freeze or other inoperable behavior.
- Reset Terminal (Quick) will cause the terminal to reset itself. This is the same reset that occurs after a transaction closes out.
-
Reboot Terminal (Slow) will cause the terminal to completely reboot. This will result in a hardware beep, and a delay, before the terminal returns to the ready state and again displays "Swipe Now" on screen.

