Skip to content

Precipitation {documentation world editor adding objects}

Luis Anton Rebollo edited this page Dec 4, 2013 · 1 revision
<script type="text/javascript" src="../../../include/wz_tooltip.js"></script>
Contents

Introduction

The Torque 3D World Editor allows you to quickly add different types of precipitation to your level. However, Precipitation is used as a general term meaning any type of particle moving downward. The ability to quickly add rain, snow, or even a sandstorm to your level is built into the editor.

Adding Precipitation

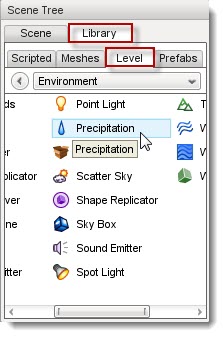
To add Precipitation to a level, switch to the Library tab in the Scene Tree panel. Click on the Level tab amd double-click the Environment folder. Locate the Precipitation entry.


Image:PrecipLibrary.jpg


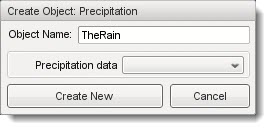
Double-click the Precipitation entry.The Create Object dialog will appear.


Image:NamePrecipRain.jpg


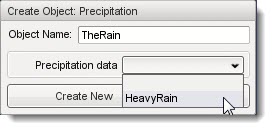
Enter a name for your Precipitation object. The Precipitation data field allows you to choose a datablock to start with as the basis for your new object. Click the drop down box for a list of available datablocks.


Image:UseHeavyRainDB.jpg


For the Full template, your only choice is HeavyRain so select it then click Create New. Your new Precipitation object will be added to your level, and rain will start falling automatically. The stock datablock for HeavyRain simulates a light shower, so you may not see much rain falling:


(click to enlarge)


The HeavyRain datablock is located in the game/art/datablocks/environment.cs file. Its initial data contains the following:

datablock PrecipitationData(HeavyRain)
{
soundProfile = "HeavyRainSound";
dropTexture = "art/environment/precipitation/rain";
splashTexture = "art/environment/precipitation/water_splash";
dropSize = 0.35;
splashSize = 0.1;
useTrueBillboards = false;
splashMS = 500;
};


We will get into manipulating the datablock later.


Precipitation Properties


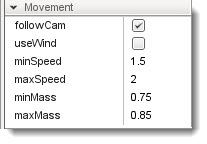
Additional properties can be changed with the Inspector pane. To change a Precipitation objects properties using the Inspector Pane click the Scene tab, then click the name of your new Precipitation object. The Inspector pane will update to display the current properties of your new sun.

Hover over each section in the image below to see a description of the fields within it:


PrecipitationData Properties

When you add a Precipitation object to a level from the Library, you are adding the actual precipitation object. In order for the object to work however it must be assigned a datablock. Datablocks have their own set of properties which are transmitted over a server to each client. When creating or editing a PrecipitationData datablock, you will be modifying the following properties:


(hover over image for descriptions


Conclusion

Of all the objects you can add to a level, Precipitation has the widest range of applications. Remember, this object is not limited to rain. Anything that can fall from the sky or float in the air over large areas can be simulated with Precipitation: snow, sandstorms, falling ash and rock, fireflies, and so on. Take the time to experiment with this to see what you can come up with.

Clone this wiki locally